BRAKE CONTROL / DYNAMIC CONTROL SYSTEMS VEHICLE STABILITY CONTROL SYSTEM(for Built-in Type Yaw Rate Sensor) C1361 Short in ABS Motor Fail Safe Relay Circuit C146C Open in ABS Motor Relay Circuit C146D Short in ABS Motor Relay Circuit
DESCRIPTION
The ABS motor relay supplies power to the ABS pump motor. While the ABS is activated, the ECU turns the motor relay on and operates the ABS pump motor.
If the voltage supplied to the motor relay (BM) is below the DTC's detection threshold due to low voltage from the battery or generator, the DTC may be stored.
| DTC No. | DTC Detection Condition | Trouble Area |
|---|---|---|
| C1361 | Immediately after the ignition switch is turned to ON, the relay contact is closed for 4 seconds when the motor fail safe relay is OFF. | ·
ABS NO. 1 fuse ·
ABS motor fail safe relay circuit ·
Brake actuator assembly (ABS motor fail safe relay) |
| C146C | When either of the following is detected:
1.
All of the following conditions continue for 0.12 seconds or more. -
The IG1 terminal voltage is between 9.5 and 17.2 V. -
While initial check and ABS, BA, TRC or VSC is operating. -
Relay contact is open when the relay is ON. 2.
Both of the following conditions continue for 0.12 seconds. -
The IG1 terminal voltage is less than 9.5 V. -
Relay contact remains open when the relay is ON. |
·
ABS NO. 1 fuse ·
ABS motor relay circuit ·
Brake actuator assembly (ABS motor relay) |
| C146D | When the motor relay is OFF, the motor relay remains closed for 4 seconds or more. | ·
ABS motor relay circuit ·
Brake actuator assembly (ABS motor relay) |
WIRING DIAGRAM
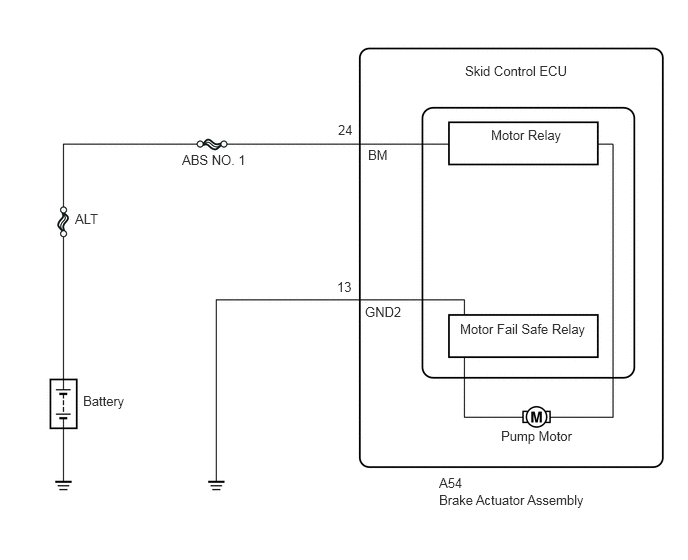
CAUTION / NOTICE / HINT
- NOTICE:
- ·
When replacing the brake actuator assembly, perform zero point calibration (See page Brake>BRAKE CONTROL / DYNAMIC CONTROL SYSTEMS>VEHICLE STABILITY CONTROL SYSTEM(for Built-in Type Yaw Rate Sensor)>CALIBRATION).
·Inspect the fuses for circuits related to this system before performing the following inspection procedure.
- HINT:
-
When C1241 is output together with C146C, C146D and/or C1361 inspect and repair the trouble areas indicated by C1241 first (See page Brake>BRAKE CONTROL / DYNAMIC CONTROL SYSTEMS>VEHICLE STABILITY CONTROL SYSTEM(for Built-in Type Yaw Rate Sensor)>C1241).
PROCEDURE
Connect the intelligent tester to the DLC3.
Turn the ignition switch to ON.
Turn the tester on.
Enter the following menus: Chassis / ABS/VSC/TRC / Active Test.
According to the display on the tester, perform the Active Test.
| Tester Display | Test Part | Control Range | Diagnostic Note |
|---|---|---|---|
| Motor Relay | ABS motor relay | Relay OFF/ON | Operating sound of motor can be heard.
[Vehicle condition] Vehicle stopped |
Check the operating sound of the ABS motor relay when operating it with the intelligent tester.
| Result | Proceed to |
|---|---|
| The operating sound is not heard | A |
| The operating sound is heard | B |
A
B
Turn the ignition switch off.
Make sure that there is no looseness at the locking part and the connecting part of the connectors.
Check the connector case and terminals for deformation and corrosion.
- OK:
No deformation or corrosion.
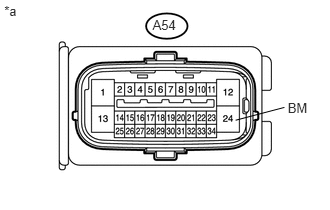
Disconnect the skid control ECU connector.
Measure the voltage according to the value(s) in the table below.
- Standard Voltage:
Tester Connection Condition Specified Condition A54-24 (BM) - Body ground Always 11 to 14 V
| *a | Front view of wire harness connector
(to Skid control ECU) |
Turn the ignition switch off.
OK
NG
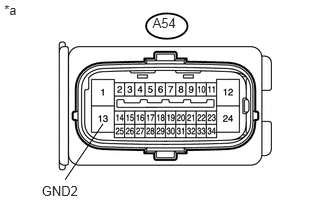
Measure the resistance according to the value(s) in the table below.
- Standard Resistance:
Tester Connection Condition Specified Condition A54-13 (GND2) - Body ground Always Below 1 Ω
| *a | Front view of wire harness connector
(to Skid control ECU) |
OK
NG
A
B