Home › Audio / Visual / Telematics › AUDIO / VIDEO › AUDIO AND VISUAL SYSTEM(for Radio and Display Type) › from 2014.07
RM19S0E _56 Audio / Visual / Telematics _051483 AUDIO / VIDEO _0248274 AUDIO AND VISUAL SYSTEM(for Radio and Display Type) J

AUDIO / VIDEO  AUDIO AND VISUAL SYSTEM(for Radio and Display Type)  Speaker Circuit  


DESCRIPTION

The radio and display receiver assembly sends sound signals to the speakers.

WIRING DIAGRAM
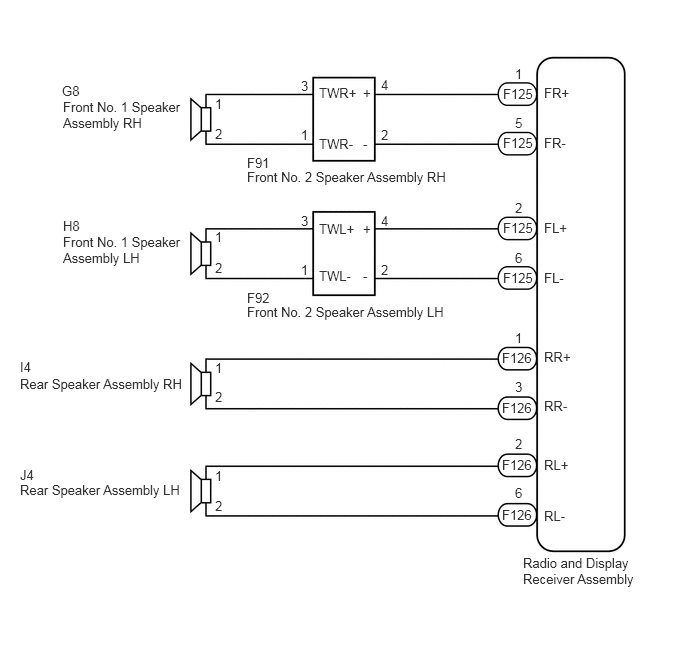
E236927E16
5.448,5.781 6.771,6.49 1.323,0.708 10 false Radio and Display Receiver Assembly 5.667,2.813 5.948,2.979 0.281,0.167 10 false FL- 5.667,2.292 5.948,2.458 0.281,0.167 10 false FL+ 5.667,1.406 5.969,1.573 0.302,0.167 10 false FR- 5.667,0.885 5.969,1.052 0.302,0.167 10 false FR+ 5.24,0.896 5.604,1.063 0.365,0.167 10 false F125 5.24,1.406 5.604,1.573 0.365,0.167 10 false F125 5.24,2.292 5.604,2.458 0.365,0.167 10 false F125 5.24,2.813 5.604,2.979 0.365,0.167 10 false F125 3.781,2.792 3.927,2.958 0.146,0.167 10 false - 3.781,2.302 3.927,2.469 0.146,0.167 10 false + 3.781,1.417 3.938,1.583 0.156,0.167 10 false - 3.781,0.885 3.938,1.052 0.156,0.167 10 false + 3.323,2.792 3.729,2.958 0.406,0.167 10 false TWL- 3.323,2.302 3.729,2.469 0.406,0.167 10 false TWL+ 3.323,1.417 3.76,1.583 0.438,0.167 10 false TWR- 3.323,0.885 3.76,1.052 0.438,0.167 10 false TWR+ 2.573,1.76 4.823,2.146 2.25,0.385 10 false Front No. 2 Speaker Assembly RH 2.573,3.167 4.823,3.542 2.25,0.375 10 false Front No. 2 Speaker Assembly LH 0.656,1.031 1.979,1.677 1.323,0.646 10 false Front No. 1 Speaker Assembly RH 0.656,2.438 1.917,3.198 1.26,0.76 10 false Front No. 1 Speaker Assembly LH 5.365,0.688 5.49,0.854 0.125,0.167 10 false 1 5.365,1.198 5.49,1.365 0.125,0.167 10 false 5 5.365,2.083 5.49,2.25 0.125,0.167 10 false 2 5.365,2.604 5.49,2.771 0.125,0.167 10 false 6 3.969,0.802 4.094,0.969 0.125,0.167 10 false 4 3.969,1.323 4.094,1.49 0.125,0.167 10 false 2 3.135,0.813 3.26,0.979 0.125,0.167 10 false 3 3.135,1.323 3.26,1.49 0.125,0.167 10 false 1 3.969,2.219 4.094,2.385 0.125,0.167 10 false 4 3.969,2.729 4.094,2.896 0.125,0.167 10 false 2 3.135,2.219 3.26,2.385 0.125,0.167 10 false 3 3.135,2.729 3.26,2.896 0.125,0.167 10 false 1 2.24,1.313 2.365,1.479 0.125,0.167 10 false 2 2.24,1 2.365,1.167 0.125,0.167 10 false 1 2.24,2.708 2.365,2.875 0.125,0.167 10 false 2 2.24,2.385 2.365,2.552 0.125,0.167 10 false 1 5.667,5.292 5.948,5.458 0.281,0.167 10 false RL- 5.667,4.76 5.948,4.927 0.281,0.167 10 false RL+ 5.667,4.146 5.969,4.313 0.302,0.167 10 false RR- 5.667,3.635 5.969,3.802 0.302,0.167 10 false RR+ 5.229,3.646 5.594,3.813 0.365,0.167 10 false F126 5.229,4.167 5.594,4.333 0.365,0.167 10 false F126 5.229,4.76 5.594,4.927 0.365,0.167 10 false F126 5.229,5.281 5.594,5.448 0.365,0.167 10 false F126 5.365,3.438 5.49,3.604 0.125,0.167 10 false 1 5.365,3.948 5.49,4.115 0.125,0.167 10 false 3 5.365,4.542 5.49,4.708 0.125,0.167 10 false 2 5.365,5.052 5.49,5.219 0.125,0.167 10 false 6 0.208,3.917 1.979,4.313 1.771,0.396 10 false Rear Speaker Assembly RH 0.208,5.021 1.969,5.385 1.76,0.365 10 false Rear Speaker Assembly LH 2.24,4.875 2.365,5.042 0.125,0.167 10 false 1 2.24,5.188 2.365,5.354 0.125,0.167 10 false 2 2.24,3.75 2.365,3.917 0.125,0.167 10 false 1 2.24,4.052 2.365,4.219 0.125,0.167 10 false 2 2.573,1.615 2.885,1.781 0.313,0.167 10 false F91 2.573,3.021 2.885,3.188 0.313,0.167 10 false F92 0.646,0.865 0.958,1.031 0.313,0.167 10 false G8 0.656,2.271 0.969,2.438 0.313,0.167 10 false H8 0.208,3.74 0.521,3.906 0.313,0.167 10 false I4 0.208,4.865 0.521,5.031 0.313,0.167 10 false J4

PROCEDURE

1.CHECK SPEAKER
a.

Check the malfunctioning speakers.

Result
Result Proceed to
Malfunction in front speaker area A
Malfunction in rear speaker area B


A

2.CHECK FRONT SIDE SPEAKER

B

7.INSPECT REAR SPEAKER ASSEMBLY
2.CHECK FRONT SIDE SPEAKER
a.

Check the malfunctioning speakers.

Result
Result Proceed to
Front No. 2 speaker assembly A
Front No. 1 speaker assembly B


A

3.INSPECT FRONT NO. 2 SPEAKER ASSEMBLY

B

5.INSPECT FRONT NO. 1 SPEAKER ASSEMBLY
3.INSPECT FRONT NO. 2 SPEAKER ASSEMBLY
a.

Temporarily replace the front No. 2 speaker assembly with a new or normally functioning one (See page Audio / Visual / Telematics>AUDIO / VIDEO>PILLAR SPEAKER>INSPECTION).


b.

Check that the malfunction disappears.

HINT:
·

Connect all the connectors to the front No. 2 speaker assemblies that were disconnected.

·

When there is a possibility that either the right or left front speaker is defective, inspect by interchanging the right one with the left one.

·

Perform the above inspection on both LH and RH sides.


Result
Result Proceed to
Malfunction disappears A
Malfunction does not disappear B


A

END (FRONT NO. 2 SPEAKER ASSEMBLY WAS DEFECTIVE)

B

4.CHECK HARNESS AND CONNECTOR (RADIO AND DISPLAY RECEIVER ASSEMBLY - FRONT NO. 2 SPEAKER ASSEMBLY)
a.

Disconnect the F125 radio and display receiver assembly connector.


b.

Disconnect the F91 and F92 front No. 2 speaker assembly connectors.


c.

Measure the resistance according to the value(s) in the table below.

Standard Resistance:
Tester Connection Condition Specified Condition
F125-1 (FR+) - F91-4 (+) Always Below 1 Ω
F125-5 (FR-) - F91-2 (-) Always Below 1 Ω
F125-1 (FR+) - Body ground Always 10 kΩ or higher
F125-5 (FR-) - Body ground Always 10 kΩ or higher
F125-2 (FL+) - F92-4 (+) Always Below 1 Ω
F125-6 (FL-) - F92-2 (-) Always Below 1 Ω
F125-2 (FL+) - Body ground Always 10 kΩ or higher
F125-6 (FL-) - Body ground Always 10 kΩ or higher


OK

REPLACE RADIO AND DISPLAY RECEIVER ASSEMBLY

NG

REPAIR OR REPLACE HARNESS OR CONNECTOR

5.INSPECT FRONT NO. 1 SPEAKER ASSEMBLY
a.

Remove the front No. 1 speaker assembly (See page Audio / Visual / Telematics>AUDIO / VIDEO>FRONT DOOR SPEAKER>REMOVAL).


b.

Inspect the front No. 1 speaker assembly (See page Audio / Visual / Telematics>AUDIO / VIDEO>FRONT DOOR SPEAKER>INSPECTION).


OK

6.CHECK HARNESS AND CONNECTOR (FRONT NO. 2 SPEAKER ASSEMBLY - FRONT NO. 1 SPEAKER ASSEMBLY)

NG

REPLACE FRONT NO. 1 SPEAKER ASSEMBLY

6.CHECK HARNESS AND CONNECTOR (FRONT NO. 2 SPEAKER ASSEMBLY - FRONT NO. 1 SPEAKER ASSEMBLY)
a.

Disconnect the F91 and F92 front No. 2 speaker assembly connectors.


b.

Disconnect the G8 and H8 front No. 1 speaker assembly connectors.


c.

Measure the resistance according to the value(s) in the table below.

Standard Resistance:
Tester Connection Condition Specified Condition
F91-3 (TWR+) - G8-1 Always Below 1 Ω
F91-1 (TWR-) - G8-2 Always Below 1 Ω
F91-3 (TWR+) - Body ground Always 10 kΩ or higher
F91-1 (TWR-) - Body ground Always 10 kΩ or higher
F92-3 (TWL+) - H8-1 Always Below 1 Ω
F92-1 (TWL-) - H8-2 Always Below 1 Ω
F92-3 (TWL+) - Body ground Always 10 kΩ or higher
F92-1 (TWL-) - Body ground Always 10 kΩ or higher


OK

REPLACE FRONT NO. 2 SPEAKER ASSEMBLY

NG

REPAIR OR REPLACE HARNESS OR CONNECTOR

7.INSPECT REAR SPEAKER ASSEMBLY
a.

Remove the rear speaker assembly (See page Audio / Visual / Telematics>AUDIO / VIDEO>REAR DOOR SPEAKER>REMOVAL).


b.

Inspect the rear speaker assembly (See page Audio / Visual / Telematics>AUDIO / VIDEO>REAR DOOR SPEAKER>INSPECTION).


OK

8.CHECK HARNESS AND CONNECTOR (RADIO AND DISPLAY RECEIVER ASSEMBLY - REAR SPEAKER ASSEMBLY)

NG

8.CHECK HARNESS AND CONNECTOR (RADIO AND DISPLAY RECEIVER ASSEMBLY - REAR SPEAKER ASSEMBLY)
a.

Disconnect the F126 radio and display receiver assembly connector.


b.

Disconnect the I4 and J4 rear speaker assembly connectors.


c.

Measure the resistance according to the value(s) in the table below.

Standard Resistance:
Tester Connection Condition Specified Condition
F126-1 (RR+) - I4-1 Always Below 1 Ω
F126-3 (RR-) - I4-2 Always Below 1 Ω
F126-1 (RR+) - Body ground Always 10 kΩ or higher
F126-3 (RR-) - Body ground Always 10 kΩ or higher
F126-2 (RL+) - J4-1 Always Below 1 Ω
F126-6 (RL-) - J4-2 Always Below 1 Ω
F126-2 (RL+) - Body ground Always 10 kΩ or higher
F126-6 (RL-) - Body ground Always 10 kΩ or higher


OK

REPLACE RADIO AND DISPLAY RECEIVER ASSEMBLY

NG

REPAIR OR REPLACE HARNESS OR CONNECTOR