METER / GAUGE / DISPLAY METER / GAUGE SYSTEM Fuel Receiver Gauge Malfunction
DESCRIPTION
The combination meter assembly controls the fuel receiver gauge in accordance with the resistance of the fuel sender gauge, which varies depending on the amount of fuel remaining in the fuel tank.
WIRING DIAGRAM
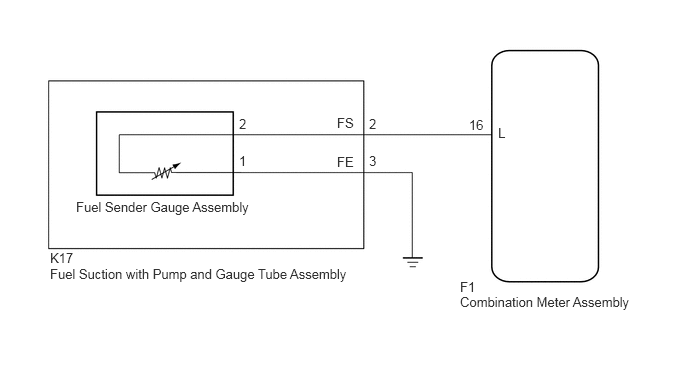
PROCEDURE
Check DTC (See page Vehicle Interior>METER / GAUGE / DISPLAY>METER / GAUGE SYSTEM>DTC CHECK / CLEAR).
| Result | Proceed to |
|---|---|
| DTC B1500 is not output | A |
| DTC B1500 is output | B |
A
B
(See pageVehicle Interior>METER / GAUGE / DISPLAY>METER / GAUGE SYSTEM>DIAGNOSTIC TROUBLE CODE CHART)
Connect the intelligent tester to the DLC3.
Turn the ignition switch to ON.
Turn the intelligent tester on.
Enter the following menus: Body / Combination Meter / Active Test.
According to the display on the intelligent tester, perform the Active Test.
| Tester Display | Test Part | Control Range | Diagnostic Note |
|---|---|---|---|
| Fuel Meter Operation | Fuel gauge | EMPTY/ 1/2 /FULL | Vehicle is stopped and the engine idling. |
- OK:
Fuel receiver gauge indication is normal.
OK
NG
Remove the fuel sender gauge assembly.
for 1NZ-FE (See page Engine / Hybrid System>1NZ-FE FUEL>FUEL SENDER GAUGE ASSEMBLY>REMOVAL)
for 2NZ-FE (See page Engine / Hybrid System>2NZ-FE FUEL>FUEL SENDER GAUGE ASSEMBLY>REMOVAL)
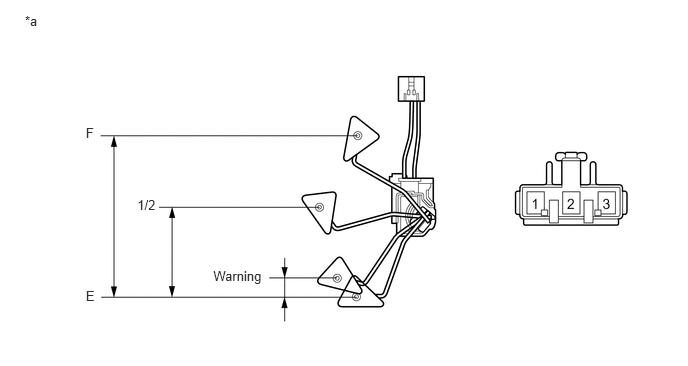
| *a | Component without harness connected
(Fuel Sender Gauge Assembly) |
- | - |
Check that the float moves smoothly between F and E.
Measure the resistance according to the value(s) in the table below.
- Standard Resistance:
Tester Connection Float Level Float Position (mm (in.)) Specified Condition 1 - 2 F 142 to 152 (5.591 to 5.984) 12.0 to 18.0 Ω 1/2 71.1 to 76.1 (2.799 to 2.996) 208.3 Ω Warning 5.9 to 10.9 (0.232 to 0.429) 365.2 Ω E 0 (0) 405.0 to 415.0 Ω
| Result | Proceed to |
|---|---|
| OK | A |
| NG (for 1NZ-FE) | B |
| NG (for 2NZ-FE) | C |
Reinstall the fuel sender gauge assembly.
A
B
C
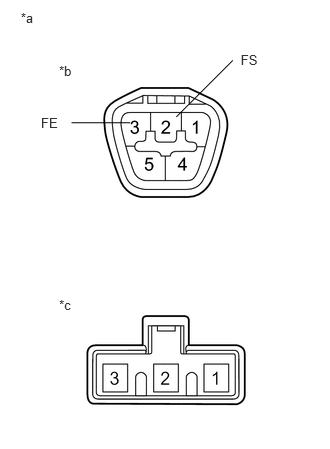
Remove the fuel suction with pump and gauge tube assembly.
for 1NZ-FE (See page Engine / Hybrid System>1NZ-FE FUEL>FUEL PUMP>REMOVAL)
for 2NZ-FE (See page Engine / Hybrid System>2NZ-FE FUEL>FUEL PUMP>REMOVAL)
Measure the resistance according to the value(s) in the table below.
- Standard Resistance:
Tester Connection Condition Specified Condition A-2 (FS) - B-2 Always Below 1 Ω A-3 (FE) - B-1 Always Below 1 Ω
| *a | Component without harness connected
(Fuel Suction with Pump and Gauge Tube Assembly) |
| *b | Connector A |
| *c | Connector B |
| Result | Proceed to |
|---|---|
| OK | A |
| NG (for 1NZ-FE) | B |
| NG (for 2NZ-FE) | C |
Reinstall the fuel suction with pump and gauge tube assembly.
A
B
C
Disconnect the F1 combination meter assembly connector.
Disconnect the K17 fuel suction with pump and gauge tube assembly connector.
Measure the resistance according to the value(s) in the table below.
- Standard Resistance:
Tester Connection Condition Specified Condition F1-16 (L) - K17-2 (FS) Always Below 1 Ω F1-16 (L) - Body ground Always 10 kΩ or higher K17-3 (FE) - Body ground Always Below 1 Ω
Reconnect the fuel suction with pump and gauge tube assembly connector.
Reconnect the combination meter assembly connector.
OK
NG