HEATING / AIR CONDITIONING FRONT EVAPORATOR TEMPERATURE SENSOR INSTALLATION
PROCEDURE

 88625
1.INSTALL FRONT EVAPORATOR TEMPERATURE SENSOR (NO. 1 COOLER THERMISTOR)
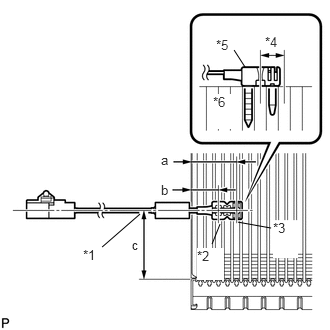
Install the front evaporator temperature sensor (No. 1 cooler thermistor) as shown in the illustration.
- Installation Position:
Mark Measurement a 34.3 mm (1.35 in.) b 20.9 mm (0.82 in.) c 48 to 52 mm (1.890 to 2.047 in.)
| *1 | from Tank |
| *2 | Fixed Part |
| *3 | Sensor Part |
| *4 | Next to Previous |
| *5 | Plastic Case |
| *6 | Evaporator |
- NOTICE:
- ·
Be sure to insert the sensor only once because reinserting it will not allow it to be firmly secured.
·When reusing the evaporator, insert the sensor one row next to the one that was used previously (*4 in the illustration).
·After inserting the sensor, do not apply excessive force to the wire.
·Directly insert the sensor until the edge of the plastic case "*5" comes into contact with the evaporator "*6".
88501
2.INSTALL NO. 1 COOLER EVAPORATOR SUB-ASSEMBLY
88515
3.INSTALL COOLER EXPANSION VALVE
87211A
4.INSTALL NO. 2 AIR DUCT
87211
5.INSTALL NO. 1 AIR DUCT
6.INSTALL AIR CONDITIONER UNIT ASSEMBLY