HEATING / AIR CONDITIONING AIR CONDITIONING UNIT INSTALLATION
PROCEDURE

 87211A
1.INSTALL NO. 2 AIR DUCT
Engage the 3 claws and install the air duct.
87211
2.INSTALL NO. 1 AIR DUCT
Engage the 3 claws and install the air duct.
88669B
3.INSTALL COOLER AIR HOSE
Install the cooler air hose.
87050
4.INSTALL AIR CONDITIONING RADIATOR ASSEMBLY
Install the air conditioning radiator with the 3 screws.
88650N
5.INSTALL AIR CONDITIONING AMPLIFIER ASSEMBLY (for Automatic Air Conditioning System)
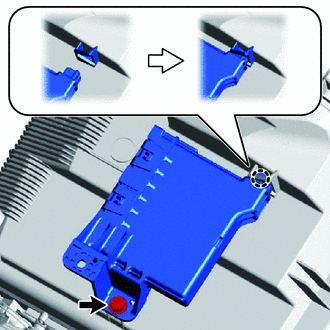
Engage the claw and install the air conditioning amplifier as shown in the illustration.
Tighten the screw.
88650N
6.INSTALL AIR CONDITIONING AMPLIFIER ASSEMBLY (for Manual Air Conditioning System)
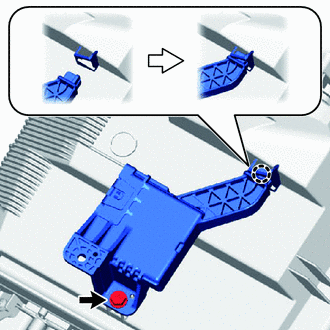
Engage the claw and install the air conditioning amplifier as shown in the illustration.
Tighten the screw.
82210K
7.INSTALL AIR CONDITIONING HARNESS ASSEMBLY (for LHD)
Connect the connectors and engage the clamps, then install the air conditioning harness.
82210K
8.INSTALL AIR CONDITIONING HARNESS ASSEMBLY (for RHD)
Connect the connectors and engage the clamps, then install the air conditioning harness.
9.TEMPORARILY TIGHTEN AIR CONDITIONER UNIT ASSEMBLY
Temporarily tighten the air conditioning unit with the 3 bolts and nut.
- NOTICE:
-
To prevent damage to the installation bracket for the air conditioning unit, be sure to support the air conditioning unit in place.
55331
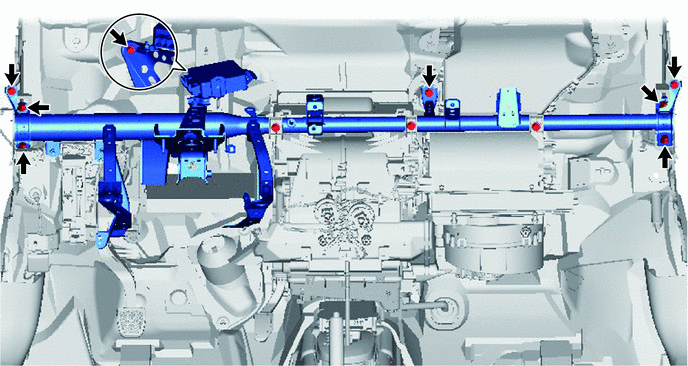
10.INSTALL INSTRUMENT PANEL REINFORCEMENT
Install the instrument panel reinforcement with the 8 bolts.
55306A
11.INSTALL NO. 1 INSTRUMENT PANEL BRACE SUB-ASSEMBLY
Install the instrument panel brace with the 2 bolts, nut and screw.
- HINT:
-
If the vehicle is equipped with knee airbag, install the knee airbag bracket mounting bolt.
12.INSTALL AIR CONDITIONER UNIT ASSEMBLY (for LHD)
Install the air duct with the 2 bolts.
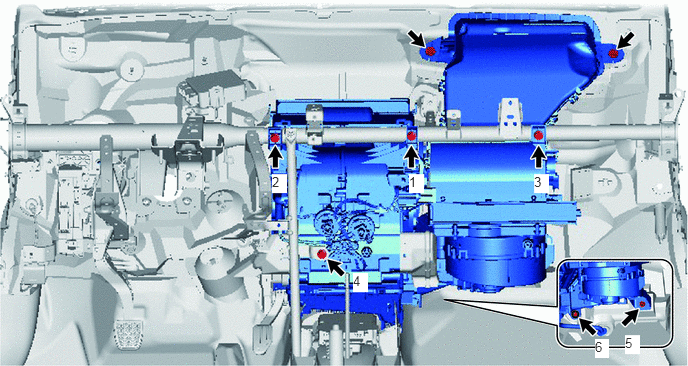
- Torque:
- 9.8 N*m (100 kgf*cm, 87 in.*lbf)
Install the bolt, nut and 4 screws in the order shown in the illustration.
- Torque:
- 9.8 N*m (100 kgf*cm, 87 in.*lbf)
for bolt
- Torque:
- 4.0 N*m (41 kgf*cm, 35 in.*lbf)
for nut
- Torque:
- 4.0 N*m (41 kgf*cm, 35 in.*lbf)
for screw 1, 2, 3
13.INSTALL AIR CONDITIONER UNIT ASSEMBLY (for RHD)
Install the air duct with the 2 bolts.
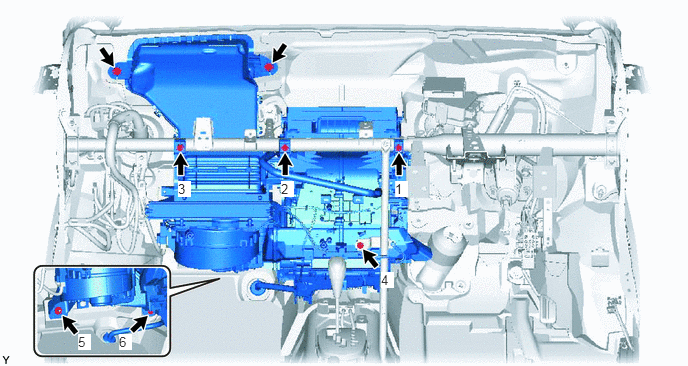
- Torque:
- 9.8 N*m (100 kgf*cm, 87 in.*lbf)
Install the bolt, nut and 4 screws in the order shown in the illustration.
- Torque:
- 9.8 N*m (100 kgf*cm, 87 in.*lbf)
for bolt
- Torque:
- 4.0 N*m (41 kgf*cm, 35 in.*lbf)
for nut
- Torque:
- 4.0 N*m (41 kgf*cm, 35 in.*lbf)
for screw 1, 2, 3
82141
14.INSTALL INSTRUMENT PANEL WIRE (for LHD)
Connect the connectors and engage the clamps, then install the instrument panel wire.
Install the ground wire with the bolts.
- Torque:
- 8.4 N*m (86 kgf*cm, 74 in.*lbf)
for Automatic Air Conditioning System:
Engage the 2 clamps and connect the instrument panel wire.
Connect the 3 connectors.
for Manual Air Conditioning System:
Engage the 3 clamps and install the instrument panel wire.
Connect the 3 connectors.
Connect the 3 clamps and install the connector holders.
Tighten the bolt.
- Torque:
- 8.4 N*m (86 kgf*cm, 74 in.*lbf)
Connect the connectors.
Install the wire harness protector with the screw.
Engage the 2 clamps and install the connector holder.
Tighten the screw.
Connect the connectors.
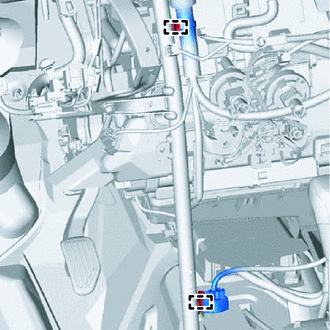
Connect the 2 clamps.
82141
15.INSTALL INSTRUMENT PANEL WIRE (for RHD)
Connect the connectors and engage the clamps, then install the instrument panel wire.
Install the ground wire with the bolts.
- Torque:
- 8.4 N*m (86 kgf*cm, 74 in.*lbf)
for Automatic Air Conditioning System:
Engage the 3 clamps and connect the instrument panel wire.
Connect the 2 connectors.
for Manual Air Conditioning System:
Engage the 5 clamps and install the instrument panel wire.
Connect the 3 connectors.
Connect the 3 clamps and install the connector holders.
Tighten the bolt.
- Torque:
- 8.4 N*m (86 kgf*cm, 74 in.*lbf)
Connect the connectors.
Install the wire harness protector with the screw.
Engage the 2 clamps and install the connector holder.
Tighten the screw.
Connect the connectors.
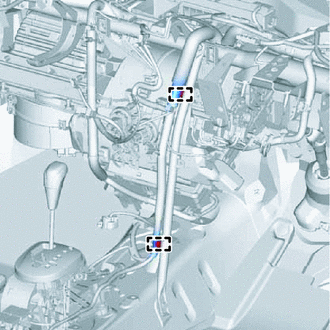
Connect the 2 clamps.
82730
16.INSTALL INSTRUMENT PANEL JUNCTION BLOCK ASSEMBLY
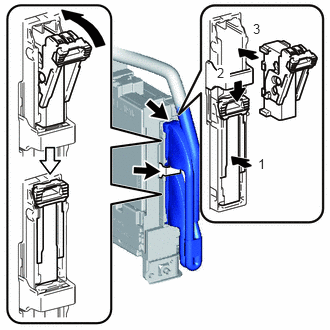
Connect the back side connectors and install the instrument panel junction block as shown in the illustration.
- NOTICE:
-
Securely connect the connector.
Install the instrument panel junction block with the bolt.
- Torque:
- 8.4 N*m (86 kgf*cm, 74 in.*lbf)
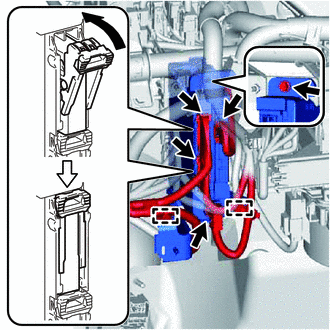
Connect the front side connectors as shown in the illustration.
- NOTICE:
-
Securely connect the connector.
Engage the clamps.
88539J
17.CONNECT DRAIN COOLER HOSE
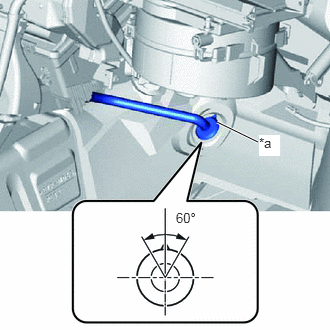
Install the drain cooler hose as shown in the illustration.
| *a | UP Mark |
- NOTICE:
- ·
Install the drain hose with its UP mark facing upward, within the 60 degree range shown in the illustration.
·Install the drain hose without twisting it.
55950G
18.INSTALL DEFROSTER NOZZLE ASSEMBLY
Engage the 2 claws and 3 guides, then install the defroster nozzle.
Engage the clamps and connect the connectors, then connect the wire harness.
55870B
19.INSTALL HEATER TO REGISTER DUCT ASSEMBLY
Engage the 3 claws and install the heater to register duct.
45250
20.INSTALL STEERING COLUMN ASSEMBLY (for LHD)
45250
21.INSTALL STEERING COLUMN ASSEMBLY (for RHD)
55303B
22.INSTALL LOWER INSTRUMENT PANEL SUB-ASSEMBLY
87245A
23.CONNECT HEATER WATER INLET HOSE A
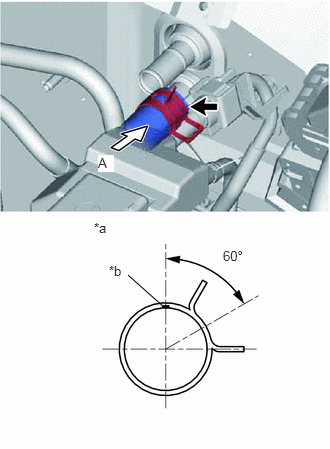
Connect the heater water inlet hose onto the air conditioning unit.
| *a | View A |
| *b | White Paint Mark |
- HINT:
-
Perform the installation with the hose clip and mark at the correct angle.
87246A
24.CONNECT HEATER WATER OUTLET HOSE A
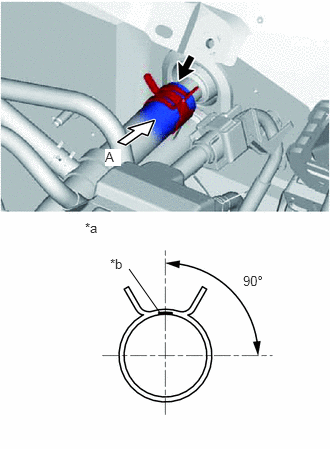
Connect the heater water outlet hose onto the air conditioning unit.
| *a | View A |
| *b | Purple Paint Mark |
- HINT:
-
Perform the installation with the hose clip and mark at the correct angle.
88706A
25.CONNECT LIQUID TUBE SUB-ASSEMBLY A
Remove the vinyl tape from liquid tube and the connecting portion of the unit.
Apply sufficient compressor oil (ND-OIL8) to a new O-ring and the connecting part of the liquid tube.
- Compressor oil:
ND-OIL8 or equivalent
Install the O-ring onto the liquid tube.
Connect the liquid tube to the unit.
88707B
26.CONNECT SUCTION TUBE SUB-ASSEMBLY B
Remove the vinyl tape from suction tube and the connecting portion of the unit.
Apply sufficient compressor oil (ND-OIL8) to a new O-ring and the connecting part of the suction tube.
- Compressor oil:
ND-OIL8 or equivalent
Install the O-ring onto the suction tube.
Securely connect the suction tube to the air conditioning unit.
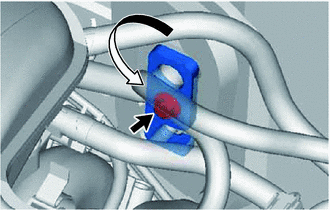
Turn the hook connector in the direction indicated by the arrow in the illustration.
Insert the pipe joints securely into the fitting holes and tighten the bolt.
- Torque:
- 9.8 N*m (100 kgf*cm, 87 in.*lbf)
55711
27.INSTALL COWL TOP OUTER PANEL
55722C
28.INSTALL COWL TOP TO COWL INNER BRACE
55735D
29.INSTALL FRONT AIR SHUTTER SEAL RH
55815E
30.INSTALL FRONT NO. 1 VENTILATOR SEAL
31.INSTALL WINDSHIELD WIPER MOTOR AND LINK
32.CONNECT CABLE TO NEGATIVE BATTERY TERMINAL
- Torque:
- 5.4 N*m (55 kgf*cm, 48 in.*lbf)
33.ADD ENGINE COOLANT (for 1NZ-FE)
34.ADD ENGINE COOLANT (for 2NZ-FE)
35. CHARGE REFRIGERANT
36.INSPECT FOR COOLANT LEAK (for 1NZ-FE)
37.INSPECT FOR COOLANT LEAK (for 2NZ-FE)
38. WARM UP ENGINE
39.INSPECT FOR REFRIGERANT LEAK