DOOR / HATCH REAR DOOR REASSEMBLY
CAUTION / NOTICE / HINT
- HINT:
- ·
Use the same procedure for both the RH and LH sides.
·The procedure described below is for the RH side.
PROCEDURE

 1.APPLY BODY GREASE
75923
2.INSTALL NO. 2 BLACK OUT TAPE
- HINT:
-
Use the same procedure as for the LH side (See page Vehicle Exterior>EXTERIOR PANELS / TRIM>BLACK OUT TAPE(for Rear Door)>INSTALLATION).
67871
3.INSTALL REAR DOOR WEATHERSTRIP
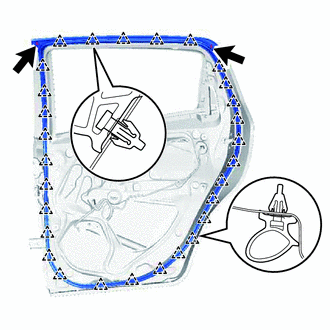
Engage the 29 clips and install the front door weatherstrip.
Engage the 2 clips.
68630D
4.INSTALL REAR DOOR CHECK ASSEMBLY
Apply MP grease to the sliding areas of the front door check.
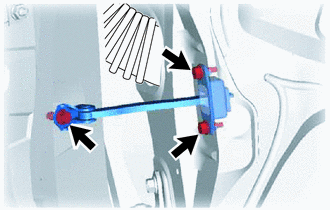
Install the rear door check onto the door panel with the 2 bolts.
- Torque:
- 5.5 N*m (56 kgf*cm, 49 in.*lbf)
Apply adhesive to the threads of the bolt.
- Adhesive:
Toyota Genuine Adhesive 1324, Three Bond 1324 or equivalent
Install the front door check onto the body panel with the bolt.
- Torque:
- 30 N*m (306 kgf*cm, 22 ft.*lbf)
69203A
5.INSTALL REAR DOOR OUTSIDE HANDLE FRAME SUB-ASSEMBLY
Apply MP grease to the sliding areas of the rear door outside handle frame.
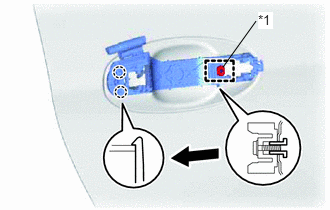
Slide the front door outside handle frame to install it.
| *1 | Grommet |
Engage the grommet and 2 claws.
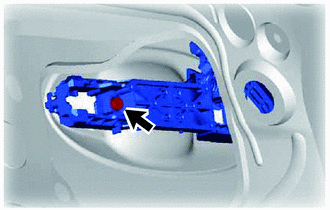
Using a "TORX" socket wrench T30, install the rear door outside handle frame with the screw.
- Torque:
- 4.0 N*m (41 kgf*cm, 35 in.*lbf)
69242G
6.INSTALL REAR DOOR OUTSIDE HANDLE REAR PAD
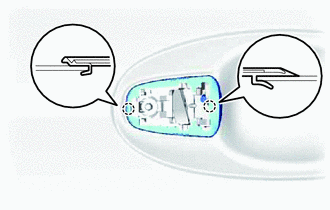
Engage the 2 claws and install the rear door outside handle rear pad.
69241G
7.INSTALL REAR DOOR OUTSIDE HANDLE FRONT PAD
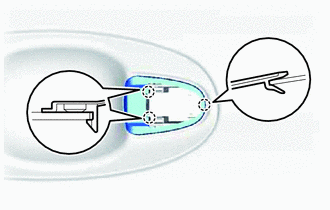
Engage the 3 claws and install the rear door outside handle front pad.
69230
8.INSTALL REAR DOOR OUTSIDE HANDLE ASSEMBLY
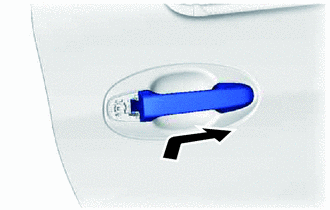
Pushing the rear door outside handle in the direction of the arrow mark shown in the illustration, install the rear door outside handle.
69227J
9.INSTALL REAR DOOR OUTSIDE HANDLE COVER
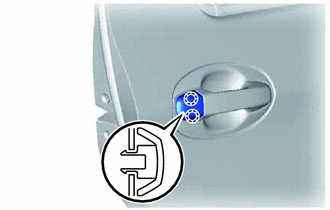
Engage the 2 claws and temporarily install the front door outside handle cover.
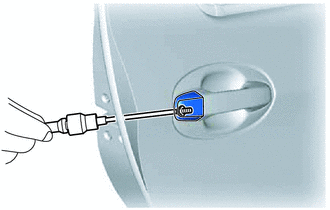
Using a "TORX" socket wrench T30, install the rear door outside handle cover.
- Torque:
- 4.0 N*m (41 kgf*cm, 35 in.*lbf)
69050A
10.INSTALL REAR DOOR LOCK ASSEMBLY (w/ Power Door Lock)
69050A
11.INSTALL REAR DOOR LOCK ASSEMBLY (w/o Power Door Lock)
68180C
12.INSTALL REAR DOOR GLASS OUTER WEATHERSTRIP ASSEMBLY
- HINT:
-
Use the same procedure as for the LH side (See page Vehicle Exterior>EXTERIOR PANELS / TRIM>REAR DOOR BELT MOULDING>INSTALLATION).
68142C
13.INSTALL REAR DOOR GLASS RUN
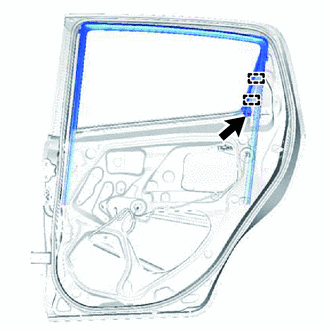
Engage the 2 guides and install the rear door glass run.
Install the clip.
69803
14.INSTALL REAR DOOR WINDOW REGULATOR SUB-ASSEMBLY (w/ Power Window)
Apply MP grease to the sliding parts of the rear door window regulator.
Install the temporary bolt.
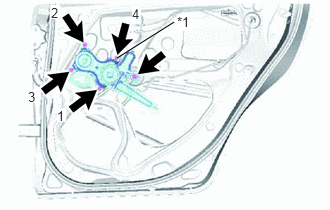
Insert the rear door window regulator into the door panel. Use the temporary bolt to hang the rear door window regulator on the door panel.
| *1 | Temporary Bolt |
Tighten the 3 bolts and the temporary bolt in the order shown in the illustration.
- Torque:
- 8.0 N*m (82 kgf*cm, 71 in.*lbf)
Connect the connector.
69803
15.INSTALL REAR DOOR WINDOW REGULATOR SUB-ASSEMBLY (w/o Power Window)
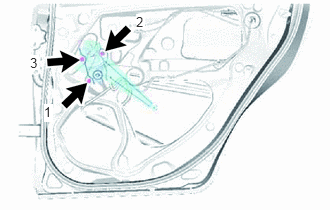
Tighten the 3 bolts in the order shown in the illustration.
- Torque:
- 8.0 N*m (82 kgf*cm, 71 in.*lbf)
69975A
16.INSTALL REAR DOOR GLASS CHANNEL FILLER
Apply soapy water to a new rear door glass channel filler.
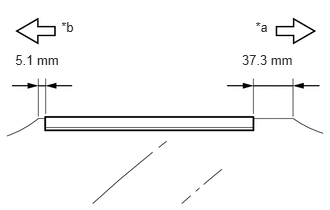
Install the new rear door glass channel filler as shown in the illustration.
| *a | Front Side |
| *b | Rear Side |
69905B
17.INSTALL REAR DOOR GLASS CHANNEL SUB-ASSEMBLY
Apply soapy water to a rear door glass channel.
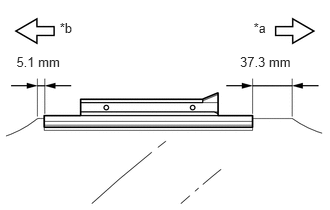
Using a plastic-faced hammer, tap the channel onto the glass to install the glass channel.
| *a | Front Side |
| *b | Rear Side |
- NOTICE:
- ·
Be careful not to damage the glass or glass channel.
·Make sure the position of the rear door glass channel filler does not change.
68103
18.INSTALL REAR DOOR GLASS SUB-ASSEMBLY
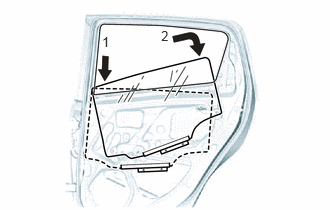
Insert the rear door glass into the rear door panel along the rear door glass run as indicated by the arrows in the order shown in the illustration.
- NOTICE:
-
Do not damage the rear door glass.
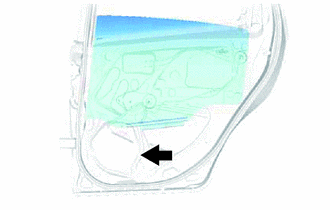
Slide the lower section of the rear door glass as indicated by the arrow as shown in the illustration.
67407E
19.INSTALL REAR DOOR WINDOW DIVISION BAR SUB-ASSEMBLY
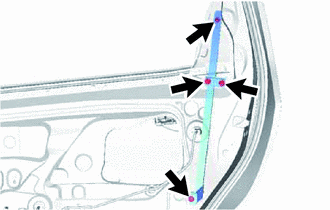
Engage the rear door window division bar to the rear door glass run.
Install the rear door window division bar with the 3 bolts and nut.
- Torque:
- 6.2 N*m (63 kgf*cm, 55 in.*lbf)
67841E
20.INSTALL REAR DOOR SERVICE HOLE COVER (w/ Rear Speaker)
Apply butyl tape to the rear door panel.
Pass the rear door lock remote control cable, rear door inside locking cable and each connector through a new rear door service hole cover.
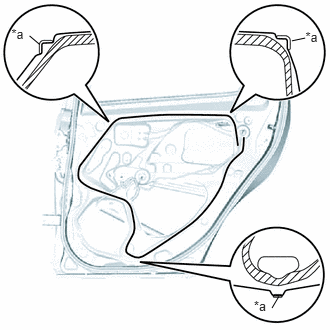
Install a new rear door service hole cover according to the reference points on the rear door panel.
| *a | Reference Point |
- HINT:
-
Securely install the rear door service hole cover taking care to prevent wrinkles.
67841E
21.INSTALL REAR DOOR SERVICE HOLE COVER (w/o Rear Speaker)
Apply butyl tape to the rear door panel.
Pass the rear door lock remote control cable, rear door inside locking cable and each connector through a new rear door service hole cover.
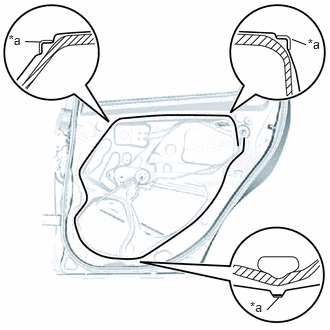
Install a new rear door service hole cover according to the reference points on the rear door panel.
| *a | Reference Point |
- HINT:
-
Securely install the rear door service hole cover taking care to prevent wrinkles.
86160B
22.INSTALL REAR SPEAKER ASSEMBLY (w/ Rear Speaker)
68173B
23.INSTALL REAR DOOR GLASS INNER WEATHERSTRIP
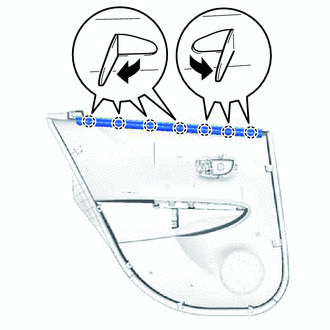
Engage the 7 claws and install the rear door glass inner weatherstrip as shown in the illustration.
69205A
24.INSTALL REAR DOOR INSIDE HANDLE SUB-ASSEMBLY
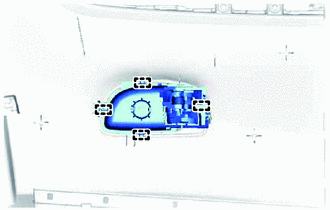
Engage the 4 guides and install the rear door inside handle.
67603
25.INSTALL REAR DOOR TRIM BOARD SUB-ASSEMBLY
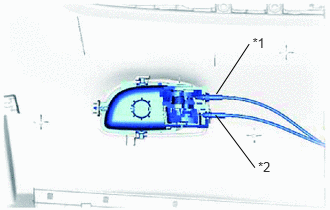
Connect the rear door lock remote control cable and the rear door inside locking cable to the rear door inside handle.
| *1 | Rear Door Lock Remote Control Cable Assembly |
| *2 | Rear Door Inside Locking Cable Assembly |
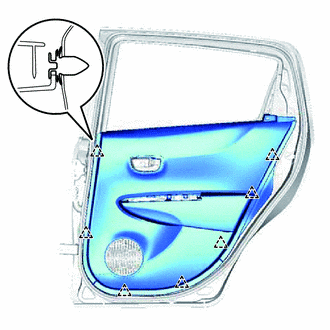
Engage the 7 clips and install the rear door trim board.
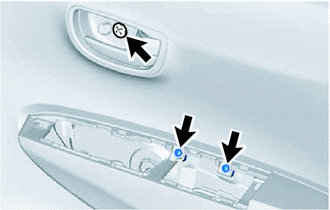
Install the 3 screws.
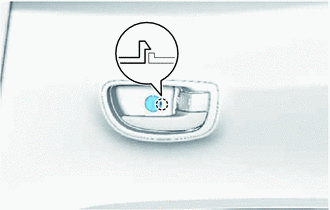
Engage the claw and close the cover.
74271A
26.INSTALL REAR DOOR ARMREST BASE UPPER PANEL (w/ Power Window)
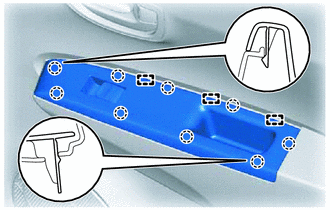
Connect the connector.
Engage the 9 claws and 3 guides, and install the rear armrest base upper panel.
74271A
27.INSTALL REAR DOOR ARMREST BASE UPPER PANEL (w/o Power Window)
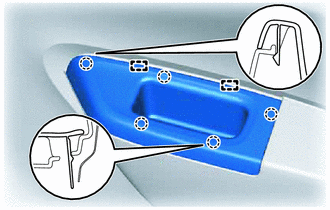
Engage the 5 claws and 2 guides, and install the front armrest base upper panel.
69260E
28.INSTALL REAR DOOR WINDOW REGULATOR HANDLE ASSEMBLY (w/o Power Window)
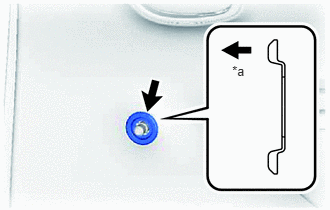
Install the window regulator handle plate.
| *a | Inside of Vehicle |
Open all the windows.
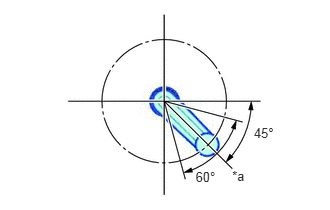
Install the rear door window regulator handle with the clip at the angle shown in the illustration.
| *a | Assemble with Glass in Fully Open Position |
67673A
29.INSTALL REAR DOOR FRAME GARNISH
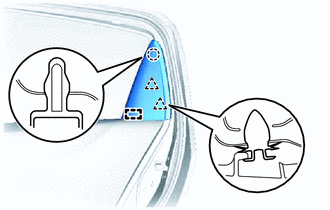
Engage the guide.
Engage the 2 clips and claw and install the rear door frame garnish.
30.CONNECT CABLE TO NEGATIVE BATTERY TERMINAL
- Torque:
- 5.4 N*m (55 kgf*cm, 48 in.*lbf)
31.INSPECT POWER WINDOW OPERATION (w/ Power Window)