BRAKE CONTROL / DYNAMIC CONTROL SYSTEMS VEHICLE STABILITY CONTROL SYSTEM(for Built-in Type Yaw Rate Sensor) Slip Indicator Light Remains ON
DESCRIPTION
The skid control ECU (brake actuator assembly) is connected to the combination meter via CAN communication.
The Slip indicator light blinks during VSC, TRC operation.
If any of the following is detected, the Slip indicator light remains on:
The skid control ECU (brake actuator assembly) connectors are disconnected from the brake actuator (skid control ECU).
There is a malfunction in the skid control ECU (brake actuator assembly) internal circuit.
There is an open in the harness between the combination meter and the skid control ECU (brake actuator assembly).
The VSC, TRC control system is defective.
- HINT:
-
In some cases, the GTS cannot be used when the skid control ECU (brake actuator assembly) is abnormal.
WIRING DIAGRAM
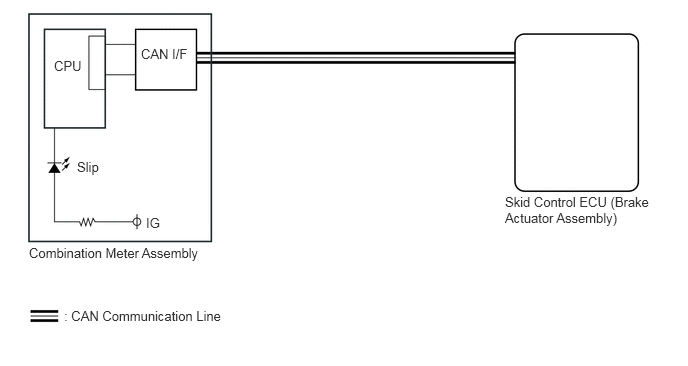
CAUTION / NOTICE / HINT
- NOTICE:
- ·
When replacing the brake actuator assembly, perform zero point calibration (See page Brake>BRAKE CONTROL / DYNAMIC CONTROL SYSTEMS>VEHICLE STABILITY CONTROL SYSTEM(for Built-in Type Yaw Rate Sensor)>CALIBRATION).
·Inspect the fuses for circuits related to this system before performing the following inspection procedure.
PROCEDURE
Check if the skid control ECU connector is securely connected.
- OK:
The connector is securely connected.
OK
NG
Check if CAN communication system DTCs are output.
w/o Toyota Safety Sense
Click herePower Source / Network>NETWORKING>CAN COMMUNICATION SYSTEM(w/o Toyota Safety Sense)>DIAGNOSIS SYSTEM
w/ Toyota Safety Sense
Click herePower Source / Network>NETWORKING>CAN COMMUNICATION SYSTEM(w/ Toyota Safety Sense)>DIAGNOSIS SYSTEM
| Result | Proceed to |
|---|---|
| DTC is not output | A |
| DTC is output (w/o Toyota Safety Sense) | B |
| DTC is output (w/ Toyota Safety Sense) | C |
A
B
C
Check the battery voltage.
- Standard voltage:
11 to 14 V
| Result | Proceed to |
|---|---|
| OK | A |
| NG (for 1NZ-FE) | B |
| NG (for 2NZ-FE) | C |
A
B
C
Disconnect the skid control ECU (brake actuator assembly) connector.
Turn the ignition switch to ON.
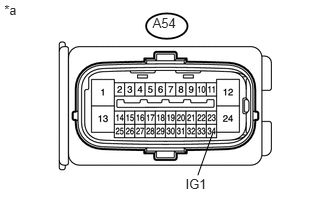
Measure the voltage according to the value(s) in the table below.
- Standard Voltage:
Tester Connection Switch Condition Specified Condition A54-34 (IG1) - Body ground Ignition switch ON 11 to 14 V
| *a | Front view of wire harness connector
(to Skid control ECU) |
Turn the ignition switch off.
OK
NG
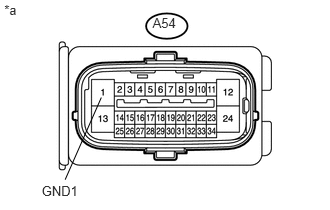
Measure the resistance according to the value(s) in the table below.
- Standard Resistance:
Tester Connection Condition Specified Condition A54-1 (GND1) - Body ground Always Below 1 Ω
| *a | Front view of wire harness connector
(to Skid control ECU) |
Reconnect the skid control ECU (brake actuator assembly) connector.
OK
NG
Turn the ignition switch off.
Connect the GTS to the DLC3.
Turn the ignition switch to ON.
Turn the GTS on.
Enter the following menus: Chassis / ABS/VSC/TRC / Data List.
According to the display on the GTS, read the Data List.
| Tester Display | Measurement Item/Range | Normal Condition | Diagnostic Note |
|---|---|---|---|
| Slip Indicator Light | SLIP indicator light/OFF or ON | OFF: Indicator light off
ON: Indicator light on |
- |
When performing the Slip Indicator Light Active Test, check Slip Indicator Light in the Data List.
| Tester Display | Test Part | Control Range | Diagnostic Note |
|---|---|---|---|
| Slip Indicator Light | Slip indicator light | Indicator light OFF/ON | Observe combination meter
[Vehicle condition] Vehicle stopped |
| Result | Proceed to | |
|---|---|---|
| Data List Display | Data List Display when Performing Active Test ON/OFF Operation | |
| ON | Changes between ON and OFF | A |
| Does not change between ON and OFF | B | |
| OFF | Changes between ON and OFF | A |
| Does not change between ON and OFF | B | |
A
B
Turn the ignition switch off.
Replace the combination meter assembly.
Click hereVehicle Interior>METER / GAUGE / DISPLAY>COMBINATION METER>REMOVAL
NEXT
Perform Active Test of the combination meter assembly using the GTS (See page Vehicle Interior>METER / GAUGE / DISPLAY>METER / GAUGE SYSTEM>DATA LIST / ACTIVE TEST).
- OK:
The Slip indicator light turns on or off in accordance with the GTS.
OK
NG