INTERIOR PANELS / TRIM UPPER INSTRUMENT PANEL REMOVAL
CAUTION / NOTICE / HINT
- HINT:
-
All bolts, screws and relevant to installing and removing the instrument panel are shown, along with their alphabetic codes, in the table below.
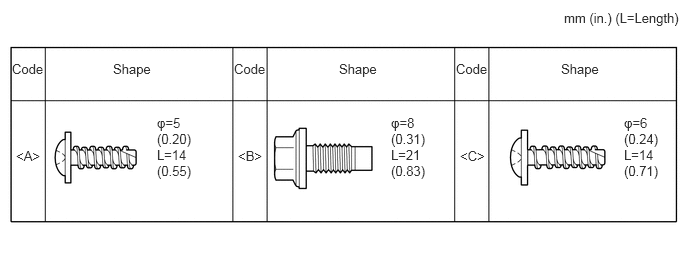 0.125,0.635 0.531,0.813 0.406,0.177 10 false Code 0.167,1.542 0.469,1.719 0.302,0.177 10 false <A> 2.479,1.542 2.781,1.719 0.302,0.177 10 false <B> 4.792,1.542 5.094,1.719 0.302,0.177 10 false <C> 1.177,0.635 1.667,0.813 0.49,0.177 10 false Shape 2.438,0.635 2.844,0.813 0.406,0.177 10 false Code 3.531,0.635 4.021,0.813 0.49,0.177 10 false Shape 4.75,0.635 5.156,0.813 0.406,0.177 10 false Code 5.844,0.635 6.333,0.813 0.49,0.177 10 false Shape 5.875,0.104 7.115,0.281 1.24,0.177 10 false mm (in.) (L=Length) 1.635,1.198 2.01,1.896 0.375,0.698 10 false φ=5 (0.20) L=14 (0.55) 4.073,1.198 4.573,1.906 0.5,0.708 10 false φ=8 (0.31) L=21 (0.83) 6.5,1.198 6.938,1.906 0.438,0.708 10 false φ=6 (0.24) L=14 (0.71)
PROCEDURE

 1. PRECAUTION
- NOTICE:
-
After turning the ignition switch off, waiting time may be required before disconnecting the cable from the negative (-) battery terminal. Therefore, make sure to read the disconnecting the cable from the negative (-) battery terminal notices before proceeding with work (See page General>INTRODUCTION>REPAIR INSTRUCTION>PRECAUTION).
2.DISCONNECT CABLE FROM NEGATIVE BATTERY TERMINAL
- NOTICE:
-
When disconnecting the cable, some systems need to be initialized after the cable is reconnected.
-
Click hereGeneral>INTRODUCTION>REPAIR INSTRUCTION>INITIALIZATION
62311B
3.SEPARATE FRONT DOOR OPENING TRIM WEATHERSTRIP RH
Separate the front door opening trim weatherstrip RH.
62312B
4.SEPARATE FRONT DOOR OPENING TRIM WEATHERSTRIP LH
Separate the front door opening trim weatherstrip LH.
62211
5.REMOVE FRONT PILLAR GARNISH RH
62212
6.REMOVE FRONT PILLAR GARNISH LH
- HINT:
-
Use the same procedure as for the RH side.
55411G
7.REMOVE NO. 1 INSTRUMENT CLUSTER FINISH PANEL
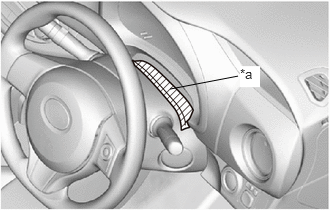
Apply protective tape, as shown in the illustration.
| *a | Protective Tape |
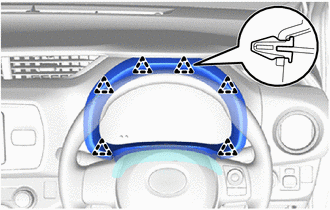
Disengage the 6 clips to remove the No. 1 instrument cluster finish panel.
55475B
8.REMOVE CENTER INSTRUMENT CLUSTER FINISH PANEL GARNISH
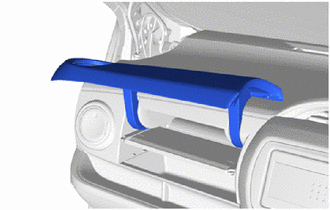
Open the No. 1 instrument panel box door sub-assembly.
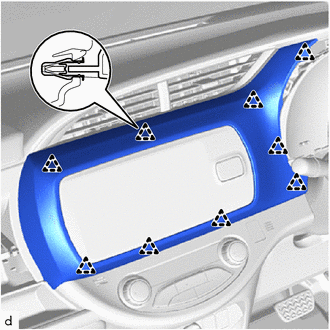
Disengage the 9 clips to remove the center instrument cluster finish panel garnish.
55445C
9.REMOVE INSTRUMENT PANEL BOX PLATE
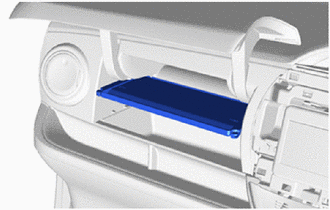
Remove the instrument panel box plate.
55041B
10.REMOVE NO. 1 INSTRUMENT PANEL BOX DOOR SUB-ASSEMBLY
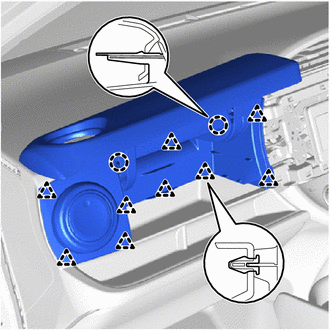
Disengage the 9 clips and 2 claws to remove the No. 1 instrument panel box door sub-assembly.
55660
11.REMOVE NO. 4 INSTRUMENT PANEL REGISTER ASSEMBLY
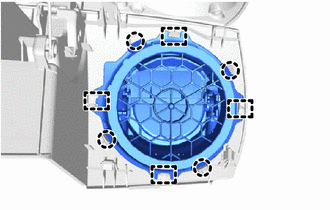
Disengage the 4 claws and 4 guides to remove the No. 4 instrument panel register assembly.
83100
12.REMOVE COMBINATION METER ASSEMBLY
55302A
13.REMOVE UPPER INSTRUMENT PANEL SUB-ASSEMBLY
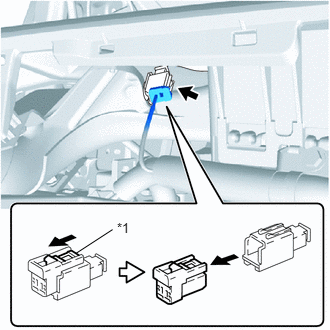
Slide the slider and disconnect the front passenger airbag connector.
| *1 | Slider |
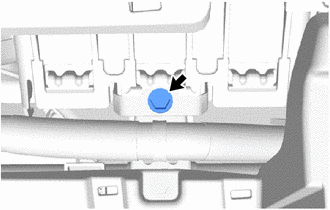
Remove the <B> bolt.
Disengage the clamps.
Disconnect the connectors.
Remove the 2 clips.
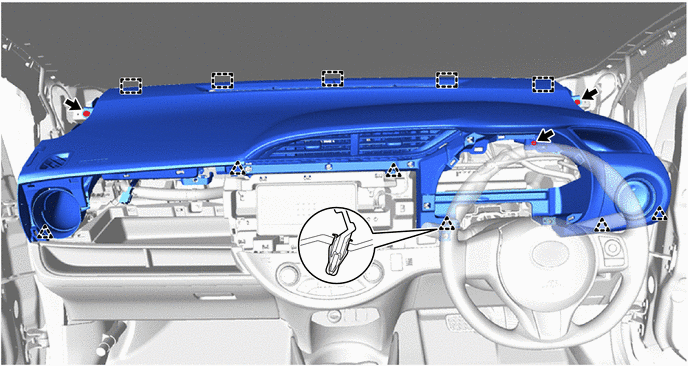
Remove the <C> screw.
Disengage the 6 clips while lifting the rear side of the upper instrument panel sub-assembly.
While lifting the instrument panel, slide it toward the rear of the vehicle. Disengage the 5 guides of the front side of the upper instrument panel sub-assembly to remove the upper instrument panel sub-assembly.
- NOTICE:
-
Be careful not to damage the upper instrument panel sub-assembly and steering wheel when removing it.