HEATING / AIR CONDITIONING CONDENSER REMOVAL
PROCEDURE

 1.RECOVER REFRIGERANT FROM REFRIGERATION SYSTEM
2.REMOVE HEADLIGHT ASSEMBLY LH
3.REMOVE HEADLIGHT ASSEMBLY RH
- HINT:
-
Use the same procedure as for the LH side.
89173
4.REMOVE FRONT AIRBAG SENSOR
53205
5.REMOVE RADIATOR UPPER SUPPORT SUB-ASSEMBLY
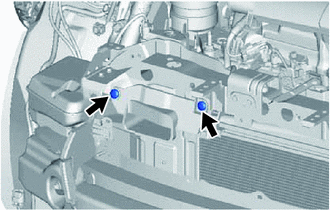
Remove the 2 clips.
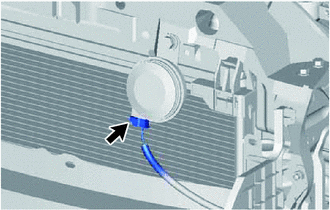
Disconnect the connector.
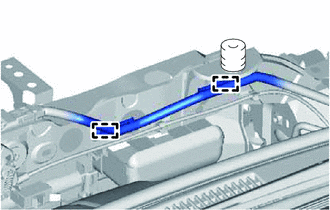
Disengage the 2 clamps and disconnect the wire harness.
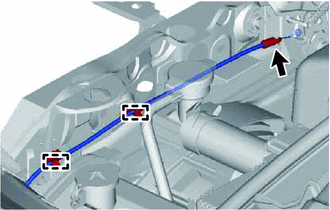
Disengage the 2 clamps and disconnect the hood lock control cable.
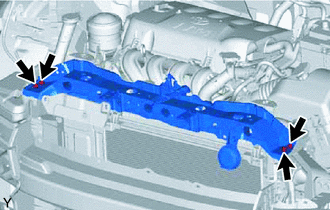
Remove the 4 bolts and the radiator support.
88891H
6.REMOVE NO. 1 COOLER COVER
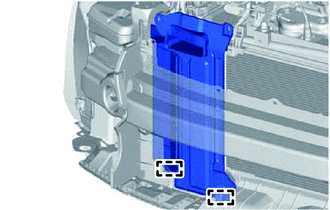
Disengage the 2 guides and remove the cooler cover.
88711
7.DISCONNECT NO. 1 COOLER REFRIGERANT DISCHARGE HOSE
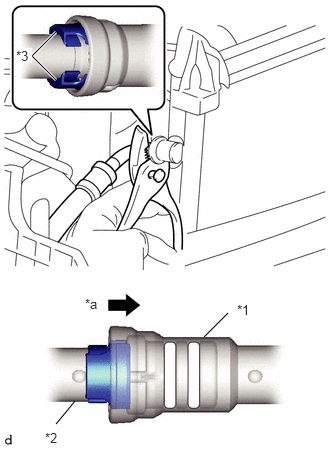
| *1 | Cooler Condenser Assembly |
| *2 | No. 1 Cooler Refrigerant Discharge Hose |
| *3 | Piping Clamp |
| *a | Press In |
While pressing the end of the cooler condenser assembly into the end of the No. 1 cooler refrigerant discharge hose, use pliers to squeeze together both sides of the piping clamp until it breaks apart.
- NOTICE:
-
Make sure that fragments of the piping clamp do not enter the piping.
Disconnect the No. 1 cooler refrigerant discharge hose.
- NOTICE:
-
Clean off any dirt or water near the ends of the cooler condenser assembly and No. 1 cooler refrigerant discharge hose.
Remove the 2 O-rings from the No. 1 cooler refrigerant discharge hose.
- NOTICE:
-
Wrap the open ends of the separated cooler condenser assembly and No. 1 cooler refrigerant discharge hose with vinyl tape to prevent dirt or water from entering.
88706A
8.DISCONNECT LIQUID TUBE SUB-ASSEMBLY A
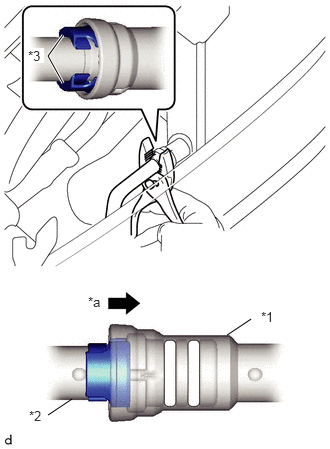
| *1 | Cooler Condenser Assembly |
| *2 | Liquid Tube Sub-assembly A |
| *3 | Piping Clamp |
| *a | Press In |
While pressing the end of the cooler condenser assembly into the end of the liquid tube sub-assembly A, use pliers to squeeze together both sides of the piping clamp until it breaks apart.
- NOTICE:
-
Make sure that fragments of the piping clamp do not enter the piping.
Disconnect the liquid tube sub-assembly A.
- NOTICE:
-
Clean off any dirt or water near the ends of the cooler condenser assembly and liquid tube sub-assembly A.
Remove the 2 O-rings from the liquid tube sub-assembly.
- NOTICE:
-
Wrap the open ends of the separated cooler condenser assembly and liquid tube sub-assembly A with vinyl tape to prevent dirt or water from entering.
88460
9.REMOVE COOLER CONDENSER ASSEMBLY
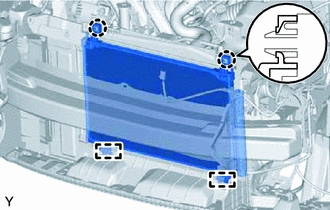
Disengage the 2 claws.
Disengage the 2 guides and remove the cooler condenser.
- NOTICE:
-
Do not damage the condenser or radiator when removing the cooler condenser.