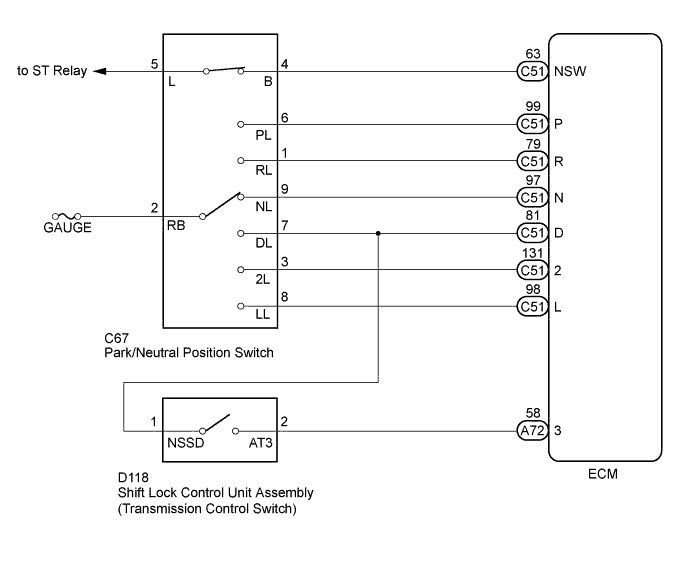
DTC P0705 Transmission Range Sensor Circuit Malfunction (PRNDL Input) |
| DTC No. | DTC Detection Condition | Trouble Area |
| P0705 | One of the following conditions (A), (B) or (C) is met: |
|
| Condition (A): Any 2 or more of the following signals are ON simultaneously (2 trip detection logic).
| ||
| Condition (B): All switches are OFF simultaneously (2 trip detection logic).
| ||
| Condition (C): When any of following conditions is met, the 3 position input signal is ON for 2 seconds or more (2 trip detection logic).
|
| Related DTCs | P0705: Park/neutral position switch/Verify switch input |
| Required sensors/Components | Park/neutral position switch, Transmission control switch |
| Frequency of operation | Continuous |
| Duration | Condition (A), (C): 2 seconds Condition (B): 60 seconds |
| MIL operation | 2 driving cycles |
| Sequence of operation | None |
| The monitor runs whenever the following DTCs are not present | None |
| Ignition switch | ON |
| Battery voltage | 10.5 V or more |
| Number of the following signals input at same time | 2 or more |
| One of the following conditions is met; P switch N switch Park/neutral position switch | ON |
| R switch | ON |
| D switch | ON |
| 2 switch | ON |
| L switch | ON |
| P switch | OFF |
| N switch | OFF |
| Park/neutral position switch | OFF |
| R switch | OFF |
| D switch | OFF |
| 2 switch | OFF |
| L switch | OFF |
| P switch | ON |
| N switch | ON |
| Park/neutral position switch | ON |
| R switch | ON |
| 2 switch | ON |
| L switch | ON |
| DATA LIST |
Turn the ignition switch off.
Connect the Techstream to the DLC3.
Turn the ignition switch to ON.
Turn the Techstream on.
Enter the following menus: Powertrain / Engine and ECT / Data List / All Data.
In accordance with the display on the Techstream, read the Data List.
| Tester Display | Measurement Item/Range | Normal Condition | Diagnostic Note |
| Neutral Position SW Signal | Park/Neutral position switch status/ OFF or ON |
| When shift lever position displayed on Techstream differs from actual position, adjustment of Park/Neutral position switch or shift cable may be incorrect. |
| Shift SW Status (R Range) | Park/Neutral position switch status/ OFF or ON |
| |
| Shift SW Status (P Range) | Park/Neutral position switch status/ OFF or ON |
| |
| Shift SW Status (N Range) | Park/Neutral position switch status/ OFF or ON |
| |
| Shift SW Status (D Range) | Park/Neutral position switch status/ OFF or ON |
| |
| Shift SW Status (3 Range) | Park/Neutral position switch status/ OFF or ON |
| |
| Shift SW Status (2 Range) | Park/Neutral position switch status/ OFF or ON |
| |
| Shift SW Status (L Range) | Park/Neutral position switch status/ OFF or ON |
|
| 1.CHECK HARNESS AND CONNECTOR (POWER SOURCE OF PARK/NEUTRAL POSITION SWITCH) |
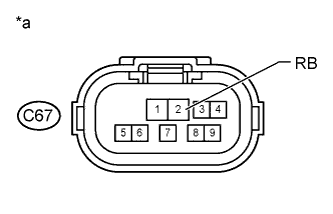 |
Disconnect the park/neutral position switch connector.
Turn the ignition switch to ON.
Measure the voltage according to the value(s) in the table below.
| Tester Connection | Switch Condition | Specified Condition |
| C67-2 (RB) - Body ground | Ignition switch ON | 11 to 14 V |
| *a | Front view of wire harness connector (to Park/Neutral Position Switch) |
|
| ||||
| OK | |
 |
| 2.CHECK HARNESS AND CONNECTOR (NSW TERMINAL VOLTAGE) |
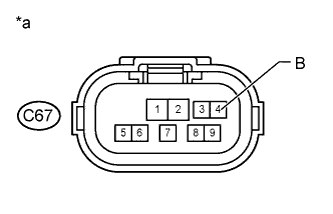 |
Measure the voltage according to the value(s) in the table below.
| Tester Connection | Switch Condition | Specified Condition |
| C67-4 (B) - Body ground | Ignition switch ON | 11 to 14 V |
| Ignition switch off | Below 1 V |
| *a | Front view of wire harness connector (to Park/Neutral Position Switch) |
|
| ||||
| OK | |
|
| 3.INSPECT PARK/NEUTRAL POSITION SWITCH |
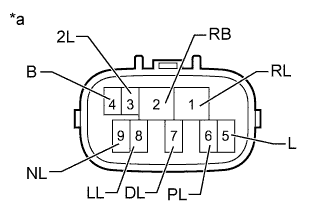 |
Measure the resistance according to the value(s) in the table below.
| Tester Connection | Condition | Specified Condition |
| 4 (B) - 5 (L) | Shift lever in P or N | Below 1 Ω |
| Shift lever not in P and N | 10 kΩ or higher | |
| 2 (RB) - 6 (PL) | Shift lever in P | Below 1 Ω |
| Shift lever not in P | 10 kΩ or higher | |
| 1 (RL) - 2 (RB) | Shift lever in R | Below 1 Ω |
| Shift lever not in R | 10 kΩ or higher | |
| 2 (RB) - 9 (NL) | Shift lever in N | Below 1 Ω |
| Shift lever not in N | 10 kΩ or higher | |
| 2 (RB) - 7 (DL) | Shift lever in D or 3 | Below 1 Ω |
| Shift lever not in D and 3 | 10 kΩ or higher | |
| 2 (RB) - 3 (2L) | Shift lever in 2 | Below 1 Ω |
| Shift lever not in 2 | 10 kΩ or higher | |
| 2 (RB) - 8 (LL) | Shift lever in L | Below 1 Ω |
| Shift lever not in L | 10 kΩ or higher |
| *a | Component without harness connected (Park/Neutral Position Switch) |
|
| ||||
| OK | |
|
| 4.INSPECT SHIFT LOCK CONTROL UNIT ASSEMBLY (TRANSMISSION CONTROL SWITCH) |
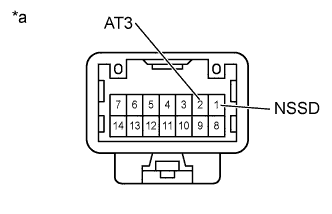 |
Disconnect the transmission control switch connector.
Measure the resistance according to the value(s) in the table below.
| Tester Connection | Condition | Specified Condition |
| 1 (NSSD) - 2 (AT3) | Shift lever in 3 | Below 1 Ω |
| Shift lever not in 3 | 10 kΩ or higher |
| *a | Component without harness connected (Shift Lock Control Unit Assembly (Transmission Control Switch)) |
|
| ||||
| OK | |
|
| 5.CHECK HARNESS AND CONNECTOR (PARK/NEUTRAL POSITION SWITCH - TRANSMISSION CONTROL SWITCH) |
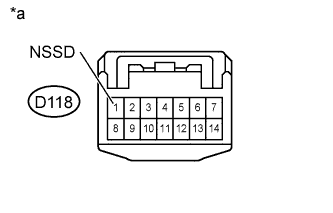 |
Connect the park/neutral position switch connector.
Turn the ignition switch to ON.
Measure the voltage according to the value(s) in the table below.
| Tester Connection | Switch Condition | Specified Condition |
| D118-1 (NSSD) - Body ground | Ignition switch ON Shift lever in D or 3 | 11 to 14 V |
| Ignition switch ON Shift lever not in D and 3 | Below 1 V |
| *a | Front view of wire harness connector (to Shift Lock Control Unit Assembly (Transmission Control Switch)) |
|
| ||||
| OK | |
|
| 6.CHECK HARNESS AND CONNECTOR (TRANSMISSION CONTROL SWITCH - ECM) |
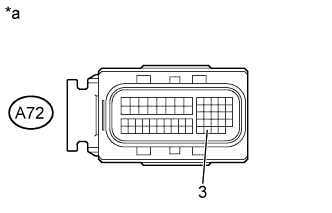 |
Connect the transmission control switch connector.
Disconnect the ECM connector.
Turn the ignition switch to ON.
Measure the voltage according to the value(s) in the table below.
| Tester Connection | Switch Condition | Specified Condition |
| A72-58 (3) - Body ground | Ignition switch ON Shift lever in 3 | 11 to 14 V |
| Ignition switch ON Shift lever not in 3 | Below 1 V |
| *a | Front view of wire harness connector (to ECM) |
|
| ||||
| OK | |
|
| 7.CHECK HARNESS AND CONNECTOR (PARK/NEUTRAL POSITION SWITCH - ECM) |
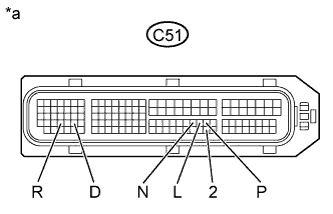 |
Disconnect the ECM connector.
Turn the ignition switch to ON.
Measure the voltage according to the value(s) in the table below.
| Tester Connection | Switch Condition | Specified Condition |
| C51-99 (P) - Body ground | Ignition switch ON Shift lever in P | 11 to 14 V |
| Ignition switch ON Shift lever not in P | Below 1 V | |
| C51-79 (R) - Body ground | Ignition switch ON Shift lever R | 11 to 14 V* |
| Ignition switch ON Shift lever not in R | Below 1 V | |
| C51-97 (N) - Body ground | Ignition switch ON Shift lever in N | 11 to 14 V |
| Ignition switch ON Shift lever not in N | Below 1 V | |
| C51-81 (D) - Body ground | Ignition switch ON Shift lever in D or 3 | 11 to 14 V |
| Ignition switch ON Shift lever not in D and 3 | Below 1 V | |
| C51-131 (2) - Body ground | Ignition switch ON Shift lever in 2 | 11 to 14 V |
| Ignition switch ON Shift lever not in 2 | Below 1 V | |
| C51-98 (L) - Body ground | Ignition switch ON Shift lever in L | 11 to 14 V |
| Ignition switch ON Shift lever not in L | Below 1 V |
| *a | Front view of wire harness connector (to ECM) |
|
| ||||
| OK | ||
 | ||
| ||
| 8.CHECK HARNESS AND CONNECTOR (PARK/NEUTRAL POSITION SWITCH - ECM) |
Disconnect the ECM connector.
Measure the resistance according to the value(s) in the table below.
| Tester Connection | Condition | Specified Condition |
| C51-63 (NSW) - C67-4 (B) | Always | Below 1 Ω |
| C51-63 (NSW) or C67-4 (B) - Body ground | Always | 10 kΩ or higher |
|
| ||||
| OK | ||
| ||
| ||

