Home › Vehicle Interior › HEATING / AIR CONDITIONING › AIR CONDITIONING UNIT (for Sedan)

AIR CONDITIONING UNIT (for Sedan) > INSTALLATION

for Preparation Click here


1. INSTALL AIR CONDITIONING UNIT
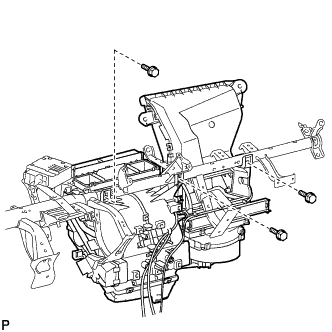
  1. Install the air conditioning unit with the 3 screws.


2. INSTALL AIR CONDITIONING AMPLIFIER ASSEMBLY
  1. Install the air conditioning amplifier assembly with the screw.


3. INSTALL INSTRUMENT PANEL REINFORCEMENT


I102594
  1. Temporarily tighten the air conditioning unit with the 3 screws.

    Torque:
    4.0 N*m{ 41 kgf*cm , 35 in.*lbf }


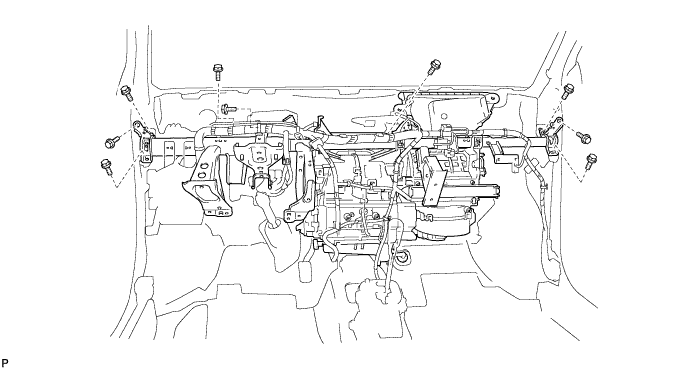
  1. Install the instrument panel reinforcement together with the air conditioning unit with the 9 bolts.

    I102593


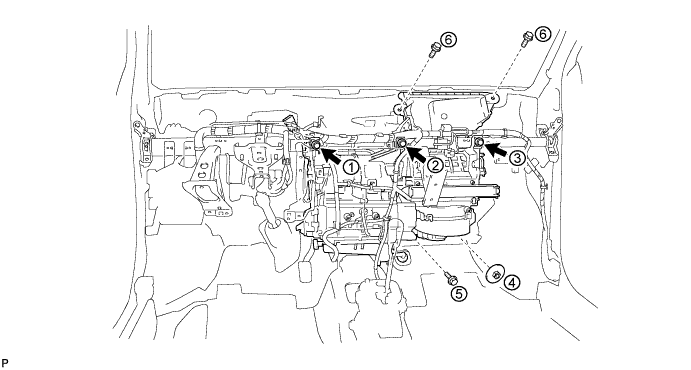
  1. Tighten the temporarily 3 screws, the 3 bolts and the nut in the sequence shown in the illustration.

    I102592E01

    Torque:
    4.0 N*m{ 41 kgf*cm , 35 in.*lbf } for screw
    9.8 N*m{ 100 kgf*cm , 87 in.*lbf } for nut
    9.8 N*m{ 100 kgf*cm , 87 in.*lbf } for bolt

  1. Install the wire harness with the clamps and connect the connectors.

  1. Engage the clamps.

  1. Connect the connectors.

  1. Install the ground wire with the bolt.
    Torque:
    3.2 N*m{ 33 kgf*cm , 28 in.*lbf }


    I107067E01
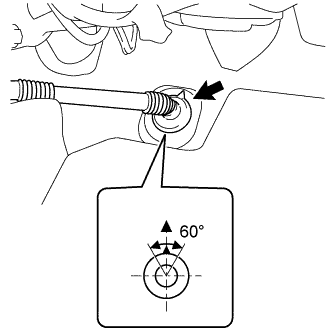
  1. Install the drain hose into the position shown in the illustration.

    NOTICE:
    1. Install the drain hose with its UP mark facing upward, within the 60 degree range shown in the illustration.
    2. Install the drain hose without twisting it.


4. INSTALL CONNECTOR NO. 2 HOLDER
  1. Connect the connectors.

  1. Install the connector No. 2 holder with the bolt.

    Torque:
    3.2 N*m{ 33 kgf*cm , 28 in.*lbf }


5. INSTALL MAIN BODY ECU (DRIVER SIDE J/B)
  1. Install the main body ECU with the 2 bolts.

    Torque:
    3.2 N*m{ 33 kgf*cm , 28 in.*lbf }

  1. Connect the 5 connectors and the 3 clamps.


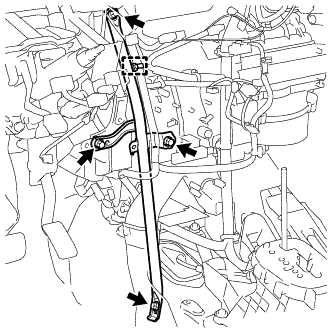
6. INSTALL INSTRUMENT PANEL BRACE SUB-ASSEMBLY


I109909
  1. Install the instrument panel brace sub-assembly with the bolt, screw and nut.

    Torque:
    9.8 N*m{ 100 kgf*cm , 87 in.*lbf }

  1. Engage the clamp.


7. INSTALL DEFROSTER NOZZLE ASSEMBLY
  1. Engage the 5 claws to install the defroster nozzle assembly.

  1. Connect the 3 clamps and connector and install the wire harness.


8. INSTALL HEATER TO REGISTER DUCT ASSEMBLY
  1. Engage the 3 claws to install the heater to register duct assembly.


9. INSTALL STEERING COLUMN ASSEMBLY
(Click here)


10. INSTALL LOWER INSTRUMENT PANEL SUB-ASSEMBLY
(Click here)


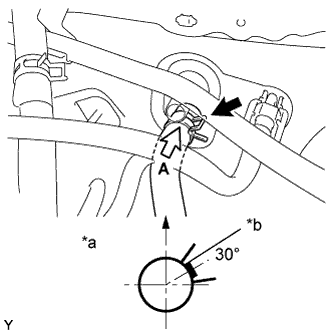
11. CONNECT HEATER WATER INLET HOSE


    I101173E05
  1. Connect the heater water inlet hose onto the heater unit.
    Text in Illustration 
    *a
    View A
    *b
    White Paint Mark

    NOTICE:
    Perform the installation with the hose clip and mark at the correct angle as shown in the illustration.


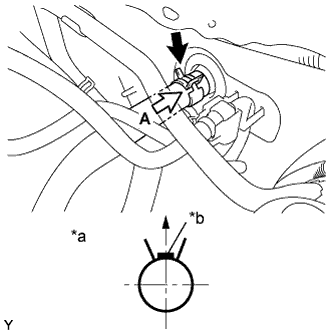
12. CONNECT HEATER WATER OUTLET HOSE


    I101172E05
  1. Connect the heater water outlet hose onto the heater unit.
    Text in Illustration 
    *a
    View A
    *b
    Purple Paint Mark

    NOTICE:
    Perform the installation with the hose clip and mark at the correct angle as shown in the illustration.


13. INSTALL LIQUID TUBE SUB-ASSEMBLY
  1. Remove the vinyl tape from the liquid tube sub-assembly and the connecting portion of the unit.

  1. Apply sufficient compressor oil (ND-OIL8) to a new O-ring and the connecting part of the liquid tube sub-assembly.

    Compressor oil:
    ND-OIL8 or the equivalent

  1. Install the O-ring onto the liquid tube sub-assembly.

  1. Connect the liquid tube sub-assembly to the unit .


14. INSTALL SUCTION TUBE SUB-ASSEMBLY
  1. Remove the vinyl tape from the suction tube sub-assembly and the connecting part of the unit.

  1. Apply sufficient compressor oil (ND-OIL8) to a new O-ring and the connecting part of the suction tube sub-assembly.

    Compressor oil:
    ND-OIL8 or the equivalent

  1. Install the O-ring onto the suction tube sub-assembly.
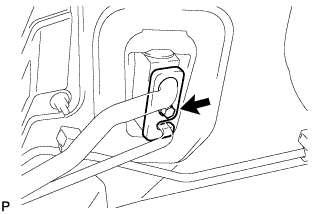


    I101237
  1. Insert the hook type connector securely into the fitting holes and tighten the bolt.

    Torque:
    9.8 N*m{ 100 kgf*cm , 87 in.*lbf }


15. ADD ENGINE COOLANT
  1. Tighten the radiator drain cock plug by hand.
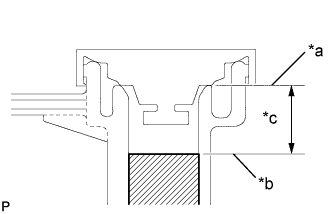


    A206788E06
  1. Slowly fill the radiator with TOYOTA Super Long Life Coolant (SLLC) from the water filler. (Coolant level should be within 20 mm (0.787 in.) from the filler tube end.)
    Text in Illustration 
    *a
    Filler Tube End
    *b
    Coolant Level
    *c
    20 mm (0.787 in.)

    Capacity:
    Transaxle Type
    Coolant Capacity
    Automatic Transaxle
    4.7 liters (5.0 US qts, 4.4 Imp. qts)
    Manual Transaxle
    4.8 liters (5.1 US qts, 4.5 Imp. qts)

    NOTICE:
    Do not substitute water for coolant.

    HINT:
    TOYOTA vehicle are filled with TOYOTA SLLC at the factory. In order to avoid damage to the engine cooling system and other technical problems, only use TOYOTA SLLC or similar high quality ethylene glycol based non-silicate, non-amine, non-nitrite, non-borate coolant with long-life hybrid organic acid technology (coolant with long-life hybrid organic acid technology is a combination of low phosphates and organic acids).

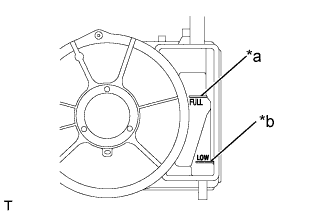
  1. Remove the reserve tank cap.


    A246002E04
  1. Slowly pour coolant into the radiator reserve tank assembly until it reaches the full line.
    Text in Illustration 
    *a
    Full Line
    *b
    Low Line

  1. Install the water filler cap sub-assembly securely.

  1. Install the reserve tank cap.

  1. Bleed air from the cooling system.

    1. Warm up the engine until the thermostat opens.
      While the thermostat is open, circulate the coolant for several minutes.

      NOTICE:
      1. Make sure that the radiator reserve tank assembly still has some coolant in it.
      2. If the coolant temperature gauge indicates an excessive temperature, turn off the engine and let it cool.
      3. If there is not enough coolant, the engine may overheat or be seriously damaged.
      4. If the radiator reserve tank assembly does not have enough coolant, perform the following stop the engine, and wait until the coolant has cooled down, and add coolant until the radiator reserve tank assembly is filled to the full line.

      HINT:
      The thermostat open timing can be confirmed by pressing the No. 2 radiator hose by hand, and checking when the coolant starts to flow inside the hose.

  1. Stop the engine and wait until the coolant cools down.

  1. Recheck the coolant level inside the radiator reserve tank assembly. If it is below the full level, add coolant.


16. CONNECT CABLE TO NEGATIVE BATTERY TERMINAL

Torque:
5.4 N*m{ 55 kgf*cm , 48 in.*lbf }


17. CHECK SRS WARNING LIGHT
(Click here)


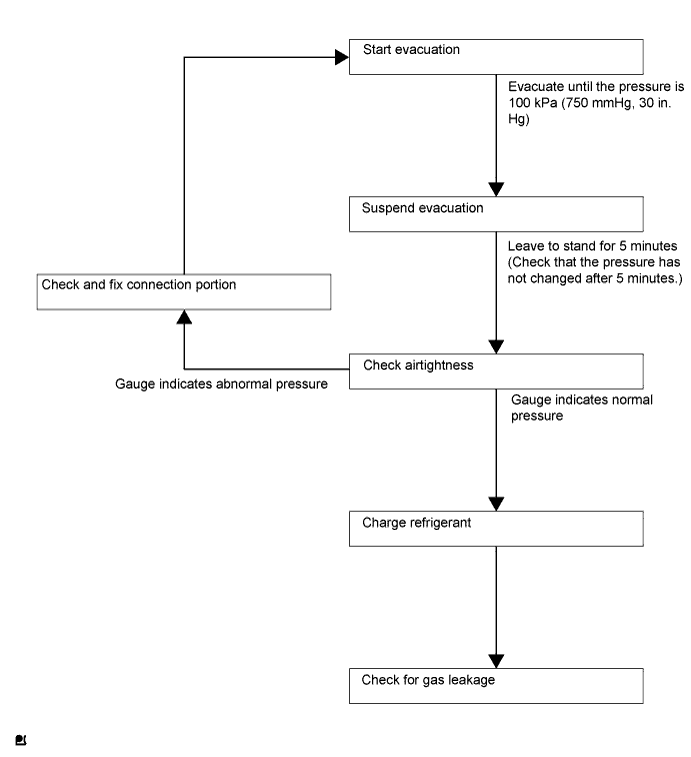
18. CHARGE REFRIGERANT


I100449E06

NOTICE:
Charge refrigerant in accordance with equipment manual.

  1. Perform vacuum purging using a vacuum pump.

  1. Charge refrigerant HFC-134a (R134a).

    SST
    09985-20010   (09985-02010, 09985-02050, 09985-02060, 09985-02070, 09985-02080, 09985-02090, 09985-02110, 09985-02130, 09985-02140, 09985-02150)

    Standard:
    330 to 390g (11.64 to 13.76oz.)

    NOTICE:
    Do not start the engine before charging it with refrigerant as the cooler compressor does not work properly without sufficient refrigerant. This could cause the compressor to overheat.

    HINT:

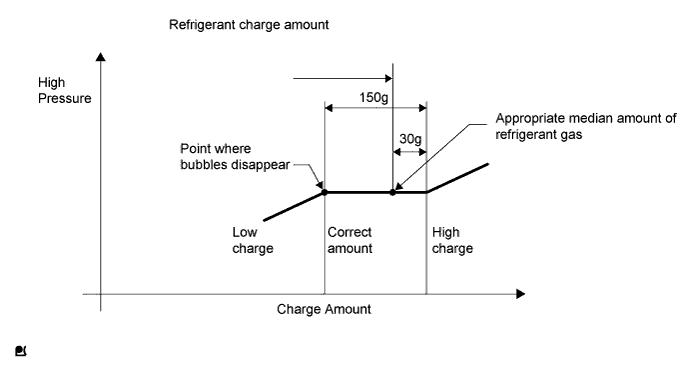
    1. The relationship between refrigerant charge amount and pressure is as follows.


      I101544E02

    2. High Charge Range:
      If refrigerant is overcharged, pressure rises on the high-pressure side. High-pressure cut off frequently occurs. This causes insufficient cooling performance and also insufficient compressor lubrication.
    3. Low Charge Range:
      Shortage of refrigerant causes insufficient cooling performance and low circulation of refrigerant oil, which shortens compressor life. Operation with insufficient coolant raises refrigerant temperature and causes heat deterioration of rubber seals and hoses. Cracking and thus refrigerant leakage may occur.


    1. Install the caps onto the service valves on the refrigerant line.


19. WARM UP ENGINE

NOTICE:
Warm up the engine at less than 2,000 rpm for 1 minute or more after charging it with refrigerant.


20. INSPECT FOR ENGINE COOLANT LEAK

CAUTION:
To avoid the danger of being burned, do not remove the water filler cap sub-assembly while the engine and radiator assembly are still hot. Thermal expansion will cause hot engine coolant and steam to blow out from the radiator assembly.


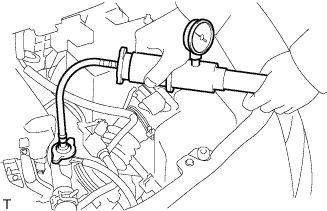
    A106594
  1. Fill the radiator assembly with engine coolant, and attach a radiator cap tester.

  1. Pump the tester to 118 kPa (1.2 kgf/cm2, 17.1 psi), and then check that the pressure does not drop.
    If the pressure drops, check the hoses, radiator assembly and water pump assembly for leaks. If there are no signs or traces of external engine coolant leaks, check the heater core, cylinder block and head.


21. INSPECT FOR REFRIGERANT LEAK
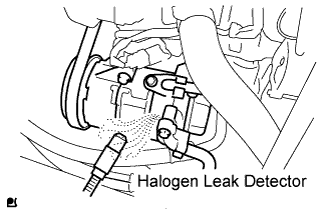
  1. After recharging the refrigerant gas, check for refrigerant gas leakage using a halogen leak detector.

  1. Perform the operation as follows:

    1. Stop the engine.
    2. Secure good ventilation (the halogen leak detector may react to volatile gases other than refrigerant, such as evaporated gasoline or exhaust gas).
    3. Repeat the test 2 or 3 times.
    4. Make sure that some refrigerant remains in the refrigeration system.
      When compressor is off: approximately 392 to 588 kPa (4 to 6 kgf/cm2, 57 to 85 psi)

    HINT:
    It is impossible for the above pressure to be maintained if there is leakage.


    I101569E02
  1. Using the halogen leak detector, check the refrigerant line, especially the connection points, for leakage.
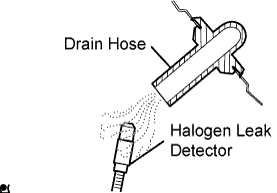


    I100587E02
  1. Bring the halogen leak detector close to the drain hose before performing the test.

    HINT:
    1. After the blower motor has stopped, leave the cooling unit for at least 15 minutes.
    2. Place the halogen leak detector sensor under the drain hose.
    3. When bringing the halogen leak detector close to the drain hose, make sure that the halogen leak detector does not react to other volatile gases.

    If such a reaction is unavoidable, the vehicle must be lifted up.

  1. If a gas leak is not detected from the drain hose, remove the blower motor from the cooling unit. Insert the halogen leak detector sensor into the unit and perform the test.

  1. Disconnect the pressure switch connector and leave it for approximately 20 minutes. Bring the halogen leak detector close to the pressure switch and perform the test.


22. POSITION FRONT WHEELS FACING STRAIGHT AHEAD


23. PERFORM CALIBRATION OF TORQUE SENSOR ZERO POINT
(Click here)