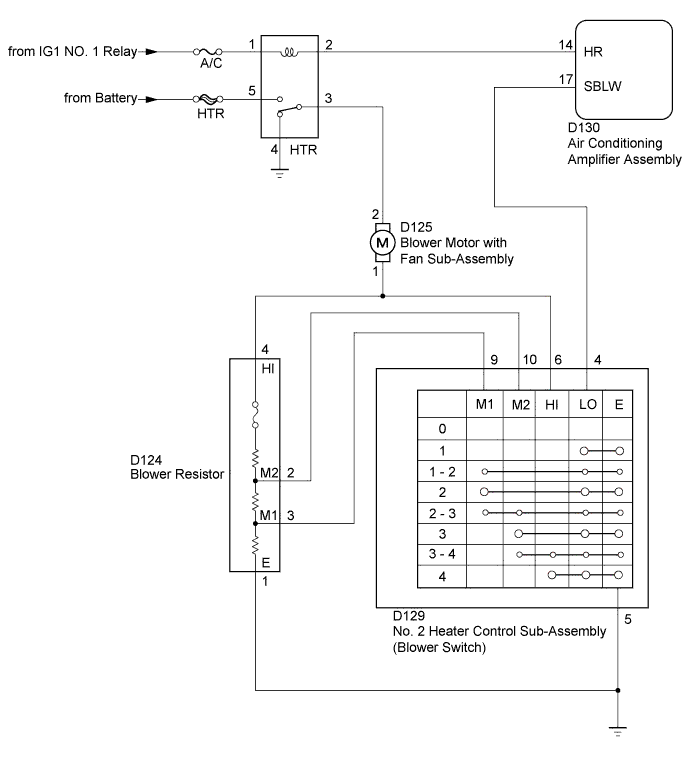
AIR CONDITIONING SYSTEM (for Hatchback) > Blower Motor Circuit |
| 1.INSPECT HEATER BLOWER MOTOR RELAY ASSEMBLY (HTR RELAY) |
Inspect the heater blower motor relay assembly (HTR relay) (Click here).
|
| ||||
| OK | |
 |
| 2.INSPECT BLOWER MOTOR WITH FAN SUB-ASSEMBLY |
Inspect the blower motor with fan sub-assembly (Click here).
|
| ||||
| OK | |
|
| 3.CHECK HARNESS AND CONNECTOR (HEATER BLOWER MOTOR RELAY ASSEMBLY (HTR RELAY) - BATTERY, IG1 NO. 1 RELAY AND BODY GROUND) |
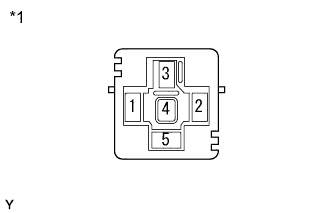 |
Remove the heater blower motor relay assembly (HTR relay).
Measure the voltage according to the value(s) in the table below.
| Tester Connection | Switch Condition | Specified Condition |
| HTR-5 - Body ground | Always | 11 to 14 V |
| HTR-1 - Body ground | Ignition switch ON | 11 to 14 V |
Measure the resistance according to the value(s) in the table below.
| Tester Connection | Condition | Specified Condition |
| HTR-4 - Body ground | Always | Below 1 Ω |
| *1 | Heater Blower Motor Relay Assembly (HTR Relay) Holder |
|
| ||||
| OK | |
|
| 4.CHECK HARNESS AND CONNECTOR (HEATER BLOWER MOTOR RELAY ASSEMBLY (HTR RELAY) - AIR CONDITIONING AMPLIFIER ASSEMBLY) |
Remove the heater blower motor relay assembly (HTR relay).
Disconnect the D130 air conditioning amplifier assembly connector.
Measure the resistance according to the value(s) in the table below.
| Tester Connection | Condition | Specified Condition |
| HTR-2 - D130-14 (HR) | Always | Below 1 Ω |
| HTR-2 - Body ground | Always | 10 kΩ or higher |
|
| ||||
| OK | |
|
| 5.CHECK HARNESS AND CONNECTOR (NO. 2 HEATER CONTROL SUB-ASSEMBLY - AIR CONDITIONING AMPLIFIER ASSEMBLY) |
Disconnect the D129 No. 2 heater control sub-assembly (blower switch) connector.
Disconnect the D130 air conditioning amplifier assembly connector.
Measure the resistance according to the value(s) in the table below.
| Tester Connection | Condition | Specified Condition |
| D129-4 (LO) - D130-17 (SBLW) | Always | Below 1 Ω |
| D129-4 (LO) - Body ground | Always | 10 kΩ or higher |
|
| ||||
| OK | |
|
| 6.CHECK HARNESS AND CONNECTOR (BLOWER MOTOR WITH FAN SUB-ASSEMBLY - HEATER BLOWER MOTOR RELAY ASSEMBLY (HTR RELAY)) |
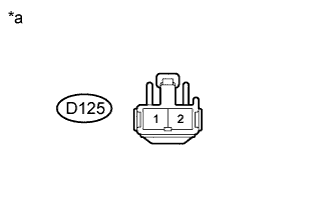 |
Disconnect the D125 blower motor with fan sub-assembly connector.
Measure the voltage according to the value(s) in the table below.
| Tester Connection | Switch Condition | Specified Condition |
| D125-2 - Body ground | Ignition switch ON Blower switch ON | 11 to 14 V |
| *a | Front view of wire harness connector (to Blower Motor with Fan Sub-Assembly) |
|
| ||||
| OK | |
|
| 7.CHECK HARNESS AND CONNECTOR (BLOWER MOTOR WITH FAN SUB-ASSEMBLY - BLOWER RESISTOR) |
Disconnect the D125 blower motor with fan sub-assembly connector.
Disconnect the D124 blower resistor connector.
Measure the resistance according to the value(s) in the table below.
| Tester Connection | Condition | Specified Condition |
| D125-1 - D124-4 (HI) | Always | Below 1 Ω |
| D125-1 - Body ground | Always | 10 kΩ or higher |
|
| ||||
| OK | |
|
| 8.INSPECT BLOWER RESISTOR |
Inspect the blower resistor (Click here).
|
| ||||
| OK | |
|
| 9.INSPECT NO. 2 HEATER CONTROL SUB-ASSEMBLY (BLOWER SWITCH) |
Inspect the No. 2 heater control sub-assembly (blower switch) (Click here).
|
| ||||
| OK | |
|
| 10.CHECK HARNESS AND CONNECTOR (NO. 2 HEATER CONTROL SUB-ASSEMBLY - BLOWER RESISTOR AND BODY GROUND) |
Disconnect the D129 No. 2 heater control sub-assembly (blower switch) connector.
Disconnect the D124 blower resistor connector.
Measure the resistance according to the value(s) in the table below.
| Tester Connection | Condition | Specified Condition |
| D129-5 (E) - D124-1 (E) | Always | Below 1 Ω |
| D129-10 (M2) - D124-2 (M2) | Always | Below 1 Ω |
| D129-9 (M1) - D124-3 (M1) | Always | Below 1 Ω |
| D129-6 (HI) - D124-4 (HI) | Always | Below 1 Ω |
| D129-5 (E) - Body ground | Always | Below 1 Ω |
| D129-10 (M2) - Body ground | Always | 10 kΩ or higher |
| D129-9 (M1) - Body ground | Always | 10 kΩ or higher |
| D129-6 (HI) - Body ground | Always | 10 kΩ or higher |
|
| ||||
| OK | ||
 | ||
| ||
