BRAKE CONTROL / DYNAMIC CONTROL SYSTEMS BRAKE ACTUATOR INSTALLATION
PROCEDURE

 44546A
1.INSTALL BRAKE ACTUATOR BRACKET CUSHION
Install the 3 brake actuator bracket cushions to the brake actuator bracket assembly.
Install the 3 brake actuator case collars to the 3 brake actuator bracket cushions.
44590
2.INSTALL BRAKE ACTUATOR BRACKET ASSEMBLY (for LHD)
for CVT:
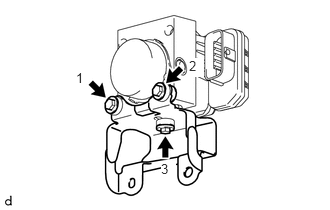
Install the brake actuator bracket assembly to the brake actuator assembly with the 3 bolts in the sequence shown in the illustration.
- Torque:
- 5.4 N*m (55 kgf*cm, 48 in.*lbf)
- NOTICE:
- ·
Do not remove the hole plug before connecting the brake tube. New actuators are filled with brake fluid.
·Do not carry the brake actuator assembly by the connector.
except CVT:
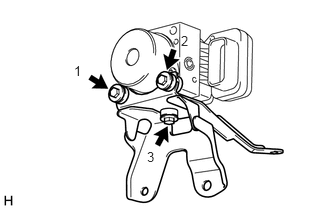
Install the brake actuator bracket assembly to the brake actuator assembly with the 3 bolts in the sequence shown in the illustration.
- Torque:
- 5.4 N*m (55 kgf*cm, 48 in.*lbf)
- NOTICE:
- ·
Do not remove the hole plug before connecting the brake tube. New actuators are filled with brake fluid.
·Do not carry the brake actuator assembly by the connector.
44590
3.INSTALL BRAKE ACTUATOR BRACKET ASSEMBLY (for RHD)
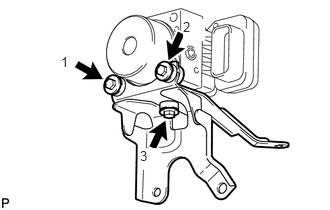
Install the brake actuator bracket assembly to the brake actuator assembly with the 3 bolts in the sequence shown in the illustration.
- Torque:
- 5.4 N*m (55 kgf*cm, 48 in.*lbf)
- NOTICE:
- ·
Do not remove the hole plug before connecting the brake tube. New actuators are filled with brake fluid.
·Do not carry the brake actuator assembly by the connector.
44510
4.INSTALL BRAKE ACTUATOR ASSEMBLY (for LHD)
for CVT w/ VSC:
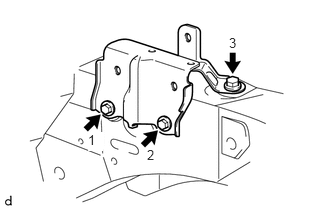
Install the No. 1 brake actuator bracket assembly with the 3 bolts in the sequence shown in the illustration.
- Torque:
- 19 N*m (194 kgf*cm, 14 ft.*lbf)
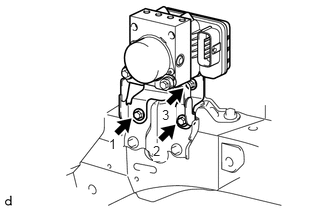
Install the brake actuator assembly with the brake actuator bracket assembly with the 3 bolts in the sequence shown in the illustration.
- Torque:
- 19 N*m (194 kgf*cm, 14 ft.*lbf)
- NOTICE:
- ·
Do not damage the brake tubes or wire harness.
·Do not carry the brake actuator assembly with the brake actuator bracket assembly by the connector.
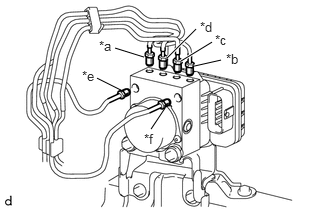
| *a | to Front Wheel Cylinder RH |
| *b | to Front Wheel Cylinder LH |
| *c | to Rear Wheel Cylinder RH |
| *d | to Rear Wheel Cylinder LH |
| *e | from Rear Master Cylinder |
| *f | from Front Master Cylinder |
Temporarily install each brake tube to the correct position on the brake actuator assembly as shown in the illustration.
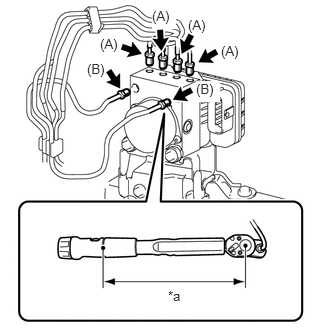
| *a | Torque Wrench Fulcrum Length |
Using a 10 mm and 12 mm union nut wrench, tighten the 6 brake tubes.
- Torque:
- Specified tightening torque (A) : 15.2 N*m (155 kgf*cm, 11 ft.*lbf)
- Specified tightening torque (B) : 19.5 N*m (199 kgf*cm, 14 ft.*lbf)
- HINT:
- ·
Calculate the torque wrench reading when changing the fulcrum length of the torque wrench.
Click hereGeneral>INTRODUCTION>REPAIR INSTRUCTION>PRECAUTION
·When using a union nut wrench (fulcrum length of 22 mm (0.866 in.)) + torque wrench (fulcrum length of 162 mm (6.38 in.)) (A): 13.4 N*m (137 kgf*cm, 10 ft.*lbf)
·When using a union nut wrench (fulcrum length of 20 mm (0.787 in.)) + torque wrench (fulcrum length of 162 mm (6.38 in.)) (B): 17.4 N*m (177 kgf*cm, 13 ft.*lbf)
- NOTICE:
- ·
Do not kink or damage the brake tubes.
·Do not allow the brake tubes to twist or interfere with other parts or the vehicle body during tightening.
·Do not allow any foreign matter such as dirt or dust to enter the brake tubes from the connecting parts.
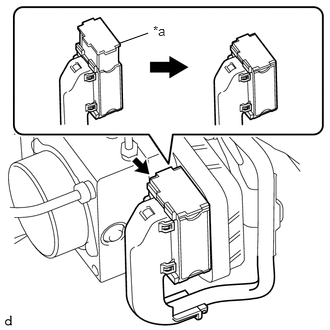
| *a | Lock Lever |
Connect the brake actuator connector.
- NOTICE:
- ·
Make sure that the connector is locked securely.
·Make sure that the brake actuator connector can be connected smoothly. Do not allow entry of water, oil or dirt.
for CVT w/ ABS:
Install the No. 1 brake actuator bracket assembly with the 3 bolts in the sequence shown in the illustration.
- Torque:
- 19 N*m (194 kgf*cm, 14 ft.*lbf)
Install the brake actuator assembly with the brake actuator bracket assembly with the 3 bolts in the sequence shown in the illustration.
- Torque:
- 19 N*m (194 kgf*cm, 14 ft.*lbf)
- NOTICE:
- ·
Do not damage the brake tubes or wire harness.
·Do not carry the brake actuator assembly with the brake actuator bracket assembly by the connector.
| *a | to Front Wheel Cylinder RH |
| *b | to Front Wheel Cylinder LH |
| *c | to Rear Wheel Cylinder RH |
| *d | to Rear Wheel Cylinder LH |
| *e | from Rear Master Cylinder |
| *f | from Front Master Cylinder |
Temporarily install each brake tube to the correct position on the brake actuator assembly as shown in the illustration.
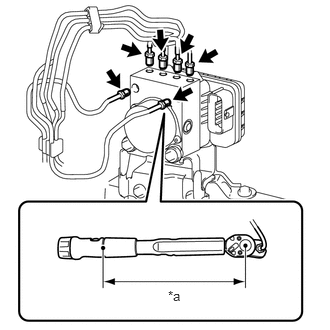
| *a | Torque Wrench Fulcrum Length |
Using a 10 mm union nut wrench, tighten the 6 brake tubes.
- Torque:
- Specified tightening torque : 15.2 N*m (155 kgf*cm, 11 ft.*lbf)
- HINT:
- ·
Calculate the torque wrench reading when changing the fulcrum length of the torque wrench.
Click hereGeneral>INTRODUCTION>REPAIR INSTRUCTION>PRECAUTION
·When using a union nut wrench (fulcrum length of 22 mm (0.866 in.)) + torque wrench (fulcrum length of 162 mm (6.38 in.)) (A): 13.4 N*m (137 kgf*cm, 10 ft.*lbf)
- NOTICE:
- ·
Do not kink or damage the brake tubes.
·Do not allow the brake tubes to twist or interfere with other parts or the vehicle body during tightening.
·Do not allow any foreign matter such as dirt or dust to enter the brake tubes from the connecting parts.
| *a | Lock Lever |
Connect the brake actuator connector.
- NOTICE:
- ·
Make sure that the connector is locked securely.
·Make sure that the brake actuator connector can be connected smoothly. Do not allow entry of water, oil or dirt.
except CVT w/ VSC:
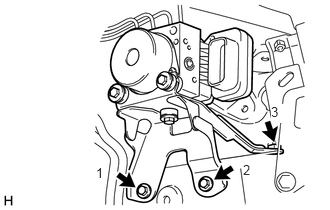
Install the brake actuator assembly with the brake actuator bracket assembly with the 3 bolts in the sequence shown in the illustration.
- Torque:
- 19 N*m (194 kgf*cm, 14 ft.*lbf)
- NOTICE:
- ·
Do not damage the brake tubes or wire harness.
·Do not carry the brake actuator assembly with the brake actuator bracket assembly by the connector.
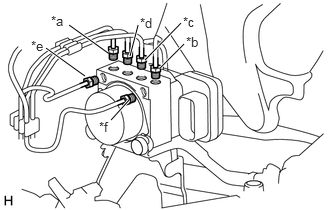
| *a | to Front Wheel Cylinder RH |
| *b | to Front Wheel Cylinder LH |
| *c | to Rear Wheel Cylinder RH |
| *d | to Rear Wheel Cylinder LH |
| *e | from Front Master Cylinder |
| *f | from Rear Master Cylinder |
Temporarily install each brake tube to the correct position on the brake actuator assembly as shown in the illustration.
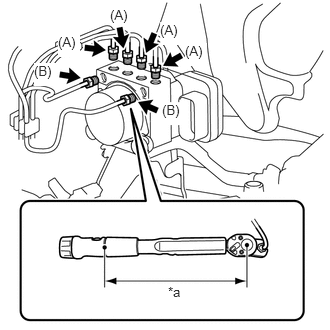
| *a | Torque Wrench Fulcrum Length |
Using a 10 mm and 12 mm union nut wrench, tighten the 6 brake tubes.
- Torque:
- Specified tightening torque (A) : 15.2 N*m (155 kgf*cm, 11 ft.*lbf)
- Specified tightening torque (B) : 19.5 N*m (199 kgf*cm, 14 ft.*lbf)
- HINT:
- ·
Calculate the torque wrench reading when changing the fulcrum length of the torque wrench.
Click hereGeneral>INTRODUCTION>REPAIR INSTRUCTION>PRECAUTION
·When using a union nut wrench (fulcrum length of 22 mm (0.866 in.)) + torque wrench (fulcrum length of 162 mm (6.38 in.)) (A): 13.4 N*m (137 kgf*cm, 10 ft.*lbf)
·When using a union nut wrench (fulcrum length of 20 mm (0.787 in.)) + torque wrench (fulcrum length of 162 mm (6.38 in.)) (B): 17.4 N*m (177 kgf*cm, 13 ft.*lbf)
- NOTICE:
- ·
Do not kink or damage the brake tubes.
·Do not allow the brake tubes to twist or interfere with other parts or the vehicle body during tightening.
·Do not allow any foreign matter such as dirt or dust to enter the brake tubes from the connecting parts.
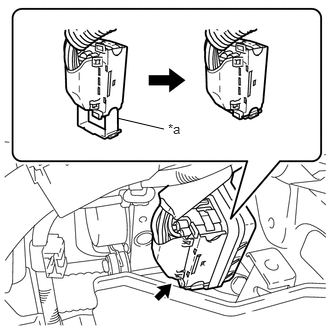
| *a | Lock Lever |
Connect the brake actuator connector.
- NOTICE:
- ·
Make sure that the connector is locked securely.
·Make sure that the brake actuator connector can be connected smoothly. Do not allow entry of water, oil or dirt.
except CVT w/ ABS:
Install the brake actuator assembly with the brake actuator bracket assembly with the 3 bolts in the sequence shown in the illustration.
- Torque:
- 19 N*m (194 kgf*cm, 14 ft.*lbf)
- NOTICE:
- ·
Do not damage the brake tubes or wire harness.
·Do not carry the brake actuator assembly with the brake actuator bracket assembly by the connector.
| *a | to Front Wheel Cylinder RH |
| *b | to Front Wheel Cylinder LH |
| *c | to Rear Wheel Cylinder RH |
| *d | to Rear Wheel Cylinder LH |
| *e | from Front Master Cylinder |
| *f | from Rear Master Cylinder |
Temporarily install each brake tube to the correct position on the brake actuator assembly as shown in the illustration.
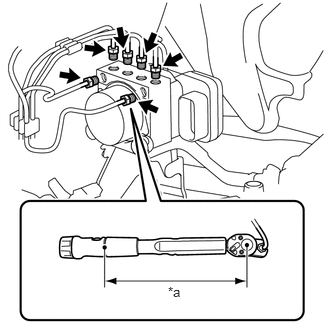
| *a | Torque Wrench Fulcrum Length |
Using a 10 mm union nut wrench, tighten the 6 brake tubes.
- Torque:
- Specified tightening torque : 15.2 N*m (155 kgf*cm, 11 ft.*lbf)
- HINT:
- ·
Calculate the torque wrench reading when changing the fulcrum length of the torque wrench.
Click hereGeneral>INTRODUCTION>REPAIR INSTRUCTION>PRECAUTION
·When using a union nut wrench (fulcrum length of 22 mm (0.866 in.)) + torque wrench (fulcrum length of 162 mm (6.38 in.)) (A): 13.4 N*m (137 kgf*cm, 10 ft.*lbf)
- NOTICE:
- ·
Do not kink or damage the brake tubes.
·Do not allow the brake tubes to twist or interfere with other parts or the vehicle body during tightening.
·Do not allow any foreign matter such as dirt or dust to enter the brake tubes from the connecting parts.
| *a | Lock Lever |
Connect the brake actuator connector.
- NOTICE:
- ·
Make sure that the connector is locked securely.
·Make sure that the brake actuator connector can be connected smoothly. Do not allow entry of water, oil or dirt.
44510
5.INSTALL BRAKE ACTUATOR ASSEMBLY (for RHD)
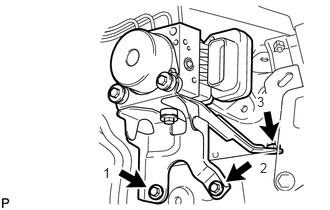
Install the brake actuator assembly with the brake actuator bracket assembly with the 3 bolts in the sequence shown in the illustration.
- Torque:
- 19 N*m (194 kgf*cm, 14 ft.*lbf)
- NOTICE:
- ·
Do not damage the brake tubes or wire harness.
·Do not carry the brake actuator assembly with the brake actuator bracket assembly by the connector.
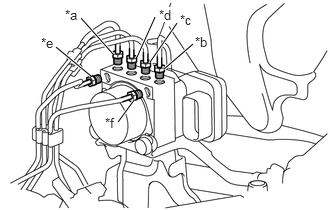
| *a | to Front Wheel Cylinder RH |
| *b | to Front Wheel Cylinder LH |
| *c | to Rear Wheel Cylinder RH |
| *d | to Rear Wheel Cylinder LH |
| *e | from Rear Master Cylinder |
| *f | from Front Master Cylinder |
Temporarily install each brake tube to the correct position on the brake actuator assembly as shown in the illustration.
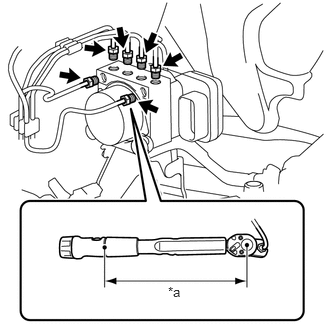
| *a | Torque Wrench Fulcrum Length |
Using a 10 mm union nut wrench, tighten the 6 brake tubes.
- Torque:
- Specified tightening torque : 15.2 N*m (155 kgf*cm, 11 ft.*lbf)
- HINT:
- ·
Calculate the torque wrench reading when changing the fulcrum length of the torque wrench.
Click hereGeneral>INTRODUCTION>REPAIR INSTRUCTION>PRECAUTION
·When using a union nut wrench (fulcrum length of 22 mm (0.866 in.)) + torque wrench (fulcrum length of 162 mm (6.38 in.)) (A): 13.4 N*m (137 kgf*cm, 10 ft.*lbf)
- NOTICE:
- ·
Do not kink or damage the brake tubes.
·Do not allow the brake tubes to twist or interfere with other parts or the vehicle body during tightening.
·Do not allow any foreign matter such as dirt or dust to enter the brake tubes from the connecting parts.
| *a | Lock Lever |
Connect the brake actuator connector.
- NOTICE:
- ·
Make sure that the connector is locked securely.
·Make sure that the brake actuator connector can be connected smoothly. Do not allow entry of water, oil or dirt.
74410
6.INSTALL BATTERY CARRIER ASSEMBLY
74431
7.INSTALL BATTERY TRAY
28800
8.INSTALL BATTERY
9.CONNECT CABLE TO NEGATIVE BATTERY TERMINAL
- Torque:
- 5.4 N*m (55 kgf*cm, 48 in.*lbf)
- NOTICE:
-
When disconnecting the cable, some systems need to be initialized after the cable is reconnected.
-
Click hereGeneral>INTRODUCTION>REPAIR INSTRUCTION>INITIALIZATION
10.BLEED BRAKE LINE
11.BLEED CLUTCH LINE (for Manual Transaxle)
for C50:
for C54:
12.INSPECT BRAKE ACTUATOR USING GTS
13.CHECK AND CLEAR DTC
14. PERFORM YAW RATE AND ACCELERATION SENSOR ZERO POINT CALIBRATION AND STORE SYSTEM INFORMATION (w/ VSC)
15.PERFORM TEST MODE INSPECTION (w/ VSC)