INTERIOR PANELS / TRIM LOWER INSTRUMENT PANEL INSTALLATION
PROCEDURE

 55303B
1.INSTALL LOWER INSTRUMENT PANEL SUB-ASSEMBLY
Using a nipper, cut off both ends of the runner portion shown in the illustration (When installing a new one).
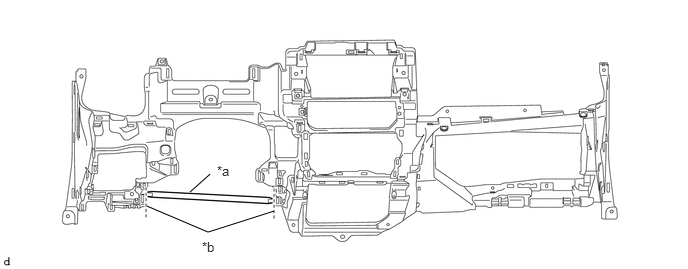
| *a | Runner Portion | *b | Cut Off |
Engage the 11 guides to temporarily install the lower instrument panel sub-assembly.
- NOTICE:
- ·
Do not damage the lower instrument panel sub-assembly.
·Do not allow the wire harnesses to interfere with the surrounding parts.
Install the 7 bolts <A>, 2 bolts <D> and 2 screws <B>.
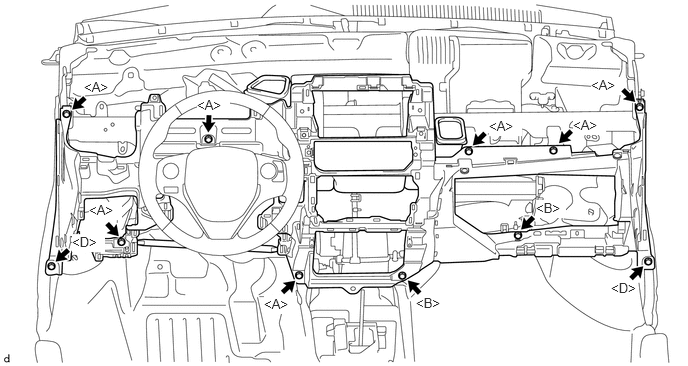
for Automatic Air Conditioning System:
Connect the cooler thermistor hose.
Engage the clamps.
Engage the 2 claws to connect the DLC3.
Engage the claw and the 3 guides to connect the hood lock control lever sub-assembly.
55433B
2.INSTALL LOWER NO. 2 INSTRUMENT PANEL FINISH PANEL (for RHD)
Engage the 4 clips to install the No. 2 lower instrument panel finish panel.
81080J
3.INSTALL NO. 1 INTERIOR ILLUMINATION LIGHT ASSEMBLY
899A0
4.INSTALL NO. 1 INDOOR ELECTRICAL KEY ANTENNA ASSEMBLY (w/ Smart Entry and Start System)
86212
5.INSTALL NO. 2 RADIO BRACKET (w/o Radio Receiver)
w/ Cover:
Install the No. 2 radio bracket and stereo opening cover and No. 2 stereo opening cover with the 4 screws.
w/o Cover:
Engage the guide to install the No. 2 radio bracket.
Install the 2 screws.
86211
6.INSTALL NO. 1 RADIO BRACKET (w/o Radio Receiver)
- HINT:
-
Use the same procedure as for the No. 2 side.
55521C
7.INSTALL STEREO OPENING COVER WITH BRACKET (w/ Radio Receiver Opening Cover)
Engage the 2 guides to install the stereo opening cover with bracket.
Install the 4 screws.
55900A
8.INSTALL HEATER CONTROL AND ACCESSORY ASSEMBLY (for Manual Air Conditioning System)
55900
9.INSTALL AIR CONDITIONING CONTROL ASSEMBLY (for Automatic Air Conditioning System)
87211C
10.INSTALL NO. 4 AIR DUCT (for Manual Air Conditioning System)
45287
11.INSTALL LOWER STEERING COLUMN COVER (for Manual Air Conditioning System)
73900
12.INSTALL LOWER NO. 1 INSTRUMENT PANEL AIRBAG ASSEMBLY (w/ Driver Side Knee Airbag)
55432B
13.INSTALL LOWER INSTRUMENT PANEL FINISH PANEL (for RHD without Driver Side Knee Airbag)
- HINT:
-
Use the same procedure as for the LHD.
-
Click hereVehicle Interior>INTERIOR PANELS / TRIM>UPPER INSTRUMENT PANEL>INSTALLATION
55607
14.INSTALL NO. 2 INSTRUMENT PANEL UNDER COVER SUB-ASSEMBLY
Engage the 3 claws and guide to install the No. 2 instrument panel under cover sub-assembly.
58837B
15.INSTALL CONSOLE BOX CUP HOLDER
Engage the 2 guides to install the console box cup holder.
Install the 5 screws <C>.
58810J
16.INSTALL CONSOLE BOX ASSEMBLY
Engage the 3 claws to install the console box assembly.
Install the bolt <D> and 2 screws <E>.
58839A
17.INSTALL CONSOLE BOX HOLE COVER
Engage the 5 clips to install the console box hole cover.
58916
18.INSTALL BOX BOTTOM MAT
Install the box bottom mat.
58912C
19.INSTALL NO. 2 BOX SIDE PANEL
Engage the 4 claws to install the No. 2 box side panel.
58911A
20.INSTALL NO. 1 BOX SIDE PANEL
- HINT:
-
Use the same procedure as for the No. 2 side.
58816D
21.INSTALL NO. 1 FRONT CONSOLE BOX INSERT (for RHD)
Engage the 2 claws and 4 guides to install the No. 1 front console box insert.
Install the 4 screws<C>.
Install the clip.
58817A
22.INSTALL NO. 2 FRONT CONSOLE BOX INSERT
Engage the 2 claws and 4 guides to install the No. 2 front console box insert.
Install the 4 screws<C>.
55302A
23.INSTALL UPPER INSTRUMENT PANEL SUB-ASSEMBLY
58910C
24.INSTALL REAR CONSOLE BOX ASSEMBLY (for RHD)
62112
25.INSTALL COWL SIDE TRIM BOARD LH
62111C
26.INSTALL COWL SIDE TRIM BOARD RH
- HINT:
-
Use the same procedure as for the LH side.
67914
27.INSTALL FRONT DOOR SCUFF PLATE LH
67913
28.INSTALL FRONT DOOR SCUFF PLATE RH
- HINT:
-
Use the same procedure as for the LH side.