INTERIOR PANELS / TRIM ROOF HEADLINING(for TMT Made Sedan) INSTALLATION
PROCEDURE

 63310
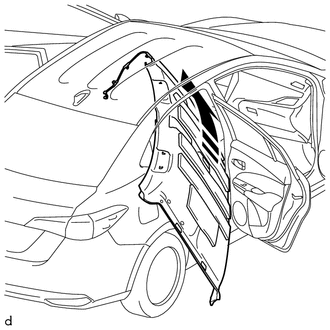
1.INSTALL ROOF HEADLINING ASSEMBLY

|
Install in this Direction |
Put the roof headlining assembly into the vehicle through the rear door RH.
- NOTICE:
-
Do not damage the roof headlining assembly or body interior.
Install the roof headlining assembly with the 2 clips.
for Rear Pillar RH Side:
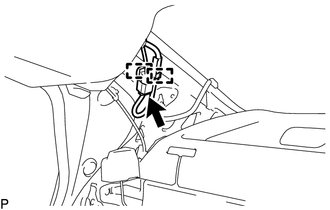
Engage the 2 clamps to connect the No. 2 antenna cord sub-assembly.
Connect the connector.
74348C
2.INSTALL VISOR HOLDER LH
74348B
3.INSTALL VISOR HOLDER RH
- HINT:
-
Use the same procedure as for the LH side.
74320
4.INSTALL VISOR ASSEMBLY LH
74310
5.INSTALL VISOR ASSEMBLY RH
- HINT:
-
Use the same procedure as for the LH side.
74610A
6.INSTALL ASSIST GRIP SUB-ASSEMBLY
81240J
7.INSTALL ROOM LIGHT ASSEMBLY
81260A
8.INSTALL MAP LIGHT ASSEMBLY
62472A
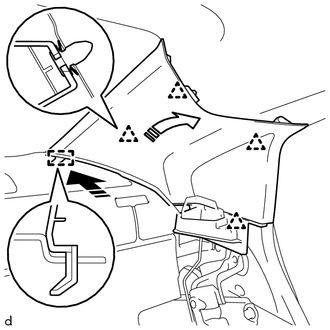
9.INSTALL ROOF SIDE INNER GARNISH LH
|
|
Install in this Direction (1) |

|
Install in this Direction (2) |
Engage the guide and 4 clips to install the roof side inner garnish LH as shown in the illustration.
62471A
10.INSTALL ROOF SIDE INNER GARNISH RH
- HINT:
-
Use the same procedure as for the LH side.
62552F
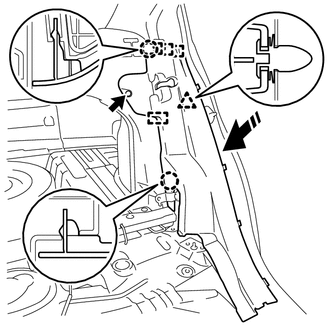
11.INSTALL REAR SEAT SIDE GARNISH LH
|
|
Install in this Direction |
Engage the 4 guides, 2 claws and clip to install the rear seat side garnish LH as shown in the illustration.
for Separate Seat Type:
Install the clip.
62551F
12.INSTALL REAR SEAT SIDE GARNISH RH
- HINT:
-
Use the same procedure as for the LH side.
73370
13.CONNECT REAR SEAT 3 POINT TYPE OUTER BELT ASSEMBLY LH
73360
14.CONNECT REAR SEAT 3 POINT TYPE OUTER BELT ASSEMBLY RH
- HINT:
-
Use the same procedure as for the LH side.
62412B
15.INSTALL CENTER PILLAR UPPER GARNISH LH
62411B
16.INSTALL CENTER PILLAR UPPER GARNISH RH
- HINT:
-
Use the same procedure as for the LH side.
62414A
17.INSTALL CENTER PILLAR LOWER GARNISH LH
62413A
18.INSTALL CENTER PILLAR LOWER GARNISH RH
- HINT:
-
Use the same procedure as for the LH side.
73220
19.CONNECT FRONT SEAT OUTER BELT ASSEMBLY LH
73210
20.CONNECT FRONT SEAT OUTER BELT ASSEMBLY RH
- HINT:
-
Use the same procedure as for the LH side.
62332A
21.INSTALL REAR DOOR OPENING TRIM WEATHERSTRIP LH
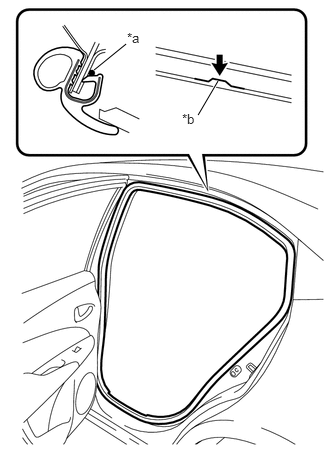
| *a | Paint Mark |
| *b | Flange Position |
Align the paint mark on the rear door opening trim weatherstrip LH with the flange position on the vehicle body and install the rear door opening trim weatherstrip LH.
- Paint Mark:
Area Color RH Side Brown LH Side White
- NOTICE:
-
After installation, check that the corners fit correctly.
62331A
22.INSTALL REAR DOOR OPENING TRIM WEATHERSTRIP RH
- HINT:
-
Use the same procedure as for the LH side.
67918A
23.INSTALL REAR DOOR SCUFF PLATE LH
67917A
24.INSTALL REAR DOOR SCUFF PLATE RH
- HINT:
-
Use the same procedure as for the LH side.
62212
25.INSTALL FRONT PILLAR GARNISH LH (w/ Curtain Shield Airbag)
62211
26.INSTALL FRONT PILLAR GARNISH RH (w/ Curtain Shield Airbag)
- HINT:
-
Use the same procedure as for the LH side.
62212
27.INSTALL FRONT PILLAR GARNISH LH (w/o Curtain Shield Airbag)
62211
28.INSTALL FRONT PILLAR GARNISH RH (w/o Curtain Shield Airbag)
- HINT:
-
Use the same procedure as for the LH side.
62312B
29.INSTALL FRONT DOOR OPENING TRIM WEATHERSTRIP LH
62311B
30.INSTALL FRONT DOOR OPENING TRIM WEATHERSTRIP RH
- HINT:
-
Use the same procedure as for the LH side.
62112
31.INSTALL COWL SIDE TRIM BOARD LH
62111C
32.INSTALL COWL SIDE TRIM BOARD RH
- HINT:
-
Use the same procedure as for the LH side.
67914
33.INSTALL FRONT DOOR SCUFF PLATE LH
67913
34.INSTALL FRONT DOOR SCUFF PLATE RH
- HINT:
-
Use the same procedure as for the LH side.
35.INSTALL REAR SEAT ASSEMBLY (for Fixed Seat Type)
36.INSTALL REAR SEAT ASSEMBLY (for Separate Seat Type)
37.INSTALL FRONT SEAT ASSEMBLY RH