FRONT SUSPENSION FRONT SHOCK ABSORBER INSTALLATION
CAUTION / NOTICE / HINT
- HINT:
- ·
Use the same procedure for the RH and LH sides.
·The procedure listed below is for the LH side.
PROCEDURE

 48158C
1.INSTALL FRONT COIL SPRING LOWER INSULATOR
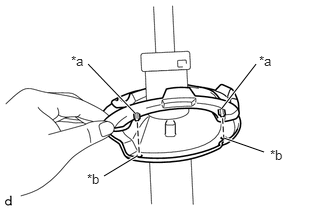
| *a | Positioning Pin |
| *b | Installation Hole |
Install the front coil spring lower insulator to the front shock absorber assembly.
- NOTICE:
-
When installing the front coil spring lower insulator, fit the front coil spring lower insulator to the depression of the front shock absorber assembly and insert the positioning pin into the installation hole.
48520
2.INSTALL FRONT SHOCK ABSORBER ASSEMBLY
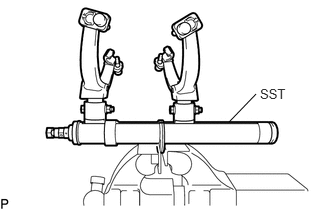
Secure SST in a vise.
- SST
- 09727-30022 (09727-00010, 09727-00022, 09727-00031)
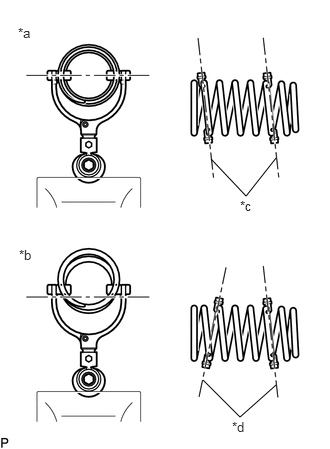
| *a | Correct |
| *b | Incorrect |
| *c | Parallel |
| *d | Not Parallel |
Attach the hooks of each SST arm across the diameter of the front coil spring.
- CAUTION:
- ·
Make sure that the hooks of the upper and lower arms are attached to the front coil spring so that the distance between the hooks is as large as possible.
·Make sure that the arms of SST are parallel and attached to the front coil spring, and the number of front coil springs between the hooks on each side is the same.
·Check that the claws of the hooks are securely attached to the front coil spring.
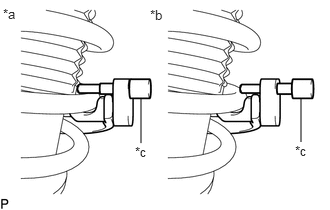
| *a | Correct |
| *b | Incorrect |
| *c | Stopper Pin |
Install the stopper pins to the hooks of SST.
- CAUTION:
-
Make sure that the stopper pins are installed securely.
Using SST, compress the front coil spring.
- CAUTION:
- ·
If the coil spring buckles while using SST, stop immediately and reattach SST correctly.
·Do not compress the coil spring to the point where the coils touch each other.
·Do not use an impact wrench.
·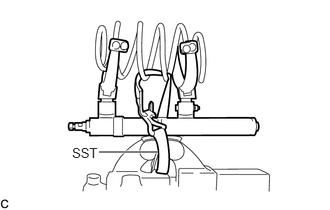 1.031,1.583 1.646,1.583 true 0.75,1.51 1.146,1.677 0.396,0.167 10 false SST
If a stopper pin touches the front coil spring while using SST, remove the stopper pin and continue with the procedure. In this case, installing the coil spring stopper belt as shown in the illustration is recommended.
- SST
- 09727-00110
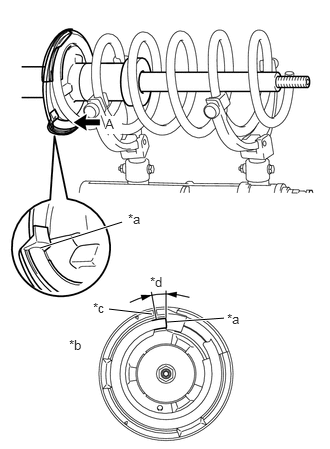
| *a | Lower End |
| *b | View A |
| *c | Convex Portion |
| *d | Installation Allowable Range |
Install the front shock absorber assembly to the front coil spring as shown in the illustration.
- NOTICE:
- ·
Install the front coil spring so that the end with the smaller diameter is facing upward.
·Fit the lower end of the front coil spring into the gap of the absorber lower seat.
48304
3.INSTALL FRONT SPRING BUMPER SUB-ASSEMBLY
Install the front spring bumper sub-assembly to the front shock absorber assembly.
48619A
4.INSTALL STRUT MOUNTING BEARING
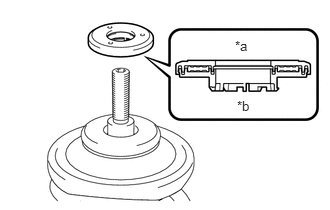
| *a | Upper Side |
| *b | Lower Side |
Install the strut mounting bearing to the front upper coil spring seat.
- NOTICE:
-
Do not install the bearing upside down.
48609
5.INSTALL FRONT SUSPENSION SUPPORT SUB-ASSEMBLY
Install the front suspension support sub-assembly to the front shock absorber assembly.
48609E
6.INSTALL FRONT SUPPORT TO FRONT SHOCK ABSORBER NUT
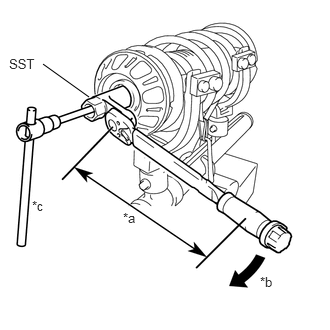
| *a | Torque Wrench Fulcrum Length |
| *b | Turn |
| *c | Hold |
Using SST and a 6 mm hexagon socket wrench, install a new front support to front shock absorber nut to the front shock absorber assembly.
- SST
- 09729-97202
- Torque:
- Specified tightening torque : 55 N*m (561 kgf*cm, 41 ft.*lbf)
- HINT:
- ·
Calculate the torque wrench reading when changing the fulcrum length of the torque wrench.
Click hereGeneral>INTRODUCTION>REPAIR INSTRUCTION>PRECAUTION
·When using SST (fulcrum length of 40 mm (1.57 in.)) + torque wrench (fulcrum length of 180 mm (7.09 in.)): 45 N*m (459 kgf*cm, 33 ft.*lbf)
Remove the front shock absorber with coil spring from SST.
- NOTICE:
-
Do not use an impact wrench. It will damage SST.
48304
7.DISCONNECT FRONT SPRING BUMPER SUB-ASSEMBLY (for TMT Made)
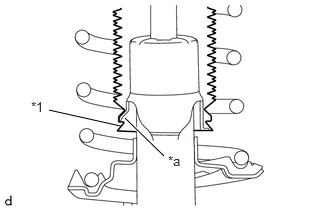
| *1 | Front Spring Bumper |
| *a | Claw |
Disconnect the front spring bumper sub-assembly from the claws of the front shock absorber assembly.
8.TEMPORARILY INSTALL FRONT SHOCK ABSORBER WITH COIL SPRING
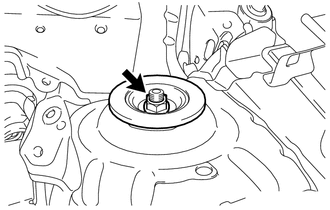
Temporarily install the front shock absorber with coil spring (upper side) and front No. 2 suspension support to the vehicle with a new nut.
Install the front shock absorber with coil spring (lower side) to the steering knuckle with the 2 nuts and 2 bolts.
- Torque:
- 164 N*m (1672 kgf*cm, 121 ft.*lbf)
- HINT:
-
Keep the bolt from rotating while turning the nut.
47313J
9.INSTALL FRONT FLEXIBLE HOSE
48810
10.INSTALL FRONT STABILIZER LINK ASSEMBLY (w/ Side Rail Reinforcement)
Install the front stabilizer link assembly to the front shock absorber with coil spring with the nut.
- Torque:
- 74 N*m (755 kgf*cm, 55 ft.*lbf)
- HINT:
-
If the ball joint turns together with the nut, use a 6 mm hexagon socket wrench to hold the stud bolt.
11.INSTALL FRONT WHEEL
- Torque:
- 103 N*m (1050 kgf*cm, 76 ft.*lbf)
12.TIGHTEN FRONT SHOCK ABSORBER WITH COIL SPRING
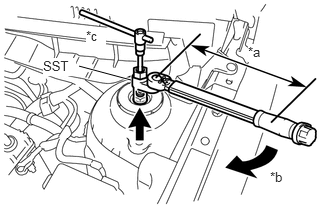
| *a | Torque Wrench Fulcrum Length |
| *b | Turn |
| *c | Hold |
Using SST and a 6 mm hexagon socket wrench, hold the shock absorber rod in place and tighten the nut.
- SST
- 09729-97202
- Torque:
- Specified tightening torque : 55 N*m (561 kgf*cm, 41 ft.*lbf)
- HINT:
- ·
Calculate the torque wrench reading when changing the fulcrum length of the torque wrench.
Click hereGeneral>INTRODUCTION>REPAIR INSTRUCTION>PRECAUTION
·When using SST (fulcrum length of 40 mm (1.57 in.)) + torque wrench (fulcrum length of 180 mm (7.09 in.)): 45 N*m (459 kgf*cm, 33 ft.*lbf)
13.INSTALL WINDSHIELD WIPER MOTOR AND LINK
14.INSPECT AND ADJUST FRONT WHEEL ALIGNMENT