K411 CVT SHIFT LEVER(for TMT Made) INSTALLATION
PROCEDURE

 33550
1.INSTALL TRANSMISSION FLOOR SHIFT ASSEMBLY
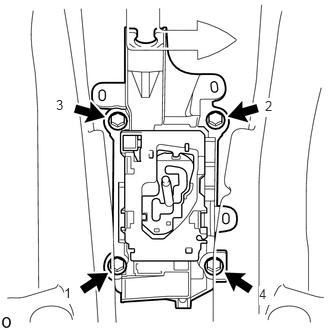
Temporarily install the transmission floor shift assembly to the body with the 4 bolts.
Fully tighten the 4 bolts in the order shown in the illustration.
- Torque:
- 12 N*m (122 kgf*cm, 9 ft.*lbf)
for LHD:
Engage the 4 clamps to install the wire harness to the transmission floor shift assembly.
for RHD:
Engage the 3 clamps to install the wire harness to the transmission floor shift assembly.
Connect the 2 connectors to the transmission floor shift assembly.
33820B
2.CONNECT TRANSMISSION CONTROL CABLE ASSEMBLY
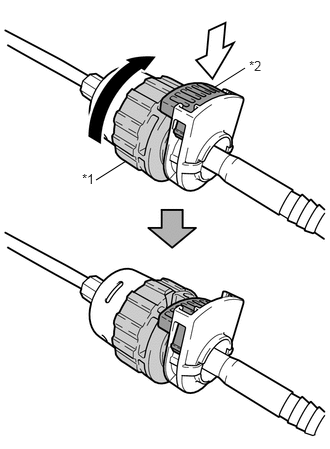
| *1 | Nut |
| *2 | Lock |

|
Rotate approximately 180° |

|
Push in |
Rotate the nut of the transmission control cable assembly approximately 180° in the direction shown in the illustration, and while holding the nut, push in the lock.
- NOTICE:
-
Rotating the nut too much will damage the internal spring, and the transmission control cable assembly will not be reusable. Do not turn the nut too far.
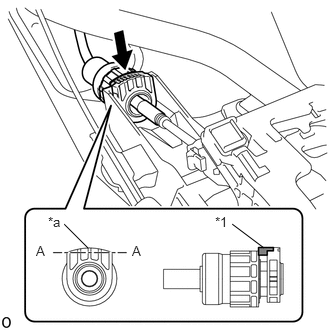
| *1 | Lock |
| *a | Protrusion |
|
|
Push in |
Install the transmission control cable assembly to the transmission floor shift assembly.
- NOTICE:
- ·
Install the transmission control cable assembly with the protrusion facing upwards.
·After installation, make sure that the lock is projecting from A as shown in the illustration.
·Make sure that the transmission control cable assembly is securely locked.
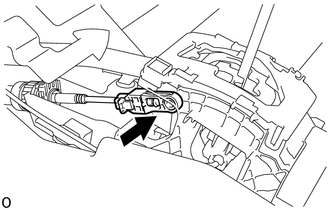
Confirm that the shift lever is in N, and then connect the end of the transmission control cable assembly to the transmission floor shift assembly.
- NOTICE:
- ·
Securely install the end of the transmission control cable assembly to the transmission floor shift assembly.
·Install the end of the transmission control cable assembly so that its adjustment lock section is on the driver side.
3.ADJUST SHIFT LEVER POSITION
4.INSPECT SHIFT LEVER POSITION
58810J
5.INSTALL CONSOLE BOX ASSEMBLY
58839A
6.INSTALL CONSOLE BOX HOLE COVER
58916
7.INSTALL BOX BOTTOM MAT
58912C
8.INSTALL NO. 2 BOX SIDE PANEL
58911A
9.INSTALL NO. 1 BOX SIDE PANEL
58817A
10.INSTALL NO. 2 FRONT CONSOLE BOX INSERT
58816D
11.INSTALL NO. 1 FRONT CONSOLE BOX INSERT
for LHD:
Click hereVehicle Interior>INTERIOR PANELS / TRIM>UPPER INSTRUMENT PANEL>INSTALLATION
for RHD:
Click hereVehicle Interior>INTERIOR PANELS / TRIM>LOWER INSTRUMENT PANEL>INSTALLATION
58910C
12.INSTALL REAR CONSOLE BOX ASSEMBLY