HEATING / AIR CONDITIONING FRONT BLOWER MOTOR(for TMMIN Made) REMOVAL
PROCEDURE

 55412D
1.REMOVE CENTER INSTRUMENT CLUSTER FINISH PANEL (w/ Radio Receiver)
55412D
2.REMOVE CENTER INSTRUMENT CLUSTER FINISH PANEL (w/o Radio Receiver)
3.REMOVE RADIO RECEIVER ASSEMBLY WITH BRACKET (w/ Radio Receiver)
4.REMOVE RADIO TUNER OPENING COVER WITH BRACKET (w/o Radio Receiver)
55606
5.REMOVE NO. 1 INSTRUMENT PANEL UNDER COVER SUB-ASSEMBLY
55432B
6.REMOVE LOWER INSTRUMENT PANEL FINISH PANEL
55411G
7.REMOVE NO. 1 INSTRUMENT CLUSTER FINISH PANEL
8.REMOVE UPPER CENTER INSTRUMENT CLUSTER FINISH PANEL
55474C
9.REMOVE NO. 1 INSTRUMENT CLUSTER FINISH PANEL GARNISH
55650
10.REMOVE NO. 1 INSTRUMENT PANEL REGISTER ASSEMBLY
55410C
11.REMOVE INSTRUMENT CLUSTER FINISH PANEL ASSEMBLY
55550
12.REMOVE GLOVE COMPARTMENT DOOR ASSEMBLY
55900
13.REMOVE AIR CONDITIONING CONTROL ASSEMBLY (for Automatic Air Conditioning System)
55902C
14.REMOVE AIR CONDITIONING PANEL SUB-ASSEMBLY (for Manual Air Conditioning System)
55604B
15.REMOVE INSTRUMENT PANEL CUP HOLDER SUB-ASSEMBLY
55475A
16.REMOVE NO. 2 INSTRUMENT CLUSTER FINISH PANEL GARNISH
58910C
17.REMOVE REAR CONSOLE BOX ASSEMBLY (for Separate Type)
58910C
18.REMOVE REAR CONSOLE BOX ASSEMBLY (for Integrated Type)
55434B
19.REMOVE NO. 2 LOWER CENTER INSTRUMENT PANEL FINISH PANEL
55306A
20.REMOVE NO. 1 INSTRUMENT PANEL BRACE SUB-ASSEMBLY
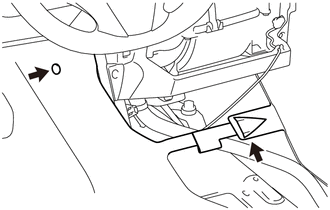
Disengage the front floor cappet assembly, as shown in the illustration.
Remove the clip and peel back the front floor carpet assembly.
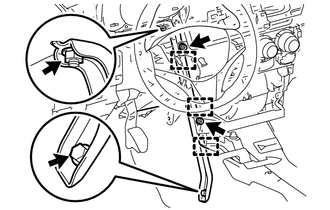
Disengage the 3 clamps.
Remove the bolt, nut and 2 screws.
Remove the No. 1 instrument panel brace sub-assembly.
87103B
21.REMOVE BLOWER MOTOR WITH FAN SUB-ASSEMBLY
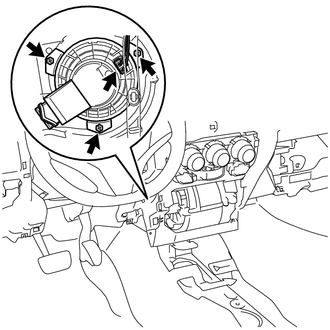
Disconnect the connector.
Remove the 3 screws and blower motor with fan sub-assembly.
- NOTICE:
-
Do not apply excessive force to the instrument panel wire.