THEFT DETERRENT / KEYLESS ENTRY THEFT DETERRENT SYSTEM Theft Deterrent System cannot be Set or Unset
DESCRIPTION
When the ignition switch is turned off and all doors, the luggage compartment door*1, and the engine hood are closed, the theft deterrent system is set when doors are locked by wireless operation or entry operation*2. If all doors are closed but the luggage compartment door*1 or engine hood is open when doors are locked by wireless operation or the entry operation, the theft deterrent system will be set when the luggage compartment door*1 or engine hood is closed. Also, when the ignition switch is turned on (IG) and the engine is run continuously for 2 seconds or more, or when the doors are unlocked by wireless operation or entry operation*2, the theft deterrent system is unset.
*1: for Sedan
*2: w/ Smart Entry and Start System
WIRING DIAGRAM
Refer to "System Diagram".
Click hereVehicle Interior>THEFT DETERRENT / KEYLESS ENTRY>THEFT DETERRENT SYSTEM>SYSTEM DIAGRAM
CAUTION / NOTICE / HINT
- NOTICE:
-
Inspect the fuses for circuits related to this system before performing the following procedure.
PROCEDURE
Check the wireless door lock control operation using the electrical key transmitter sub-assembly.
- Result:
Result Proceed to OK A NG (w/ Smart Entry and Start System) B NG (w/o Smart Entry and Start System) C
A
B
C
Open the driver side window.
Set the theft deterrent system.
Close all doors, luggage compartment door*1 and the engine hood.
*1: for Sedan
Lock the doors using wireless operation or entry operation*1.
*1: w/ Smart Entry and Start System
Wait for 30 seconds or more.
Unlock the driver door using the door lock knob.
Open the driver door and activate the theft deterrent system.
- Result:
Result Proceed to Theft deterrent system does not operate A Theft deterrent system operates B
A
B
Disconnect the driver side junction block assembly connector.
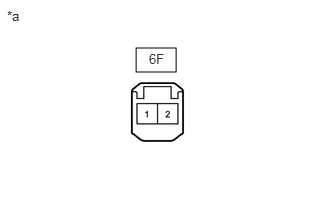
| *a | Front view of wire harness connector
(to Driver Side Junction Block Assembly) |
Measure the voltage according to the value(s) in the table below.
- Standard Voltage:
Tester Connection Switch Condition Specified Condition 6F-1 - Body ground Ignition switch ON 11 to 14 V 6F-1 - Body ground Ignition switch off Below 1 V
- Result:
Proceed to OK NG
OK
NG
Remove the body computer.
Click herePower Source / Network>POWER DISTRIBUTION>MAIN BODY ECU>REMOVAL
Disconnect the driver side junction block assembly connector.
Measure the resistance according to the value(s) in the table below.
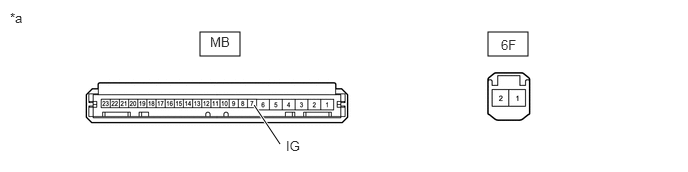
| *a | Component without harness connected
(Driver Side Junction Block Assembly) |
- | - |
- Standard Resistance:
Tester Connection Condition Specified Condition 6F-1 - MB-7 (IG) Always Below 1 Ω
- Result:
Result Proceed to OK A NG (w/ Door Control Battery) B NG (w/o Door Control Battery) C
A
B
C
Remove the driver side junction block assembly with connectors still connected.
Click herePower Source / Network>POWER DISTRIBUTION>MAIN BODY ECU>REMOVAL
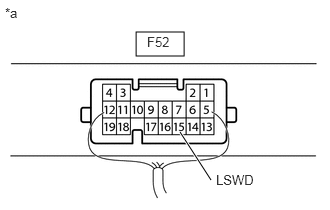
| *a | Component with harness connected
(Body Computer) |
Measure the voltage and check for pulse according to the value(s) in the table below.
- Standard Voltage:
Tester Connection Condition Specified Condition F52-15 (LSWD) - Body ground Driver side door unlocked Below 1 V F52-15 (LSWD) - Body ground Driver side door locked Pulse generation
- Result:
Result Proceed to OK A NG (for LHD) B NG (for RHD) C
A
B
C
Remove the driver side junction block assembly with connectors still connected.
Click herePower Source / Network>POWER DISTRIBUTION>MAIN BODY ECU>REMOVAL
Measure the voltage and check for pulses according to the value(s) in the table below.
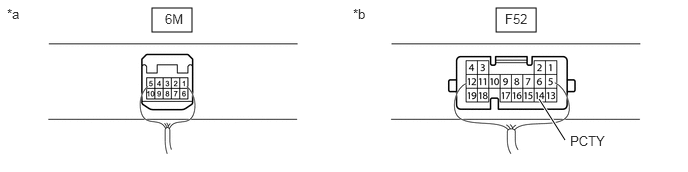
| *a | Component with harness connected
(Driver Side Junction Block Assembly) |
*b | Component with harness connected
(Body Computer) |
- Standard Voltage:
Tester Connection Condition Specified Condition 6M-2 - Body ground Driver side door open Below 1 V 6M-2 - Body ground Driver side door closed Pulse generation F52-14 (PCTY) - Body ground Passenger side door open Below 1 V F52-14 (PCTY) - Body ground Passenger side door closed Pulse generation F52-14 (PCTY) - Body ground Rear door LH open Below 1 V F52-14 (PCTY) - Body ground Rear door LH closed Pulse generation F52-14 (PCTY) - Body ground Rear door RH open Below 1 V F52-14 (PCTY) - Body ground Rear door RH closed Pulse generation
- Result:
Result Proceed to OK (for Sedan) A OK (for Hatchback) B NG (for Driver side door) C NG (for Any doors other than driver side door) D
A
B
C
D
Remove the driver side junction block assembly with connectors still connected.
Click herePower Source / Network>POWER DISTRIBUTION>MAIN BODY ECU>REMOVAL
Measure the voltage and check for pulses according to the value(s) in the table below.
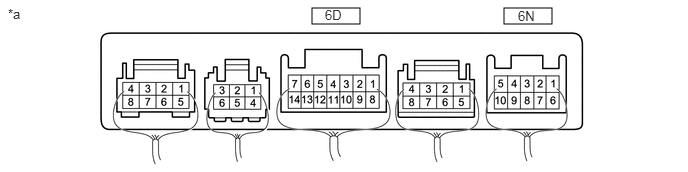
| *a | Component with harness connected
(Driver Side Junction Block Assembly) |
- | - |
- Standard Voltage:
Tester Connection Condition Specified Condition 6D-11 - Body ground Engine hood open Below 1 V 6D-11 - Body ground Engine hood closed Pulse generation 6N-1 - Body ground Luggage compartment door open Below 1 V 6N-1 - Body ground Luggage compartment door closed Pulse generation
- Result:
Result Proceed to OK A NG (Engine hood) B NG (Luggage compartment door) C
A
B
C
Remove the hood lock assembly.
Click hereVehicle Interior>THEFT DETERRENT / KEYLESS ENTRY>ENGINE HOOD COURTESY SWITCH>REMOVAL
Inspect the hood lock assembly.
Click hereVehicle Interior>THEFT DETERRENT / KEYLESS ENTRY>ENGINE HOOD COURTESY SWITCH>INSPECTION
- Result:
Proceed to OK NG
OK
NG
Disconnect the A29 hood lock assembly connector.
Disconnect the 6D driver side junction block assembly connector.
Measure the resistance according to the value(s) in the table below.
- Standard Resistance:
Tester Connection Condition Specified Condition A29-1 - 6D-11 Always Below 1 Ω A29-2 - Body ground Always Below 1 Ω A29-1 or 6D-11 - Body ground Always 10 kΩ or higher
- Result:
Proceed to OK NG
OK
NG
Remove the body computer.
Click herePower Source / Network>POWER DISTRIBUTION>MAIN BODY ECU>REMOVAL
Disconnect the driver side junction block assembly connector.
Measure the resistance according to the value(s) in the table below.
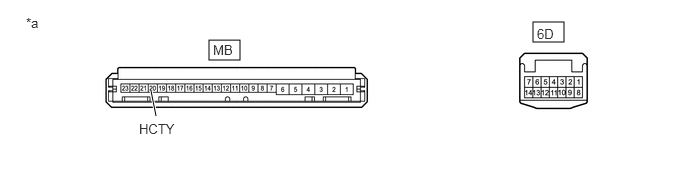
| *a | Component without harness connected
(Driver Side Junction Block Assembly) |
- | - |
- Standard Resistance:
Tester Connection Condition Specified Condition 6D-11 - MB-20 (HCTY) Always Below 1 Ω
- Result:
Proceed to OK NG
OK
NG
Remove the luggage compartment door lock assembly.
Click hereVehicle Interior>LIGHTING (INT)>BACK DOOR COURTESY SWITCH(for Sedan)>REMOVAL
Inspect the luggage compartment door lock assembly.
Click hereVehicle Interior>LIGHTING (INT)>BACK DOOR COURTESY SWITCH(for Sedan)>INSPECTION
- Result:
Proceed to OK NG
OK
NG
Disconnect the L5 luggage compartment door lock assembly connector.
Disconnect the 6N driver side junction block assembly connector.
Measure the resistance according to the value(s) in the table below.
- Standard Resistance:
Tester Connection Condition Specified Condition L5-3 (D+) - 6N-1 Always Below 1 Ω L5-2 (ACT-) - Body ground Always Below 1 Ω L5-3 (D+) or 6N-1 - Body ground Always 10 kΩ or higher
- Result:
Proceed to OK NG
OK
NG
Remove the body computer.
Click herePower Source / Network>POWER DISTRIBUTION>MAIN BODY ECU>REMOVAL
Disconnect the driver side junction block assembly connector.
Measure the resistance according to the value(s) in the table below.
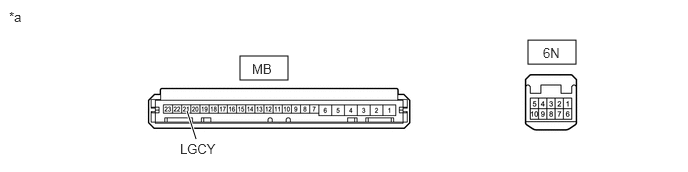
| *a | Component without harness connected
(Driver Side Junction Block Assembly) |
- | - |
- Standard Resistance:
Tester Connection Condition Specified Condition 6N-1 - MB-21 (LGCY) Always Below 1 Ω
- Result:
Proceed to OK NG
OK
NG
Remove the driver side junction block assembly with connectors still connected.
Click herePower Source / Network>POWER DISTRIBUTION>MAIN BODY ECU>REMOVAL
Measure the voltage and check for pulses according to the value(s) in the table below.
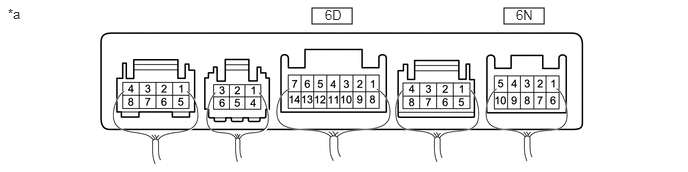
| *a | Component with harness connected
(Driver Side Junction Block Assembly) |
- | - |
- Standard Voltage:
Tester Connection Condition Specified Condition 6D-11 - Body ground Engine hood open Below 1 V 6D-11 - Body ground Engine hood closed Pulse generation 6N-1 - Body ground Back door open Below 1 V 6N-1 - Body ground Back door closed Pulse generation
- Result:
Result Proceed to OK A NG (Engine hood) B NG (Back door) C
A
B
C
Remove the hood lock assembly.
Click hereVehicle Interior>THEFT DETERRENT / KEYLESS ENTRY>ENGINE HOOD COURTESY SWITCH>REMOVAL
Inspect the hood lock assembly.
Click hereVehicle Interior>THEFT DETERRENT / KEYLESS ENTRY>ENGINE HOOD COURTESY SWITCH>INSPECTION
- Result:
Proceed to OK NG
OK
NG
Disconnect the A29 hood lock assembly connector.
Disconnect the 6D driver side junction block assembly connector.
Measure the resistance according to the value(s) in the table below.
- Standard Resistance:
Tester Connection Condition Specified Condition A29-1 - 6D-11 Always Below 1 Ω A29-2 - Body ground Always Below 1 Ω A29-1 or 6D-11 - Body ground Always 10 kΩ or higher
- Result:
Proceed to OK NG
OK
NG
Remove the body computer.
Click herePower Source / Network>POWER DISTRIBUTION>MAIN BODY ECU>REMOVAL
Disconnect the driver side junction block assembly connector.
Measure the resistance according to the value(s) in the table below.
| *a | Component without harness connected
(Driver Side Junction Block Assembly) |
- | - |
- Standard Resistance:
Tester Connection Condition Specified Condition 6D-11 - MB-20 (HCTY) Always Below 1 Ω
- Result:
Proceed to OK NG
OK
NG
Remove the back door lock assembly.
Click hereVehicle Interior>LIGHTING (INT)>BACK DOOR COURTESY SWITCH(for Hatchback)>REMOVAL
Inspect the back door lock assembly.
Click hereVehicle Interior>LIGHTING (INT)>BACK DOOR COURTESY SWITCH(for Hatchback)>INSPECTION
- Result:
Proceed to OK NG
OK
NG
Disconnect the R2 back door courtesy light switch (back door lock assembly) connector.
Disconnect the 6N driver side junction block assembly connector.
Measure the resistance according to the value(s) in the table below.
- Standard Resistance:
Tester Connection Condition Specified Condition R2-3 (D+) - 6N-1 Always Below 1 Ω R2-2 (ACT-) - Body ground Always Below 1 Ω R2-3 (D+) or 6N-1 - Body ground Always 10 kΩ or higher
- Result:
Proceed to OK NG
OK
NG
Remove the body computer.
Click herePower Source / Network>POWER DISTRIBUTION>MAIN BODY ECU>REMOVAL
Disconnect the driver side junction block assembly connector.
Measure the resistance according to the value(s) in the table below.
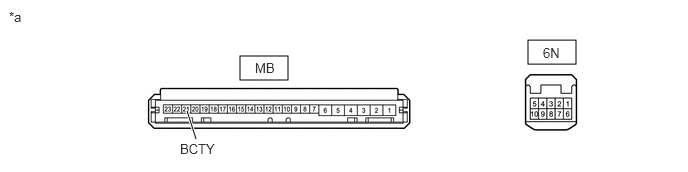
| *a | Component without harness connected
(Driver Side Junction Block Assembly) |
- | - |
- Standard Resistance:
Tester Connection Condition Specified Condition 6N-1 - MB-21 (BCTY) Always Below 1 Ω
- Result:
Proceed to OK NG
OK
NG
Remove the front door courtesy light switch assembly LH.
Click hereVehicle Interior>LIGHTING (INT)>FRONT DOOR COURTESY SWITCH>REMOVAL
Inspect the front door courtesy light switch assembly LH.
Click hereVehicle Interior>LIGHTING (INT)>FRONT DOOR COURTESY SWITCH>INSPECTION
- Result:
Result Proceed to OK (for LHD) A OK (for RHD) B NG (for LHD) C NG (for RHD) D
A
B
C
D
Disconnect the F31 front door courtesy light switch assembly LH connector.
Disconnect the 6M driver side junction block assembly connector.
Measure the resistance according to the value(s) in the table below.
- Standard Resistance:
Tester Connection Condition Specified Condition F31-1 - 6M-2 Always Below 1 Ω F31-1 or 6M-2 - Body ground Always 10 kΩ or higher
- Result:
Proceed to OK NG
OK
NG
Remove the body computer.
Click herePower Source / Network>POWER DISTRIBUTION>MAIN BODY ECU>REMOVAL
Disconnect the driver side junction block assembly connector.
Measure the resistance according to the value(s) in the table below.
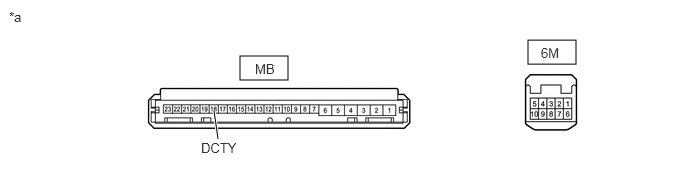
| *a | Component without harness connected
(Driver Side Junction Block Assembly) |
- | - |
- Standard Resistance:
Tester Connection Condition Specified Condition 6M-2 - MB-18 (DCTY) Always Below 1 Ω 6M-4 - MB-18 (DCTY) Always Below 1 Ω
- Result:
Proceed to OK NG
OK
NG
Disconnect the F32 front door courtesy light switch assembly RH connector.
Disconnect the 6M driver side junction block assembly connector.
Measure the resistance according to the value(s) in the table below.
- Standard Resistance:
Tester Connection Condition Specified Condition F32-1 - 6M-2 Always Below 1 Ω F32-1 or 6M-2 - Body ground Always 10 kΩ or higher
- Result:
Proceed to OK NG
OK
NG
Remove the body computer.
Click herePower Source / Network>POWER DISTRIBUTION>MAIN BODY ECU>REMOVAL
Disconnect the driver side junction block assembly connector.
Measure the resistance according to the value(s) in the table below.
| *a | Component without harness connected
(Driver Side Junction Block Assembly) |
- | - |
- Standard Resistance:
Tester Connection Condition Specified Condition 6M-2 - MB-18 (DCTY) Always Below 1 Ω 6M-4 - MB-18 (DCTY) Always Below 1 Ω
- Result:
Proceed to OK NG
OK
NG
Connect the GTS to the DLC3.
Turn the ignition switch to ON.
Turn the GTS on.
Enter the following menus: Body Electrical / Combination Meter / Data List.
According to the display on the GTS, read the Data List.
- Body Electrical > Combination Meter > Data List
-
Tester Display Measurement Item Range Normal Condition Diagnostic Note Passenger Side Door Front door courtesy switch signal (passenger side) CLOSE or OPEN CLOSE: Passenger side door is closed
OPEN: Passenger side door is opened- Rear Left Side Door Rear door courtesy switch signal (LH side) CLOSE or OPEN CLOSE: Rear LH door is closed
OPEN: Rear LH door is opened- Rear Right Side Door Rear door courtesy switch signal (RH side) CLOSE or OPEN CLOSE: Rear RH door is closed
OPEN: Rear RH door is opened-
- Body Electrical > Combination Meter > Data List
-
Tester Display Passenger Side Door Rear Left Side Door Rear Right Side Door - 50003 122 156,157,158
- Result:
Result Proceed to OK A NG (Passenger side door) B NG (Rear door LH) C NG (Rear door RH) D
A
B
C
D
Disconnect the F38 combination meter assembly connector.
Disconnect the F52 body computer connector.
Measure the resistance according to the value(s) in the table below.
- Standard Resistance:
Tester Connection Condition Specified Condition F38-29 (ACTY) - F52-14 (PCTY) Always Below 1 Ω F38-29 (ACTY) or F52-14 (PCTY) - Body ground Always 10 kΩ or higher
- Result:
Proceed to OK NG
OK
NG
Remove the front door courtesy light switch assembly RH.
Click hereVehicle Interior>LIGHTING (INT)>FRONT DOOR COURTESY SWITCH>REMOVAL
Inspect the front door courtesy light switch assembly RH.
Click hereVehicle Interior>LIGHTING (INT)>FRONT DOOR COURTESY SWITCH>INSPECTION
- Result:
Result Proceed to OK (for LHD) A OK (for RHD) B NG (for LHD) C NG (for RHD) D
A
B
C
D
Disconnect the F32 front door courtesy light switch assembly RH connector.
Disconnect the 6M driver side junction block assembly connector.
Measure the resistance according to the value(s) in the table below.
- Standard Resistance:
Tester Connection Condition Specified Condition F32-1 - 6M-2 Always Below 1 Ω F32-1 or 6M-2 - Body ground Always 10 kΩ or higher
- Result:
Proceed to OK NG
OK
NG
Disconnect the F31 front door courtesy light switch assembly LH connector.
Disconnect the 6M driver side junction block assembly connector.
Measure the resistance according to the value(s) in the table below.
- Standard Resistance:
Tester Connection Condition Specified Condition F31-1 - 6M-2 Always Below 1 Ω F31-1 or 6M-2 - Body ground Always 10 kΩ or higher
- Result:
Proceed to OK NG
OK
NG
Remove the rear door courtesy light switch assembly LH.
Click hereVehicle Interior>LIGHTING (INT)>REAR DOOR COURTESY SWITCH>REMOVAL
Inspect the rear door courtesy light switch assembly LH.
Click hereVehicle Interior>LIGHTING (INT)>REAR DOOR COURTESY SWITCH>INSPECTION
- Result:
Proceed to OK NG
OK
NG
Disconnect the F33 rear door courtesy light switch assembly LH connector.
Disconnect the F38 combination meter assembly connector.
Measure the resistance according to the value(s) in the table below.
- Standard Resistance:
Tester Connection Condition Specified Condition F33-1 - F38-32 (RLCY) Always Below 1 Ω F33-1 or F38-32 (RLCY) - Body ground Always 10 kΩ or higher
- Result:
Proceed to OK NG
OK
NG
Remove the rear door courtesy light switch assembly RH.
Click hereVehicle Interior>LIGHTING (INT)>REAR DOOR COURTESY SWITCH>REMOVAL
Inspect the rear door courtesy light switch assembly RH.
Click hereVehicle Interior>LIGHTING (INT)>REAR DOOR COURTESY SWITCH>INSPECTION
- Result:
Proceed to OK NG
OK
NG
Disconnect the F34 rear door courtesy light switch assembly RH connector.
Disconnect the F38 combination meter assembly connector.
Measure the resistance according to the value(s) in the table below.
- Standard Resistance:
Tester Connection Condition Specified Condition F34-1 - F38-33 (RRCY) Always Below 1 Ω F34-1 or F38-33 (RRCY) - Body ground Always 10 kΩ or higher
- Result:
Proceed to OK NG
OK
NG
Remove the front door lock assembly LH.
Click hereVehicle Interior>DOOR LOCK>FRONT DOOR LOCK>REMOVAL
Inspect the front door lock assembly LH.
Click hereVehicle Interior>DOOR LOCK>FRONT DOOR LOCK>INSPECTION
- Result:
Proceed to OK NG
OK
NG
Disconnect the H3 front door lock assembly LH connector.
Disconnect the F52 body computer connector.
Measure the resistance according to the value(s) in the table below.
- Standard Resistance:
Tester Connection Condition Specified Condition H3-8 (LSSR) - F52-15 (LSWD) Always Below 1 Ω H3-7 (E) - Body ground Always Below 1 Ω H3-8 (LSSR) or F52-15 (LSWD) - Body ground Always 10 kΩ or higher
- Result:
Proceed to OK NG
OK
NG
Remove the front door lock assembly RH.
Click hereVehicle Interior>DOOR LOCK>FRONT DOOR LOCK>REMOVAL
Inspect the front door lock assembly RH.
Click hereVehicle Interior>DOOR LOCK>FRONT DOOR LOCK>INSPECTION
- Result:
Proceed to OK NG
OK
NG
Disconnect the G2 front door lock assembly RH connector.
Disconnect the F52 body computer connector.
Measure the resistance according to the value(s) in the table below.
- Standard Resistance:
Tester Connection Condition Specified Condition G2-7 (LSSR) - F52-15 (LSWD) Always Below 1 Ω G2-8 (E) - Body ground Always Below 1 Ω G2-8 or F52-15 (LSWD) - Body ground Always 10 kΩ or higher
- Result:
Proceed to OK NG
OK
NG