1KR-FE INTAKE / EXHAUST EXHAUST MANIFOLD INSTALLATION
PROCEDURE

 25628B
1.INSTALL INLET EGR GASKET
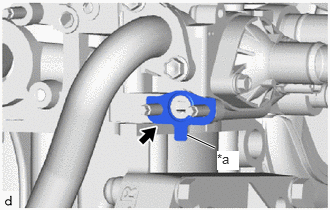
| *a | Protrusion |
Install a new inlet EGR gasket to the cylinder head sub-assembly.
- HINT:
-
Install the inlet EGR gasket so its protrusion is facing the bottom of the engine.
17173
2.INSTALL EXHAUST MANIFOLD TO HEAD GASKET
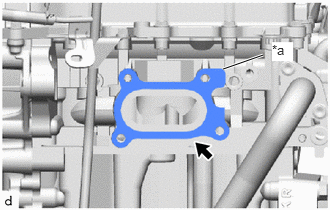
| *a | Protrusion |
Install a new exhaust manifold to head gasket to the cylinder head sub-assembly.
- HINT:
-
Install the exhaust manifold to head gasket so its protrusion is facing the rear of the engine.
25587
3.INSTALL NO. 2 MANIFOLD CONVERTER INSULATOR
Install the No. 2 manifold converter insulator to the exhaust manifold with the 2 bolts.
- Torque:
- 8.5 N*m (87 kgf*cm, 75 in.*lbf)
25586
4.INSTALL NO. 1 MANIFOLD CONVERTER INSULATOR
Install the No. 1 manifold converter insulator to the exhaust manifold with the 3 bolts.
- Torque:
- 8.5 N*m (87 kgf*cm, 75 in.*lbf)
17140A
5.INSTALL EXHAUST MANIFOLD
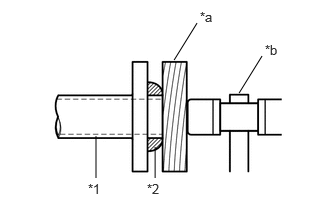
| *1 | Exhaust Manifold |
| *2 | Exhaust Pipe Gasket |
| *a | Wooden Block |
| *b | Plastic Hammer |
Using a plastic hammer and a wooden block, tap in a new exhaust pipe gasket until its surface is flush with the exhaust manifold.
- NOTICE:
- ·
Install the exhaust pipe gasket in the correct direction.
·Do not reuse the exhaust pipe gasket.
·Do not damage the exhaust pipe gasket by dropping it, etc.
·Do not damage the outer surface of the exhaust pipe gasket.
·Do not push in the exhaust pipe gasket with the front exhaust pipe assembly when connecting it.
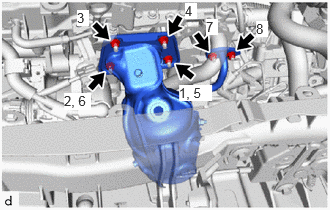
Temporarily install the exhaust manifold to the cylinder head sub-assembly with the 6 nuts.
Tighten the 6 nuts in the order shown in the illustration.
- Torque:
- 25 N*m (255 kgf*cm, 18 ft.*lbf)
17118
6.INSTALL MANIFOLD STAY
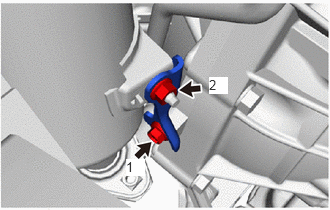
Temporarily install the manifold stay to the exhaust manifold and cylinder block sub-assembly with the bolt and nut.
Tighten the bolt and nut in the order shown in the illustration.
- Torque:
- 24 N*m (245 kgf*cm, 18 ft.*lbf)
25706B
7.INSTALL NO. 1 VACUUM TRANSMITTING PIPE SUB-ASSEMBLY (w/ Differential Pressure Sensor)
Temporarily install a new No. 1 vacuum transmitting pipe sub-assembly to the exhaust manifold with the bolt.
- NOTICE:
-
Do not reuse the No. 1 vacuum transmitting pipe sub-assembly.
Using a 17 mm union nut wrench, tighten the No. 1 pipe.
- Torque:
- 48 N*m (489 kgf*cm, 35 ft.*lbf)
- HINT:
- ·
Calculate the torque wrench reading when changing the fulcrum length of the torque wrench.
Click hereGeneral>INTRODUCTION>REPAIR INSTRUCTION>PRECAUTION
·When using a 17 mm union nut wrench (fulcrum length of 30 mm (1.18 in.)) + torque wrench (fulcrum length of 180 mm (7.09 in.)): 48 N*m (489 kgf*cm, 35 ft.*lbf)
Tighten the bolt.
- Torque:
- 10 N*m (102 kgf*cm, 7 ft.*lbf)
25760
8.CONNECT VACUUM TRANSMITTING HOSE ASSEMBLY (w/ Differential Pressure Sensor)
82715W
9.INSTALL WIRING HARNESS CLAMP BRACKET
Install the wiring harness clamp bracket to the cylinder head sub-assembly with the bolt and engage the clamp.
- Torque:
- 13 N*m (133 kgf*cm, 10 ft.*lbf)
89465
10.INSTALL HEATED OXYGEN SENSOR
17410
11.INSTALL FRONT EXHAUST PIPE ASSEMBLY
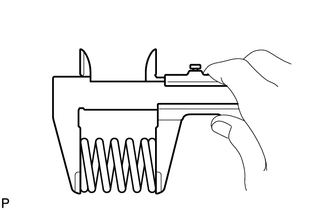
Inspect the free length.
- Free Length of Compression Spring:
Standard Length Minimum Length 43 mm (1.69 in.) 41.5 mm (1.63 in.)
Using a vernier caliper, measure the free length of the compression spring.
If the length is not as specified, replace the compression spring.
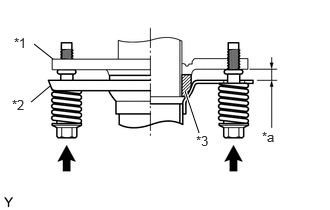
| *1 | Exhaust Manifold |
| *2 | Front Exhaust Pipe Assembly |
| *3 | Exhaust Pipe Gasket |
| *a | Space between flanges: 8.5 mm (0.335 in.) |
Install the front exhaust pipe assembly to the exhaust manifold with the 2 compression springs and 2 bolts.
- Torque:
- 43 N*m (438 kgf*cm, 32 ft.*lbf)
- NOTICE:
-
After the installation, check that the gaps between the flanges of the exhaust manifold and front exhaust pipe assembly are consistent front-to-rear and left-to-right.
Engage the 3 clamps to connect the No. 2 heated oxygen sensor wire to the fan shroud.
Connect the No. 2 heated oxygen sensor connector.
12.INSPECT FOR EXHAUST GAS LEAK