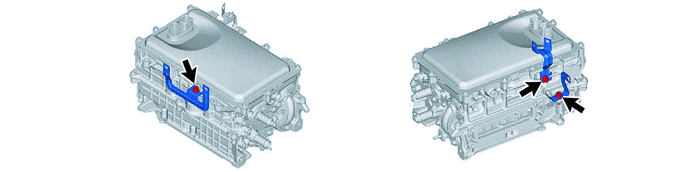
HYBRID / BATTERY CONTROL INVERTER WITH CONVERTER REMOVAL
CAUTION / NOTICE / HINT
The necessary procedures (adjustment, calibration, initialization, or registration) that must be performed after parts are removed and installed, or replaced during inverter with converter assembly removal/installation are shown below.
| Replaced Part or Performed Procedure | Necessary Procedures | Effect/Inoperative Function when Necessary Procedure not Performed | Link |
|---|---|---|---|
| Auxiliary battery terminal is disconnected/reconnected | Memorize steering angle neutral point | Parking assist monitor system | ( ) |
| Replacement of inverter with converter assembly | Resolver learning | ·
DTCs are stored ·
Slight vibration at a vehicle speed of 5 km/h (3 mph) or less ·
Shock or vibration during acceleration |
()
|
- CAUTION:
- ·
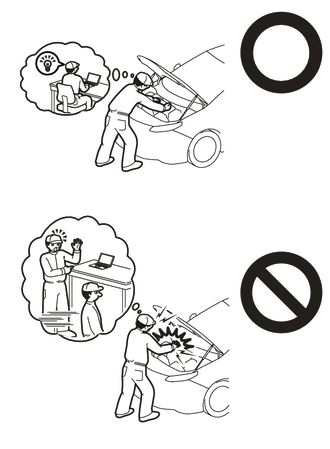
Orange wire harnesses and connectors indicate high-voltage circuits. To prevent electric shock, always follow the procedure described in the repair manual.
Click hereEngine / Hybrid System>HYBRID / BATTERY CONTROL>HYBRID CONTROL SYSTEM>PRECAUTION
·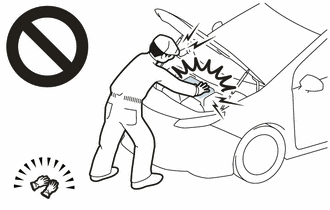
To prevent electric shock, wear insulated gloves when working on wire harnesses and components of the high voltage system.
- HINT:
- ·
When the cable is disconnected / reconnected to the auxiliary battery terminal, systems temporarily stop operating. However, each system has a function that completes learning the first time the system is used.
·Learning completes when vehicle is driven
Effect/Inoperative Function When Necessary Procedures are not Performed Necessary Procedures Link Lane tracing assist system Drive the vehicle straight ahead at 35 km/h (22 mph) or more for 5 seconds or more. ( )
Pre-collision system
·Learning completes when vehicle is operated normally
Effect/Inoperative Function When Necessary Procedures are not Performed Necessary Procedures Link Power door lock control system
·Back door opener
Perform door unlock operation with door control switch or electrical key transmitter sub-assembly switch. ( )
Air conditioning system After the ignition switch is turned to ON, the servo motor standard position is recognized. -
PROCEDURE

 1. PRECAUTION
- NOTICE:
-
After turning the ignition switch off, waiting time may be required before disconnecting the cable from the negative (-) auxiliary battery terminal.
-
Click hereGeneral>SETUP>WHEN DISCONNECTING OR RECONNECTING BATTERY TERMINAL>BEFORE DISCONNECTING BATTERY
G3834
2.REMOVE SERVICE PLUG GRIP
3.DRAIN COOLANT (for Inverter)
4.REMOVE AIR CLEANER ASSEMBLY WITH AIR CLEANER HOSE
Disconnect the connector.
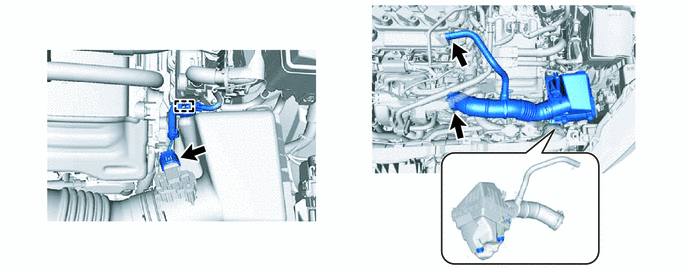
Disconnect the clamp.
Slide the clip and disconnect the No. 2 ventilation hose from the cylinder head cover sub-assembly.
Loosen the hose clamp and remove the air cleaner assembly from the throttle body assembly.
Disengage the 3 grommets to remove air cleaner assembly with air cleaner hose from the vehicle body.
89661
5.REMOVE ECM
82121
6.DISCONNECT ENGINE WIRE
- CAUTION:
-
Wear insulated gloves.
- NOTICE:
-
Do not allow any foreign matter or water to enter the inverter with converter assembly.
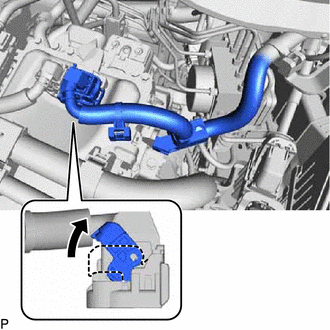
Move the lock lever while pushing the lock on the connector, and disconnect the inverter with converter assembly connector.
- NOTICE:
- ·
Do not damage the terminals, connector housing or inverter with converter assembly during disconnection.
·Cover the hole where the cable was connected with tape (non-residue type) or equivalent to prevent entry of foreign matter.
·Insulate the disconnected terminals with insulating tape.
·Do not touch the waterproof seal or terminals of the connector.
for LHD:
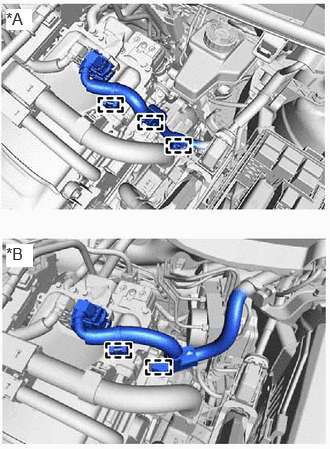
| *A | for LHD |
| *B | for RHD |
Disengage the 3 clamps and disconnect the engine wire.
for RHD:
Disengage the 2 clamps and disconnect the engine wire.
7.REMOVE CONNECTOR COVER ASSEMBLY
- CAUTION:
-
Wear insulated gloves.
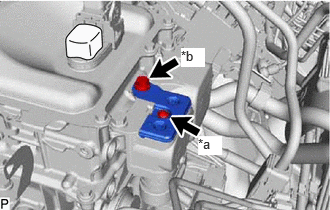
| *a | Bolt (A) |
| *b | Bolt (B) |
Remove the bolt (B).
Using a T25 "TORX" socket wrench, remove the bolt (A) and connector cover assembly from the inverter with converter assembly.
- NOTICE:
- ·
Do not touch the connector cover assembly waterproof seal.
·Do not allow any foreign matter or water to enter the inverter with converter assembly.
8.CHECK TERMINAL VOLTAGE
- CAUTION:
-
Wear insulated gloves.
- NOTICE:
-
Do not allow any foreign matter or water to enter the inverter with converter assembly.
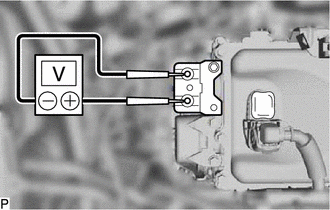
Using a voltmeter, measure the voltage between the terminals of the 2 phase connectors.
- Standard Voltage:
0 V
- HINT:
-
Use a measuring range of DC 750 V or more on the voltmeter.
9.TEMPORARILY INSTALL CONNECTOR COVER ASSEMBLY
- CAUTION:
-
Wear insulated gloves.
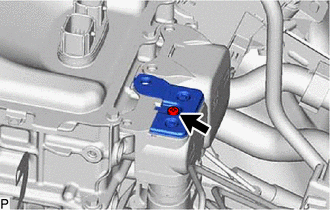
Temporarily install the connector cover assembly to the inverter with converter assembly.
Using a T25 "TORX" socket wrench, install the bolt.
- Torque:
- 4.5 N*m (46 kgf*cm, 40 in.*lbf)
- NOTICE:
-
Do not touch the waterproof seal of the connector cover assembly.
821H1
10.DISCONNECT FLOOR UNDER WIRE
- CAUTION:
-
Wear insulated gloves.
- NOTICE:
-
Do not allow any foreign matter or water to enter the inverter with converter assembly.
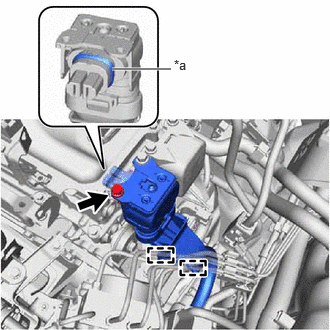
| *a | Waterproof Seal |
Remove the bolt and disconnect the HV floor under wire from the inverter with converter assembly.
- NOTICE:
- ·
Do not touch the waterproof seal or terminals of the connector.
·Do not damage the terminals, connector housing or inverter with converter assembly during disconnection.
·Cover the hole where the cable was connected with tape (non-residue type) or equivalent to prevent entry of foreign matter.
·Do not allow any foreign matter or water to enter the inverter with converter assembly.
·Insulate the disconnected terminals with insulating tape.
Disengage the 2 clamps.
821H2
11.DISCONNECT HV AIR CONDITIONING WIRE
- CAUTION:
-
Wear insulated gloves.
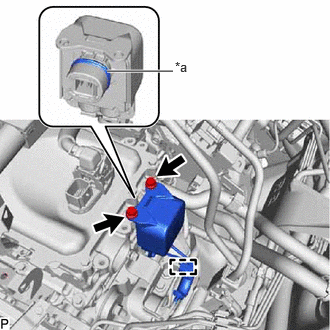
| *a | Waterproof Seal |
Remove the 2 bolts and disconnect the air conditioning wire from the inverter with converter assembly.
- NOTICE:
- ·
Do not allow any foreign matter or water to enter the inverter with converter assembly.
·Do not touch the waterproof seal or terminals of the connector.
·Do not damage the terminals, connector housing or inverter with converter assembly during disconnection.
·Insulate the disconnected terminals with insulating tape.
·Cover the hole where the cable was connected with tape (non-residue type) or equivalent to prevent entry of foreign matter.
Disengage the clamp.
12.REMOVE WINDSHIELD WIPER MOTOR AND LINK
55815E
13.REMOVE FRONT NO. 1 VENTILATOR SEAL
55735A
14.REMOVE WATER GUARD PLATE LH
55701J
15.REMOVE OUTER COWL TOP PANEL SUB-ASSEMBLY
16.REMOVE WIRE HARNESS CLAMP BRACKET
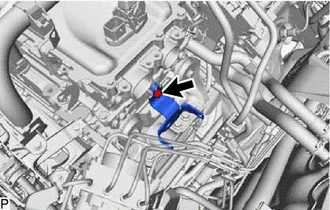
Remove the nut and wire harness clamp bracket.
25860
17.REMOVE PURGE VALVE (PURGE VSV)
82121
18.DISCONNECT ENGINE WIRE
- CAUTION:
-
Be sure to wear insulated gloves.
- NOTICE:
-
Do not allow any foreign matter or water to enter the inverter with converter assembly.
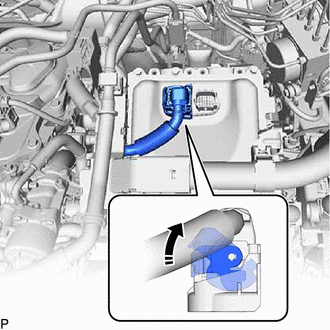
Move the lock lever while pushing the lock on the connector, and disconnect the inverter with converter assembly connector.
- NOTICE:
- ·
Do not damage the terminals, connector housing or inverter with converter assembly during disconnection.
·Cover the hole where the cable was connected with tape (non-residue type) or equivalent to prevent entry of foreign matter.
·Insulate the disconnected terminals with insulating tape.
·Do not touch the waterproof seal or terminals of the connector.
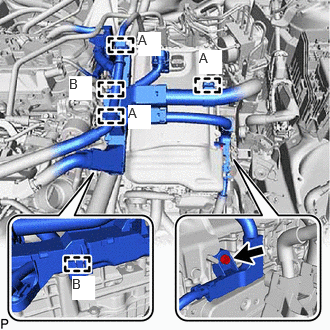
Disengage the 3 clamps (A) and disconnect the No. 1 fuel vapor feed hose.
Remove the bolt.
Disengage the 2 clamps (B).
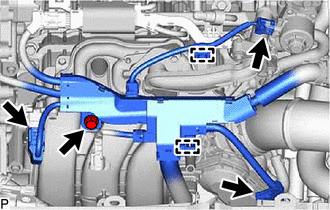
Disengage the 2 clamps.
Remove the bolt.
Disconnect the 3 connectors.
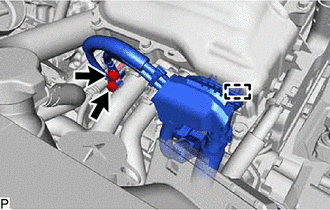
Remove the 2 bolts.
Disengage the clamp.
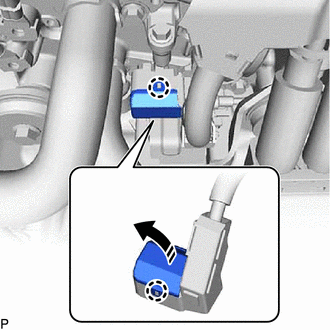
Disengage the 2 claws and open the engine wire terminal cover.
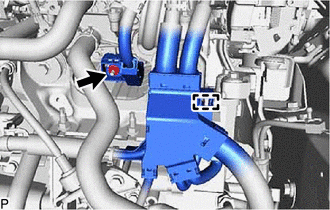
Remove the nut.
Disengage the clamp and disconnect the engine wire from the inverter with converter assembly.
G922C
19.DISCONNECT OUTLET NO. 1 INVERTER COOLING HOSE
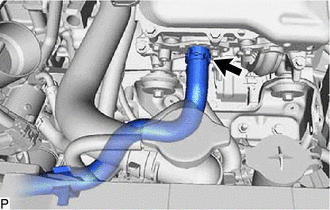
Slide the clip and disconnect the outlet No. 1 inverter cooling hose from the inverter with converter assembly.
- NOTICE:
-
Put pieces of cloth into the pipe and disconnected hose or cover the pipe and hose with plastic bags to prevent entry of foreign matter.
G922AA
20.DISCONNECT INLET NO. 1 INVERTER COOLING HOSE
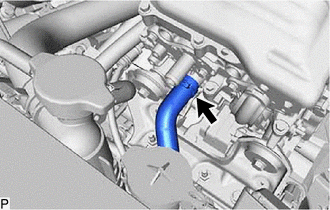
Slide the clip and disconnect the inlet No. 1 inverter cooling hose from the inverter with converter assembly.
- NOTICE:
-
Put pieces of cloth into the pipe and disconnected hose or cover the pipe and hose with plastic bags to prevent entry of foreign matter.
21.REMOVE UPPER INVERTER COVER
- CAUTION:
-
Wear insulated gloves.
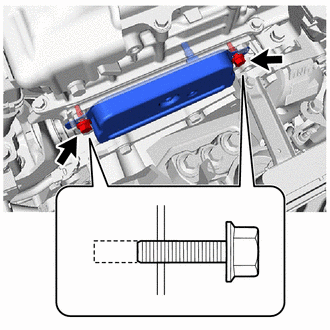
Loosen the 2 bolts, leaving 2 to 3 threads at the tip of the bolt still engaged.
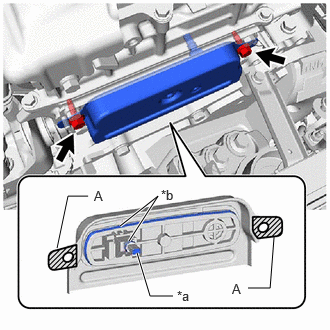
| *a | Interlock |
| *b | Waterproof Seal |
Using the 2 bolts as guides, remove the upper inverter cover from the inverter with converter assembly.
- NOTICE:
- ·
Make sure to pull the upper inverter cover straight out, as a connector is connected to the inside of the upper inverter cover.
·Do not touch the waterproof seal of the upper inverter cover.
·Do not allow any foreign matter or water to enter the inverter with converter assembly.
·When removing the upper inverter cover, do not pull the areas (A) as they may deform.
·Make sure that the interlock is installed to the upper inverter cover.
·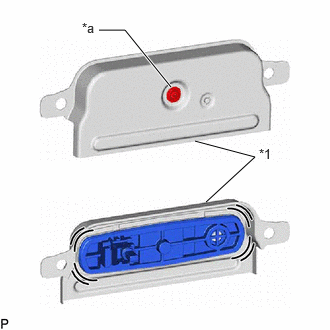 2.146,2.104 2.656,1.635 2.656,1.635 2.031,1.469 false 1.031,0.313 1.302,0.313 1.302,0.313 1.781,0.906 true 0.854,0.208 1.167,0.406 0.313,0.198 10 false *a 2.698,1.521 3.01,1.719 0.313,0.198 10 false *1
*1 Inverter Cover *a Screw
Do not remove or excessively tighten the screw of the upper inverter cover.
·Although the inverter cover may feel loose, this is not due to a malfunction.
·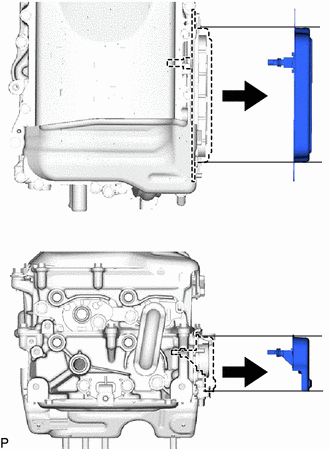 2.083,0.281 3.333,0.281 false 2.104,1.688 3.354,1.688 false 2.104,3.5 3.354,3.5 false 2.115,4.073 3.365,4.073 false
Hold the upper inverter cover horizontal while removing it.
- HINT:
-
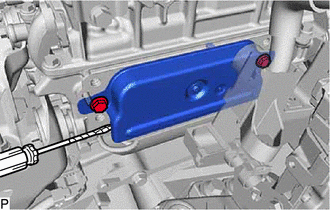
-
If necessary, use a screwdriver with its tip wrapped with protective tape as shown in the illustration to remove the upper inverter cover.
Remove the 2 bolts.
G1148
22.DISCONNECT MOTOR CABLE
- CAUTION:
-
Wear insulated gloves.
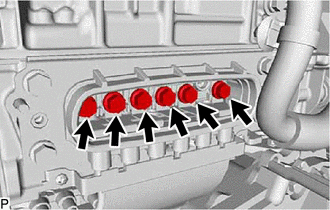
Using an insulated tool, remove the 6 bolts.
- NOTICE:
- ·
Do not allow any foreign matter or water to enter the inverter with converter assembly.
·Do not touch the waterproof seal or terminals of the connector.
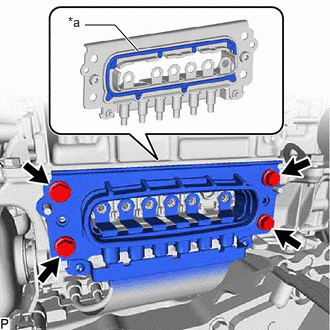
| *a | Waterproof Seal |
Remove the 4 bolts and disconnect the motor cable from the inverter with converter assembly.
- NOTICE:
- ·
Do not allow any foreign matter or water to enter the inverter with converter assembly.
·Do not touch the waterproof seal or terminals of the connector.
·Do not damage the terminals, connector housing or inverter with converter assembly during disconnection.
·Insulate the disconnected terminals with insulating tape.
·Cover the hole where the cable was connected with tape (non-residue type) or equivalent to prevent entry of foreign matter.
·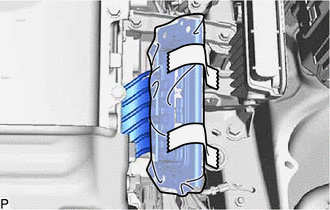
To prevent the wire harness from being caught, make sure to bundle the wire harness using insulating tape or equivalent.
G921E
23.REMOVE INVERTER PROTECTOR
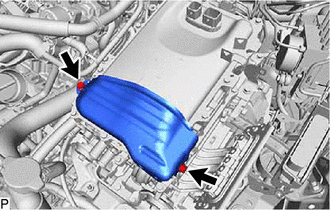
Remove the 2 bolts from the inverter with converter assembly.
G9215
24.REMOVE NO. 2 INVERTER BRACKET
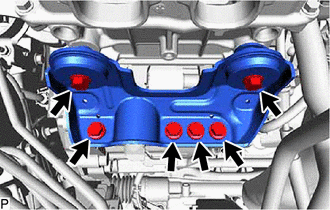
Remove the 6 bolts and No. 2 inverter bracket from the inverter with converter assembly and hybrid vehicle transaxle assembly.
G9200
25.REMOVE INVERTER WITH CONVERTER ASSEMBLY
- CAUTION:
-
Be sure to wear insulated gloves.
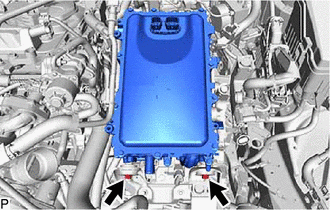
Remove the 2 bolts and inverter with converter assembly.
- NOTICE:
- ·
When removing the inverter with converter assembly, be careful not to damage the parts around it.
·To prevent damage, do not hold the inverter with converter assembly by the connectors, brackets or cooling pipes.
·To prevent damage due to static electricity, do not touch the terminals of the disconnected connectors.
- HINT:
-
Even after the coolant is drained, coolant remains in the inverter due to its internal structure. Therefore, seal or cover the pipes when removing the inverter with converter assembly so that coolant does not spill out.
G9214
26.REMOVE NO. 1 INVERTER BRACKET
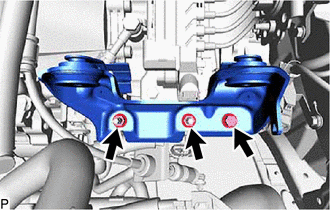
Remove the bolt, 2 nuts and No. 1 inverter bracket from the hybrid vehicle transaxle assembly.
27.REMOVE WIRE HARNESS CLAMP BRACKET
Remove the 3 bolts and 3 wire harness clamp brackets from the inverter with converter assembly.