BRAKE SYSTEM (OTHER) BRAKE PEDAL(for Gasoline Model RHD) ADJUSTMENT
PROCEDURE

 1.INSPECT AND ADJUST BRAKE PEDAL HEIGHT
Remove front door scuff plate RH.
- HINT:
-
Use the same procedure as for the LH side.
-
Click hereVehicle Interior>INTERIOR PANELS / TRIM>ROOF HEADLINING>REMOVAL
Remove cowl side trim board RH.
- HINT:
-
Use the same procedure as for the LH side.
-
Click hereVehicle Interior>INTERIOR PANELS / TRIM>ROOF HEADLINING>REMOVAL
Turn back floor carpet.
Turn back dash panel insulator assembly.
Check the brake pedal height.
- HINT:
-
Inspect and adjust the brake pedal height with the tibia pad folded back.
Measure the shortest distance between the brake pedal pad surface and floor panel as shown in the illustration.
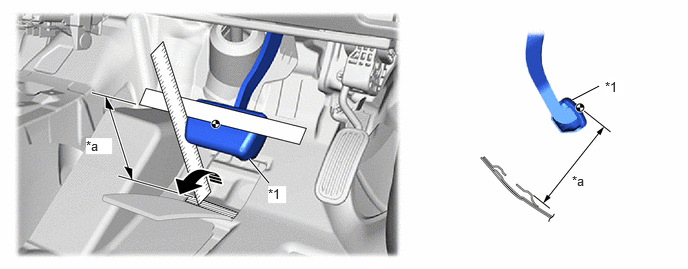
| *1 | Brake Pedal Pad | - | - |
| *a | Brake Pedal Height | - | - |

|
Measuring Plane of Floor Panel | - | - |
- Brake Pedal Height from Floor Panel:
157.8 to 173.8 mm (6.21 to 6.84 in.)
If the pedal height is not as specified, adjust the brake pedal height according to the procedure below.
Adjust the brake pedal height.
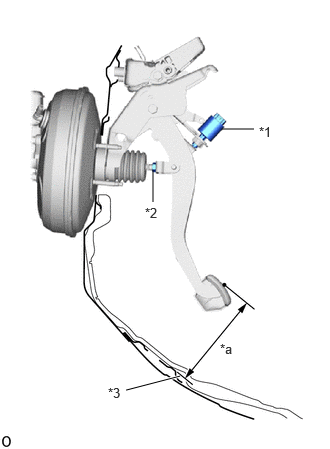
| *1 | Stop Light Switch Assembly |
| *2 | Clevis Lock Nut |
| *3 | Floor Panel |
| *a | Brake Pedal Height |
Remove the stop light switch assembly.
Click hereVehicle Exterior>LIGHTING (EXT)>STOP LIGHT SWITCH>REMOVAL
Loosen the clevis lock nut.
Adjust the brake pedal height by turning the push rod.
- Brake Pedal Height from Floor Panel:
157.8 to 173.8 mm (6.21 to 6.84 in.)
Tighten the clevis lock nut.
- Torque:
- for TMMC Made : 26 N*m (265 kgf*cm, 19 ft.*lbf)
- for TMMF Made : 15 N*m (153 kgf*cm, 11 ft.*lbf)
Install the stop light switch assembly.
Click hereVehicle Exterior>LIGHTING (EXT)>STOP LIGHT SWITCH>INSTALLATION
Install the dash panel insulator assembly.
Install the floor carpet.
Install cowl side trim board RH.
- HINT:
-
Use the same procedure as for the LH side.
-
Click hereVehicle Interior>INTERIOR PANELS / TRIM>ROOF HEADLINING>INSTALLATION
Install front door scuff plate RH.
- HINT:
-
Use the same procedure as for the LH side.
-
Click hereVehicle Interior>INTERIOR PANELS / TRIM>ROOF HEADLINING>INSTALLATION
2.INSPECT BRAKE PEDAL FREE PLAY
Stop the engine and firmly depress the brake pedal several times until no vacuum is left in the brake booster assembly.
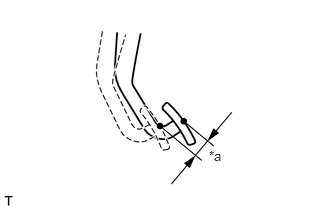
| *a | Brake Pedal Free Play |
Depress the brake pedal until a slight resistance is felt. Measure the brake pedal free play as shown in the illustration.
- Brake Pedal Free Play:
1.0 to 6.0 mm (0.0394 to 0.236 in.)
If the pedal free play is not as specified, check the stop light switch clearance.
Click hereVehicle Exterior>LIGHTING (EXT)>STOP LIGHT SWITCH>INSTALLATION
If the pedal free play is as specified, proceed to the Inspect Brake Pedal Reserve Distance procedure.
3.INSPECT BRAKE PEDAL RESERVE DISTANCE
Remove front door scuff plate RH.
- HINT:
-
Use the same procedure as for the LH side.
-
Click hereVehicle Interior>INTERIOR PANELS / TRIM>ROOF HEADLINING>REMOVAL
Remove cowl side trim board RH.
- HINT:
-
Use the same procedure as for the LH side.
-
Click hereVehicle Interior>INTERIOR PANELS / TRIM>ROOF HEADLINING>REMOVAL
Turn back floor carpet.
Turn back dash panel insulator assembly.
With the engine running, depress the brake pedal and measure the brake pedal reserve distance as shown in the illustration.
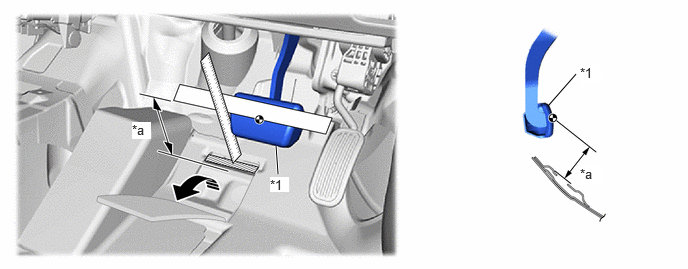
| *1 | Brake Pedal Pad | - | - |
| *a | Brake Pedal Reserve Distance | - | - |
|
|
Measuring Plane of Floor Panel | - | - |
- Brake Pedal Reserve Distance from Floor Panel at 300 N (31 kgf, 67.4 lbf):
- for TMC Made:
83 mm (3.27 in.) or more
- for TMMF Made M15A-KFS:
82 mm (3.23 in.) or more
- for TMMF Made 1KR-FE:
84 mm (3.31 in.) or more
If the distance is not as specified, troubleshoot the brake system.
Click hereBrake>BRAKE SYSTEM (OTHER)>BRAKE SYSTEM (for Gasoline Model)>PROBLEM SYMPTOMS TABLE
Install the dash panel insulator assembly.
Install the floor carpet.
Install cowl side trim board RH.
- HINT:
-
Use the same procedure as for the LH side.
-
Click hereVehicle Interior>INTERIOR PANELS / TRIM>ROOF HEADLINING>INSTALLATION
Install front door scuff plate RH.
- HINT:
-
Use the same procedure as for the LH side.
-
Click hereVehicle Interior>INTERIOR PANELS / TRIM>ROOF HEADLINING>INSTALLATION