DOOR / HATCH BACK DOOR REASSEMBLY
PROCEDURE

 64381A
1.INSTALL PACKAGE TRAY TRIM HANGER
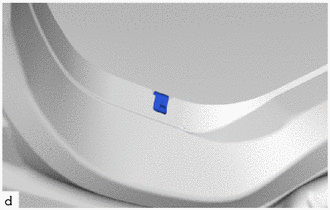
Install the package tray trim hanger.
- HINT:
-
Use the same procedure as for the opposite side.
67837N
2.INSTALL BACK DOOR DUST PROOF SEAL
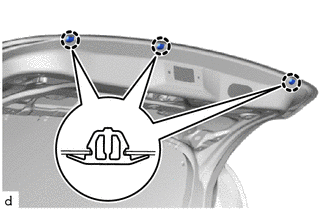
Engage the claw to install 3 new back door dust proof seals.
82185
3.INSTALL NO. 2 BACK DOOR WIRE
for 5 Door:
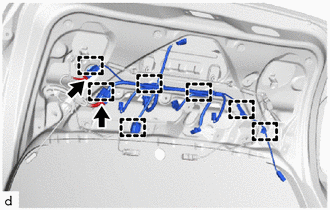
Engage the clamps to install the No. 2 back door wire.
Connect the 2 connectors.
for 3 Door:
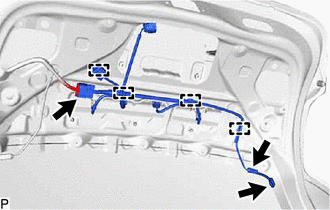
Engage the clamps to install the No. 2 back door wire.
Connect the 3 connectors.
86101W
4.INSTALL NO. 7 ANTENNA CORD SUB-ASSEMBLY (w/ Digital Audio Broadcasting Antenna)
86101V
5.INSTALL NO. 6 ANTENNA CORD SUB-ASSEMBLY (w/ Digital Audio Broadcasting Antenna)
86101R
6.INSTALL NO. 5 ANTENNA CORD SUB-ASSEMBLY (w/ Digital Audio Broadcasting Antenna)
81270
7.INSTALL LICENSE PLATE LIGHT ASSEMBLY
67005B
8.INSTALL BACK DOOR PANEL CUSHION
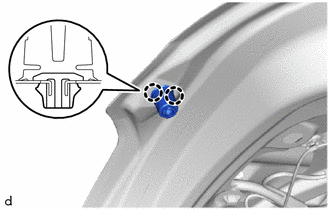
Engage the claws to install a new back door panel cushion.
- HINT:
-
Use the same procedure as for the opposite side.
67893A
9.INSTALL NO. 1 BACK DOOR PANEL PROTECTOR
- HINT:
-
Use the same procedure as for the opposite side.
Clean back door installation surface.
Remove the release paper from a new No. 1 back door panel protector.
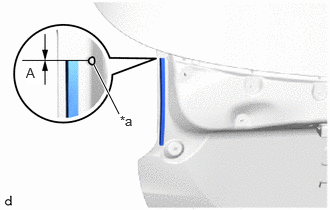
| *a | Location Bead |
Install the No. 1 back door panel protector as shown in the illustration.
- Standard Measurement:
Area Measurement A -5.0 to 5.0 mm (-0.197 to 0.197 in.)
85345R
10.INSTALL REAR WASHER NOZZLE (w/o Rear Wiper)
81006
11.INSTALL CENTER STOP LIGHT SET (for 5 Door)
12.INSTALL CENTER STOP LIGHT COVER LH (for 5 Door)
13.INSTALL CENTER STOP LIGHT COVER RH (for 5 Door)
- HINT:
-
Use the same procedure as for the LH side.
14.INSTALL REAR SPOILER ASSEMBLY (w/ Rear Spoiler)
for 5 Door:
Click hereVehicle Exterior>EXTERIOR PANELS / TRIM>REAR SPOILER (for 5 Door)>INSTALLATION
for 3 Door:
Click hereVehicle Exterior>EXTERIOR PANELS / TRIM>REAR SPOILER (for 3 Door)>INSTALLATION
76827B
15.INSTALL NO. 2 BACK DOOR GARNISH RETAINER (w/o Rear View Monitor System)
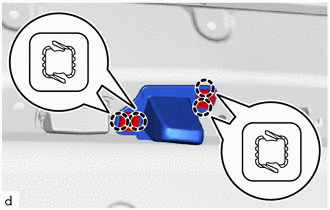
Engage the claws to install the No. 2 back door garnish retainer.
Install the 2 screws.
86790D
16.INSTALL REAR TELEVISION CAMERA ASSEMBLY (w/ Rear View Monitor System)
84840G
17.INSTALL BACK DOOR OPENER SWITCH ASSEMBLY
18.INSTALL BACK DOOR OUTSIDE GARNISH SUB-ASSEMBLY
74811D
19.INSTALL DOOR PULL HANDLE
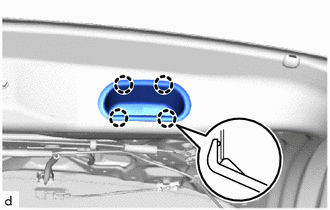
Engage the claws to install the door pull handle.
69350P
20.INSTALL BACK DOOR LOCK ASSEMBLY WITH COURTESY LIGHT SWITCH
85143R
21.INSTALL REAR WIPER MOTOR GROMMET (w/ Rear Wiper)
85110R
22.INSTALL REAR WIPER MOTOR ASSEMBLY (w/ Rear Wiper)
23.INSTALL REAR WIPER ARM AND BLADE ASSEMBLY (w/ Rear Wiper)
85292A
24.INSTALL REAR WIPER ARM HEAD CAP (w/ Rear Wiper)
25.INSPECT REAR WIPER ARM AND BLADE ASSEMBLY
67761A
26.INSTALL BACK DOOR TRIM COVER
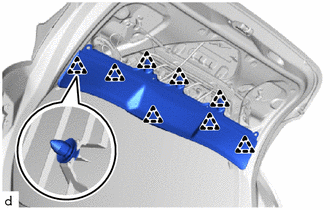
Engage the clips to install the back door trim cover.
67751
27.INSTALL BACK DOOR TRIM BOARD
for 5 Door:
Install the back door trim board with the 8 clips.
for 3 Door:
Install the back door trim board with the 11 clips.
75441E
28.INSTALL NO. 1 BACK DOOR NAME PLATE (for Gasoline Model AWD)
75441E
29.INSTALL NO. 1 BACK DOOR NAME PLATE (for HV Model)