G16E-GTS FUEL FUEL FILTER REPLACEMENT
CAUTION / NOTICE / HINT
The necessary procedures (adjustment, calibration, initialization or registration) that must be performed after parts are removed and installed, or replaced during fuel filter(fuel sub-tank sub-assembly) removal/installation are shown below.
| Replaced Part or Performed Procedure | Necessary Procedure | Effect/Inoperative Function when Necessary Procedure not Performed | Link |
|---|---|---|---|
| Auxiliary battery terminal is disconnected/reconnected | Memorize steering angle neutral point | Parking assist monitor system | ( ) |
- CAUTION:
- ·
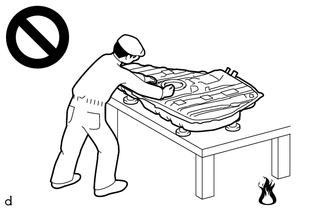
Never perform work on fuel system components near any possible ignition sources.
·Vaporized fuel could ignite, resulting in a serious accident.
- ·
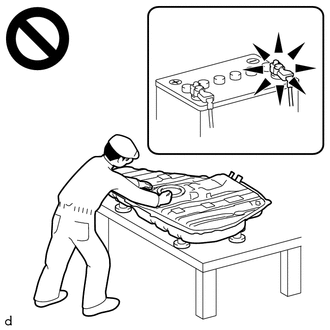
Do not perform work on fuel system components without first disconnecting the cable from the negative (-) battery terminal.
·Sparks could cause vaporized fuel to ignite, resulting in a serious accident.
- NOTICE:
- ·
After the ignition switch is turned off, the radio and display receiver assembly records various types of memory and settings. As a result, after turning the ignition switch off, make sure to wait at least 120 seconds before disconnecting the cable from the negative (-) auxiliary battery terminal.
·This procedure includes the removal of small-head bolts. Refer to Small-Head Bolts of Basic Repair Hint to identify the small-head bolts.
Click hereGeneral>INTRODUCTION>REPAIR INSTRUCTION>PRECAUTION
- HINT:
-
When the cable is disconnected/reconnected to the auxiliary battery terminal, systems temporarily stop operating. However, each system has a function that completes learning the first time the system is used.
- ·
Learning completes when vehicle is driven
Effect/Inoperative Function When Necessary Procedures are not Performed Necessary Procedures Link Lane tracing assist system Drive the vehicle straight ahead at 35 km/h (22 mph) or more for 5 second or more. ( )
Pre-collision system Stop and start system Drive the vehicle until stop and start control is permitted (approximately 5 to 60 minutes) ( )
·Learning completes when vehicle is operated normally
Effect/Inoperative Function When Necessary Procedures are not Performed Necessary Procedures Link Power door lock control system
·Back door opener
Perform door unlock operation with door control switch or electrical key transmitter sub-assembly switch. ( )
Air conditioning system After the ignition switch is turned to ON, the servo motor standard position is recognized. -
PROCEDURE

 1. PRECAUTION
- NOTICE:
-
After turning the ignition switch off, waiting time may be required before disconnecting the cable fromthe negative (-) auxiliary battery terminal.
-
Click hereGeneral>SETUP>WHEN DISCONNECTING OR RECONNECTING BATTERY TERMINAL>BEFORE DISCONNECTING BATTERY
2.DISCONNECT CABLE FROM NEGATIVE AUXILIARY BATTERY TERMINAL
77020A
3.REMOVE FUEL SUCTION WITH PUMP AND GAUGE TUBE ASSEMBLY
83320
4.REMOVE FUEL SENDER GAUGE ASSEMBLY
77103
5.REMOVE FUEL FILTER(FUEL SUB-TANK SUB-ASSEMBLY)
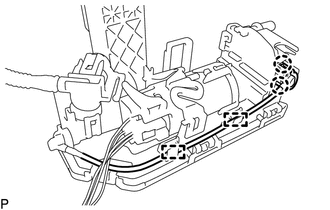
Detach the 2 claws and 2 clamps and disconnect the fuel suction tube from the fuel filter(fuel sub-tank sub-assembly).
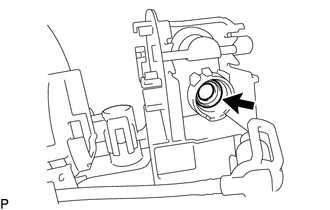
Remove the O-ring from the fuel filter(fuel sub-tank sub-assembly).
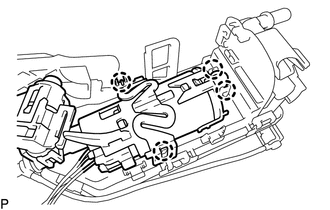
Detach the 4 claws and disconnect the sub-assembly support from the fuel filter(fuel sub-tank sub-assembly).
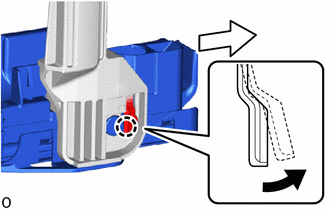

|
Pull |

|
Slide |
Detach the claw and slide the fuel filter(fuel sub-tank sub-assembly) and disconnect it from the fuel suction plate sub-assembly.
77103
6.INSTALL FUEL FILTER(FUEL SUB-TANK SUB-ASSEMBLY)
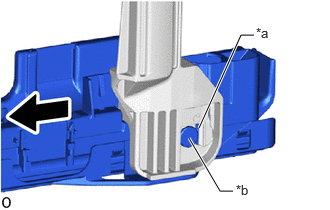
| *a | Installation Hole |
| *b | Protrusion |
|
|
Slide |
Align the protrusion of the fuel filter(fuel sub-tank sub-assembly) with the installation hole of the fuel suction plate sub-assembly and slide the fuel sub-tank sub-assembly to install the fuel suction plate sub-assembly.
Attach the 4 claws and connect the sub-assembly support to the fuel filter(fuel sub-tank sub-assembly).
Apply gasoline to a new O-ring.
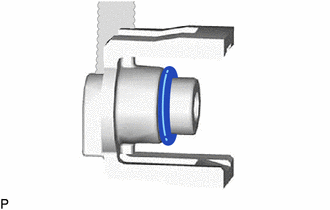
Install the O-ring to the fuel suction tube.
Attach the 2 claws and 2 clamps and connect the fuel suction tube to the fuel filter(fuel sub-tank sub-assembly).
83320
7.INSTALL FUEL SENDER GAUGE ASSEMBLY
77020A
8.INSTALL FUEL SUCTION WITH PUMP AND GAUGE TUBE ASSEMBLY
9.CONNECT CABLE FROM NEGATIVE AUXILIARY BATTERY TERMINAL
10. INITIALIZATION AFTER RECONNECTING AUXILIARY BATTERY TERMINAL
Click hereGeneral>SETUP>WHEN DISCONNECTING OR RECONNECTING BATTERY TERMINAL>WORK PROCEDURE
- HINT:
-
When disconnecting and reconnecting the battery, there is an automatic learning function that completes learning when the respective system is used.
-
Click hereGeneral>SETUP>WHEN DISCONNECTING OR RECONNECTING BATTERY TERMINAL>AUTOMATIC LEARNING CHART