BRAKE CONTROL / DYNAMIC CONTROL SYSTEMS STEERING ANGLE SENSOR INSTALLATION
CAUTION / NOTICE / HINT
- NOTICE:
-
After performing the update ECU security key procedure, make sure to perform the initialization procedure for when the cable has been disconnected and reconnected to the negative (-) auxiliary battery terminal.
PROCEDURE

 84306
1.INSPECT SPIRAL CABLE WITH SENSOR SUB-ASSEMBLY
89245B
2.INSTALL STEERING SENSOR
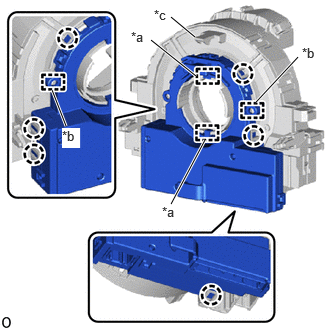
| *a | Guide |
| *b | Pin |
| *c | Lock Pin |
Align the 2 pins and 2 guides, and engage the 6 claws to install the steering sensor to the spiral cable sub-assembly.
- NOTICE:
- ·
Do not remove the lock pin before the steering sensor is installed to the spiral cable sub-assembly.
·Do not damage the pins of the spiral cable sub-assembly or guides of the steering sensor.
·The spiral cable sub-assembly can be rotated up to 30° even when the interlock is engaged. Therefore, make sure that both guides are aligned properly when installing the steering sensor to the spiral cable sub-assembly.
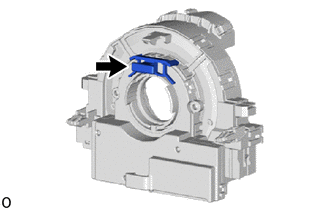
Remove the lock pin from the steering sensor.
3.PLACE FRONT WHEELS FACING STRAIGHT AHEAD
84306
4.INSTALL SPIRAL CABLE WITH SENSOR SUB-ASSEMBLY
45286B
5.INSTALL UPPER STEERING COLUMN COVER
45287
6.INSTALL LOWER STEERING COLUMN COVER
84306
7.ADJUST SPIRAL CABLE WITH SENSOR SUB-ASSEMBLY
45100
8.INSTALL STEERING WHEEL ASSEMBLY
45130
9.INSTALL HORN BUTTON ASSEMBLY
10.CONNECT CABLE TO NEGATIVE AUXILIARY BATTERY TERMINAL
for M15A-FKS:
Click hereGeneral>MAINTENANCE>M15A-FKS AUXILIARY BATTERY>INSTALLATION
for M15A-FXE:
Click hereGeneral>MAINTENANCE>M15A-FXE AUXILIARY BATTERY>INSTALLATION
for G16E-GTS:
Click hereGeneral>MAINTENANCE>G16E-GTS AUXILIARY BATTERY>INSTALLATION
for 1KR-FE:
Click hereGeneral>MAINTENANCE>1KR-FE AUXILIARY BATTERY>INSTALLATION
11. UPDATE ECU SECURITY KEY
45130
12.INSPECT HORN BUTTON ASSEMBLY
13. PERFORM DIAGNOSTIC SYSTEM CHECK
14.CHECK SRS WARNING LIGHT
15.PERFORM CALIBRATION
16. INITIALIZATION AFTER RECONNECTING AUXILIARY BATTERY TERMINAL
Click hereGeneral>SETUP>WHEN DISCONNECTING OR RECONNECTING BATTERY TERMINAL>WORK PROCEDURE
- HINT:
-
When disconnecting and reconnecting the auxiliary battery, there is an automatic learning function that completes learning when the respective system is used.
-
Click hereGeneral>SETUP>WHEN DISCONNECTING OR RECONNECTING BATTERY TERMINAL>AUTOMATIC LEARNING CHART