P0112 Intake Air Temperature Circuit Low Input
Diagnostic trouble codes · Vehicles built from Aug 2005
Also covers:
- P0113 Intake Air Temperature Circuit High Input
DESCRIPTION
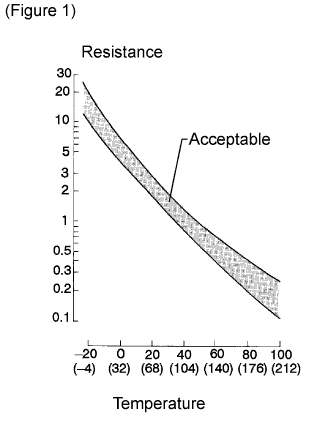
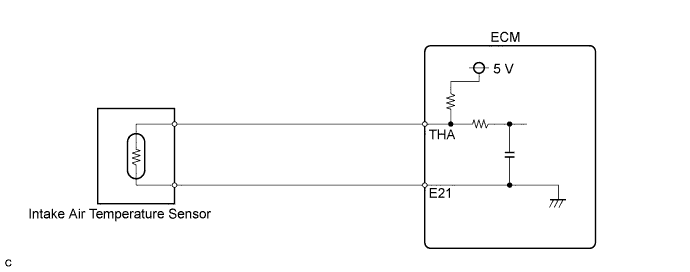
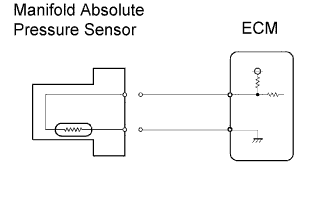
The Intake Air Temperature (IAT) sensor is built into the manifold absolute pressure sensor, and monitors the intake air temperature. The IAT sensor has a built-in thermistor that varies its resistance depending on the temperature of the intake air. When the air temperature is low, the resistance in the thermistor increases. When the temperature is high, the resistance drops. The variations in resistance are reflected in the voltage applied to the ECM terminal (see figure 1).The IAT sensor is connected to the ECM. The 5 V power source voltage in the ECM is applied to the IAT sensor from terminal THA via resistor R.
Resistor R and the IAT sensor are connected in series. When the resistance value of the IAT sensor changes in accordance with changes in the intake air temperature, the voltage at terminal THA also changes. Based on this signal, the ECM increases the fuel injection volume to improve the driveability during cold engine operation.

- HINT:
- When the IAT sensor output is outside the normal range, the ECM determines this as a malfunction.
| DTC No. |
DTC Detecting Condition |
Trouble Area |
| P0112 |
IAT sensor output is less than -47°C (-53°F) for 0.5 seconds (3 trip detection logic) |
|
| P0113 |
IAT sensor output is more than 140°C (284°F) for 0.5 seconds (3 trip detection logic) |
|
- HINT:
- DTC P0112 is detected when the engine idles for approximately 5 minutes.
- DTC P0113 is detected when the ignition switch is on (IG) or the engine is running.
- When DTC P0112 or P0113 is detected, check the intake air temperature by selecting Powertrain / Engine and ECT / Data List / Intake Air on the intelligent tester.
- DTC P0112 is detected when the engine idles for approximately 5 minutes.
| Temperature Displayed |
Malfunction |
| Less than -40°C (-40°F) |
Open circuit or short +B circuit |
| More than 140°C (284°F) |
Short circuit |
WIRING DIAGRAM
INSPECTION PROCEDURE
- NOTICE:
- Perform electronic throttle learning after replacing the ECM (Click here).
- HINT:
- Read freeze frame data using the intelligent tester. The ECM records vehicle and driving condition information as freeze frame data the moment a DTC is stored. When troubleshooting, freeze frame data can help determine if the vehicle was moving or stationary, if the engine was warmed up or not, if the air-fuel ratio was lean or rich, and other data from the time the malfunction occurred.
| 1. READ VALUE OF INTAKE AIR TEMPERATURE SENSOR |

Connect the intelligent tester to the DLC3.
Turn the ignition switch on (IG) and turn the tester ON.
Select the following menu items: Powertrain / Engine and ECT / Data List / Intake Air.
Read the value.
- Result:
Temperature Displayed
Proceed To
-40°C (-40°F)
A
140°C (284°F)
B
Same as actual intake air temperature
C
- HINT:
- If there is an open circuit, the intelligent tester indicates -40°C (-40°F).
- If there is a short to GND, the intelligent tester indicates 140°C (284°F).
- If there is an open circuit, the intelligent tester indicates -40°C (-40°F).
|
|
||||
|
|
||||


| A | |
 |
| 2. CHECK WIRE HARNESS (CHECK FOR OPEN IN WIRE HARNESS) |
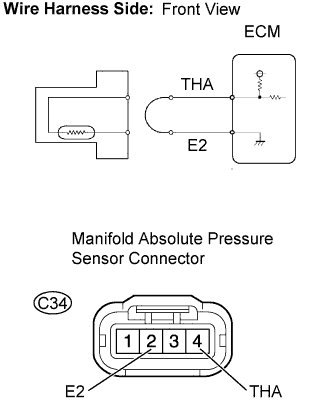 |
Confirm that the manifold absolute pressure sensor connector is connected properly.
Disconnect the manifold absolute pressure sensor connector.
Connect terminals THA and E2 of the manifold absolute pressure sensor wire harness side connector.
Connect the intelligent tester to the DLC3.
Turn the ignition switch on (IG) and turn the tester ON.
Select the following menu items: Powertrain / Engine and ECT / Data List / Intake Air.
Read the value.
- Standard:
- 140°C (248°F)
Reconnect the manifold absolute pressure sensor connector.
|
|
||||
| NG | |
|
| 3. CHECK HARNESS AND CONNECTOR (MANIFOLD ABSOLUTE PRESSURE SENSOR - ECM) |
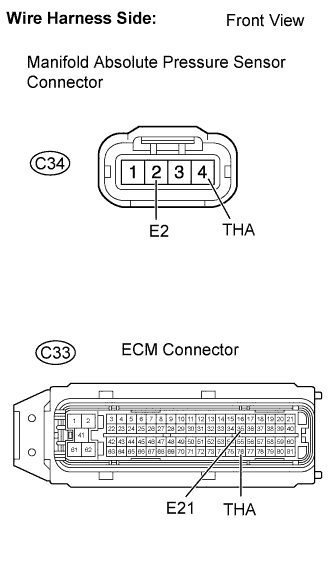 |
Disconnect the manifold absolute pressure sensor connector.
Disconnect the ECM connector.
Check the resistance.
- Standard resistance (Check for open):
Tester Connection
Specified Condition
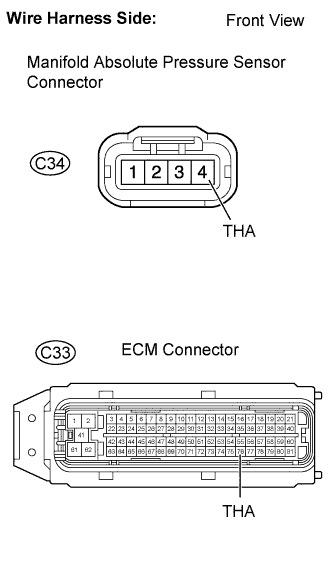
THA (C34-4) - THA (C33-76)
Below 1 Ω
E2 (C34-2) - E21 (C33-35)
Below 1 Ω
Reconnect the manifold absolute pressure sensor connector.
Reconnect the ECM connector.
|
|
||||
| OK | ||
 |
||
| ||
| 4. CHECK WIRE HARNESS (CHECK FOR SHORT IN WIRE HARNESS) |
 |
Disconnect the manifold absolute pressure sensor connector.
Connect the intelligent tester to the DLS3.
Turn the ignition switch on (IG) and turn the tester ON.
Select the following menu items: Powertrain / Engine and ECT / Data List / Intake Air.
Read the value.
- Standard:
- -40°C (-40°F)
Reconnect the manifold absolute pressure sensor connector.
|
|
||||
| NG | |
|
| 5. CHECK HARNESS AND CONNECTOR (MANIFOLD ABSOLUTE PRESSURE SENSOR - ECM) |
 |
Disconnect the manifold absolute pressure sensor connector.
Disconnect the ECM connector.
Check the resistance.
- Standard resistance (Check for short):
Tester Connection
Specified Condition
THA (C34-4) or THA (C33-76) - Body ground
10 kΩ or higher
Reconnect the manifold absolute pressure sensor connector.
Reconnect the ECM connector.
|
|
||||
| OK | ||
|
||
| ||