P0327 Knock Sensor 1 Circuit Low Input (Bank 1 or Single Sensor)
Diagnostic trouble codes · Vehicles built from Nov 2006
Also covers:
- P0328 Knock Sensor 1 Circuit High Input (Bank 1 or Single Sensor)
DESCRIPTION
Flat type knock sensors (non-resonant type) have structures that can detect vibrations over a wide band of frequencies: between approximately 6 kHz and 15 kHz.Knock sensors are fitted onto the engine block to detect engine knocking.
The knock sensor contains a piezoelectric element which generates a voltage when it becomes deformed.
The voltage is generated when the engine block vibrates due to knocking. Any occurrence of engine knocking can be suppressed by delaying the ignition timing.
| DTC No. |
DTC Detection Condition |
Trouble Area |
| P0327 |
Output voltage of knock sensor 0.5 V or less for 1 second or more (1 trip detection logic) |
|
| P0328 |
Output voltage of knock sensor 4.5 V or more for 1 second or more (1 trip detection logic) |
|
- HINT:
- When any of DTCs P0327 and P0328 are set, the ECM enters fail-safe mode. During fail-safe mode, the ignition timing is delayed to its maximum retardation. Fail-safe mode continues until the ignition switch is turned off.
WIRING DIAGRAM
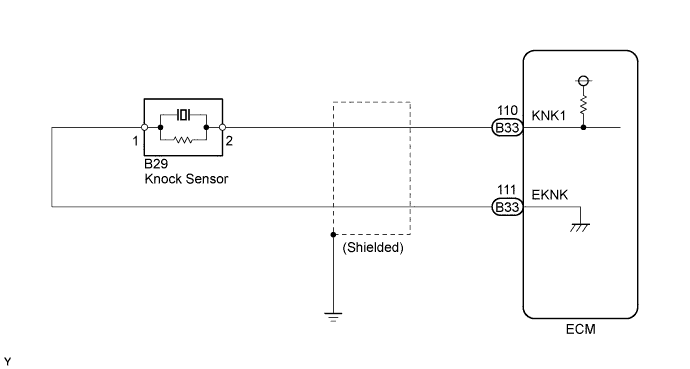

INSPECTION PROCEDURE
- HINT:
- Read freeze frame data using an intelligent tester. The ECM records vehicle and driving condition information as freeze frame data the moment a DTC is stored. When troubleshooting, freeze frame data can help determine if the vehicle was moving or stationary, if the engine was warmed up or not, if the air-fuel ratio was lean or rich, and other data from the time the malfunction occurred.
| 1. READ VALUE USING INTELLIGENT TESTER (KNOCK FEEDBACK VALUE) |

Connect an intelligent tester to the DLC3.
Start the engine and turn the tester on.
Warm up the engine.
Select the following menu items: Powertrain / Engine and ECT / Data List / Knock Feedback Value.
Read the value while driving the vehicle.
- Standard:
- The value changes.
- HINT:
Malfunction does not occur
Knock Feedback Value changes
Malfunctions occur
Knock Feedback Value does not change
- The knock feedback value change can be confirmed by running the engine with a high load, for example, by activating the air conditioning system and racing the engine.
|
|
||||

| OK | ||
 |
||
| ||
| 2. INSPECT ECM (KNK1 VOLTAGE) |
Disconnect the knock sensor connector.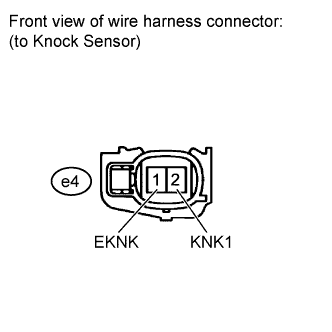
Turn the ignition switch on (IG).
Measure the voltage according to the value(s) in the table below.
- Standard voltage:
Tester Connection
Switch Condition
Specified Condition
e4-2 (KNK1) - e4-1 (EKNK)
Ignition switch on (IG)
4.5 to 5.5 V
Reconnect the knock sensor connector.
|
|
||||
| OK | |
 |
| 3. INSPECT KNOCK SENSOR |
Remove the knock sensor.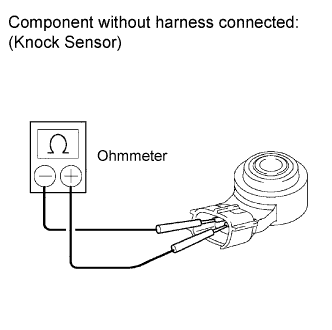
Measure the resistance according to the value(s) in the table below.
- Standard resistance:
Tester Connection
Condition
Specified Condition
1 - 2
20°C (68°F)
120 to 280 kΩ
Reinstall the knock sensor.
|
|
||||

| OK | ||
|
||
| ||
| 4. CHECK HARNESS AND CONNECTOR (ECM - KNOCK SENSOR) |
Disconnect the knock sensor connector.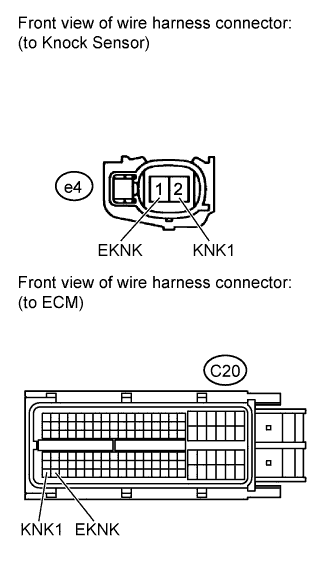
Disconnect the ECM connector.
Measure the resistance according to the value(s) in the table below.
- Standard resistance (Check for open):
Tester Connection
Condition
Specified Condition
e4-2 (KNK1) - C20-110 (KNK1)
Always
Below 1 Ω
e4-1 (EKNK) - C20-111 (EKNK)
Always
Below 1 Ω
- Standard resistance (Check for short):
Tester Connection
Condition
Specified Condition
e4-2 (KNK1) - C20-110 (KNK1) - Body ground
Always
10 kΩ or higher
e4-1 (EKNK) - C20-111 (EKNK) - Body ground
Always
10 kΩ or higher
Reconnect the knock sensor connector.
Reconnect the ECM connector.
|
|
||||
| OK | ||
|
||
| ||