INSTALLATION
Removal / installation · Vehicles built from Nov 2005
| 1. INSTALL CLUTCH ACTUATOR ASSEMBLY |

- NOTICE:
- Perform the following procedure ((1) to (5)) to set a new clutch actuator in the clutch clamp position because it is not originally placed in that position.
- (1) Connect the clutch stroke sensor connector and motor connector to the clutch actuator.
- (2) Connect the battery negative terminal.
- (3) Perform clutch position adjustment (clutch clamp position)
- (Click here)
- (4) Disconnect the battery negative terminal.
- (5) Disconnect the clutch stroke sensor connector and motor connector.
Apply grease to the clutch release lever.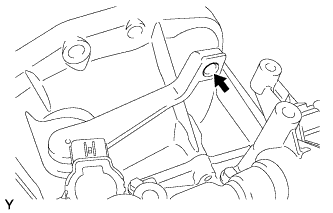

- Sealant:
- Toyota Genuine Release Hub Grease or Equivalent
Set the clutch actuator to the transaxle and provisionally tighten the 3 bolts.
- NOTICE:
- Keep the clearance between the bolt head and actuator flange.
Gently hold down the clutch actuator assembly toward flat surface of transmission assembly and slide it so that the convex portion of the clutch actuator rod comes into contact with the concave portion of the release lever.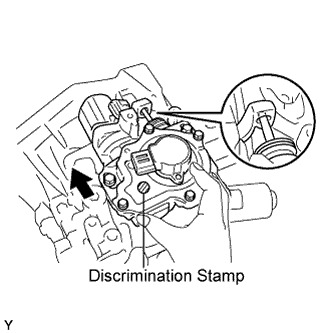
- NOTICE:
- Do no apply excessive load to them during the operation.
- Make sure that the convex portion of the clutch actuator rod is securely fitted into the concave portion of the release lever.
- 1KR-FE and 2SZ-FE clutch actuators have their own discrimination stamp on the housing upper.
Engine
Discrimination Color
1KR-FE
Green
2SZ-FE
Blue
- Do no apply excessive load to them during the operation.
Tighten the 3 bolts by hand while holding the clutch actuator assembly.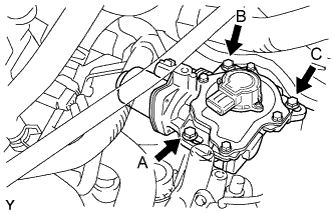
- NOTICE:
- Support the clutch actuator assembly until all the 3 bolts are tightened.
Tighten the 3 bolts to the specified torque in the order A, B, and C, as shown.
- Torque:
- 17 N*m{ 173 kgf*cm , 13 ft.*lbf }
Connect the clutch stroke sensor connector and motor connector.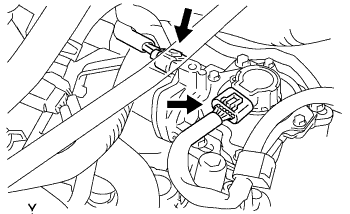
Install the wire harness bracket onto the transaxle with the bolt.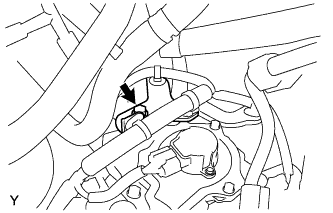
- Torque:
- 13 N*m{ 131 kgf*cm , 9.5 ft.*lbf }
| 2. INSTALL BATTERY CARRIER (for 1KR-FE) |
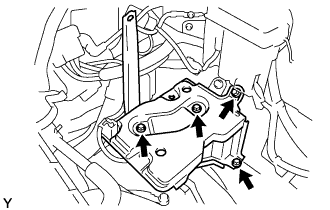 |
Install the battery carrier with the 4 bolts.
- Torque:
- 17 N*m{ 175 kgf*cm , 13 ft.*lbf }
| 3. INSTALL BATTERY CARRIER (for 2SZ-FE) |
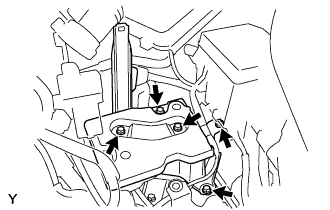 |
Install the battery carrier with the 5 bolts.
- Torque:
- 17 N*m{ 175 kgf*cm , 13 ft.*lbf }
| 4. INSTALL BATTERY TRAY |
| 5. INSTALL BATTERY |
| 6. INSTALL BATTERY HOLD DOWN CLAMP |
| 7. INSTALL AIR CLEANER INLET NO.1 (for 2SZ-FE) |
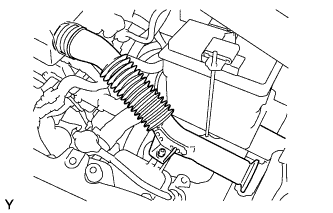 |
Install the air cleaner inlet No. 1.
| 8. CONNECT CABLE TO NEGATIVE BATTERY TERMINAL |
- Torque:
- 5.4 N*m{ 55 kgf*cm , 48 in.*lbf }
| 9. INITIALIZATION OF MULTI-MODE MANUAL TRANSMISSION ECU |
| 10. LEARNING OF MULTI-MODE MANUAL TRANSMISSION SYSTEM |
| 11. SYNCHRONIZATION POSITION CALIBRATION |