INSTALLATION
Removal / installation · Vehicles built Aug 2005 – Oct 2005
Versions by build date: Aug 2005 – Oct 2005 from Nov 2005
| 1. INSTALL RADIATOR HOSE NO. 1 |
| 2. INSTALL RADIATOR HOSE NO. 2 |
| 3. INSTALL HEATER WATER OUTLET HOSE A (FROM HEATER UNIT) |
| 4. INSTALL HEATER WATER INLET HOSE A |
| 5. INSTALL ENGINE WIRE |
| 6. INSTALL KNOCK SENSOR |

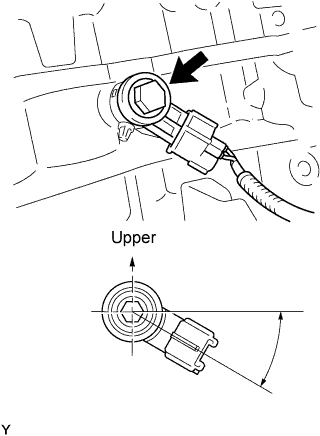  |
Install the knock sensor with the bolt.
- Torque:
- 20 N*m{ 204 kgf*cm , 15 ft.*lbf }
- HINT:
- It is acceptable for the sensor to be tilted 0 to 45°.
Connect the connector.
| 7. INSTALL RADIO SETTING CONDENSER |
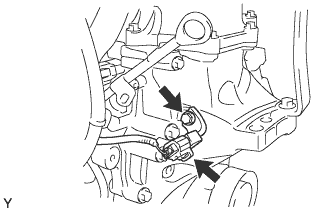 |
Install condenser with a bolt.
- Torque:
- 10 N*m{ 102 kgf*cm , 7 ft.*lbf }
Connect the connector.
| 8. INSTALL FUEL INJECTOR ASSEMBLY |
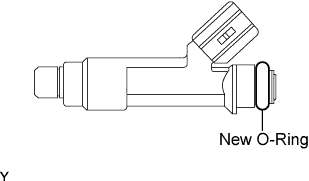 |
Apply a light coat of grease or gasoline to a new O-ring, and install it onto the injector.
Apply a light coat of grease or gasoline to the place where the delivery pipe touches the O-ring.
Push the fuel injector while twisting it back and forth to install it in the fuel delivery pipe.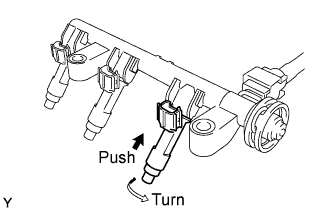
- NOTICE:
- Do not twist the O-ring.
- Check that the fuel injector turns smoothly after installing it. If it does not, reinstall it with a new O-ring.
- Do not twist the O-ring.
Position the injector connectors so that they face upward.
| 9. INSTALL FUEL DELIVERY PIPE |
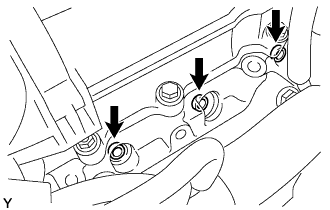 |
Install 3 new fuel injector vibration insulators to the cylinder head.
Place the fuel delivery pipe and the 3 fuel injectors together to the cylinder head.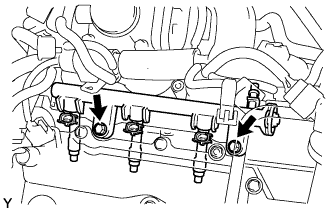
- NOTICE:
- Do not drop the fuel injectors when installing the fuel delivery pipe .
Provisionally install the 2 bolts which are used to hold the fuel delivery pipe to the cylinder head.
- NOTICE:
- Check that the fuel injector turns smoothly after installing it. If does not, reinstall it with a new O-ring.
Tighten the 2 bolts which are used to hold the fuel delivery pipe to the cylinder head.
- Torque:
- 27 N*m{ 275 kgf*cm , 20 ft.*lbf }
Engage the 5 clamps and install the engine wire harness onto the cylinder head cover.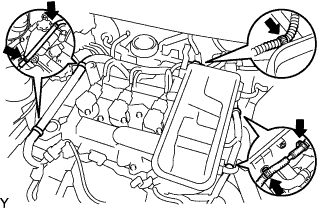
Connect the 3 injector connectors.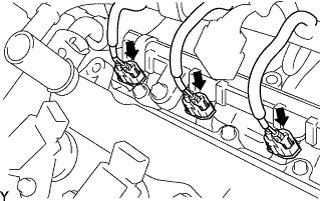
Connect the 3 ignition coil connectors.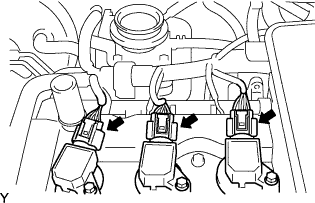
| 10. INSTALL INTAKE MANIFOLD |
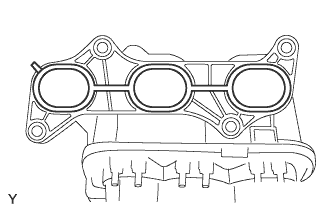 |
Install the new gasket.
Install the intake manifold with the 3 bolts and 2 nuts in the order shown in the illustration.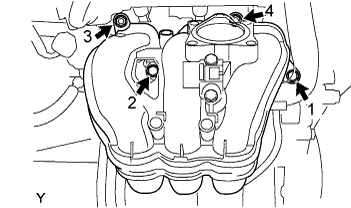
- Torque:
- 30 N*m{ 306 kgf*cm , 22 ft.*lbf }
Install the wire harness clamp with the bolt.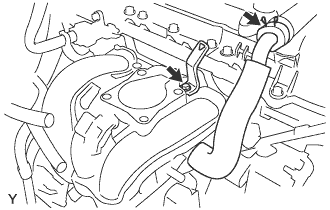
- Torque:
- 8.4 N*m{ 85 kgf*cm , 74 in.*lbf }
Connect the ventilation hose.
Connect the manifold absolute pressure sensor connector and the wire harness clamp.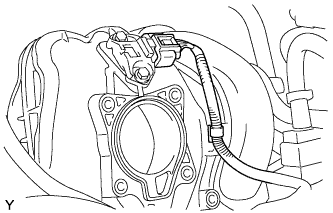
| 11. INSTALL INTAKE MANIFOLD STAY |
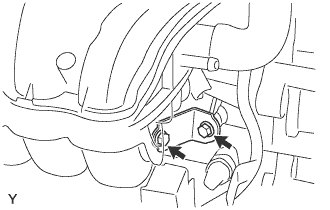 |
Install the intake manifold stay with the 2 bolts.
- Torque:
- 21 N*m{ 214 kgf*cm , 16 ft.*lbf }
| 12. INSTALL THROTTLE WITH MOTOR BODY ASSEMBLY |
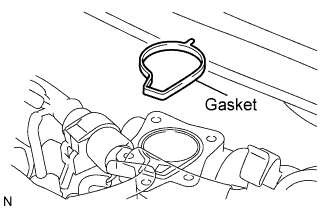 |
Install the new throttle body gasket.
Install the throttle body with the 4 bolts.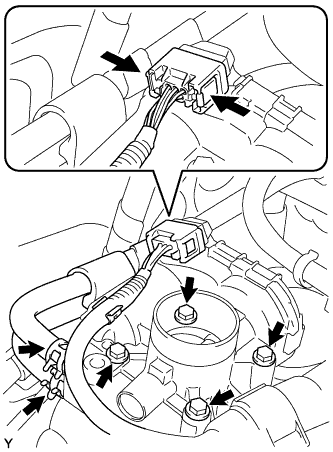
- Torque:
- 10 N*m{ 102 kgf*cm , 7.4 ft.*lbf }
- NOTICE:
- Do not bend the throttle body gasket while installing the throttle body.
Connect the 2 water by-pass hoses.
Connect the connector and the wire harness clamp.
| 13. INSTALL EXHAUST MANIFOLD ASSEMBLY |
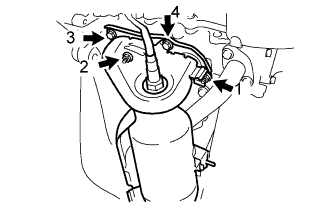 |
Install the new gasket.
Install the exhaust manifold with the 2 bolts and 2 nuts in the order shown in the illustration.
- Torque:
- 24 N*m{ 245 kgf*cm , 18 ft.*lbf }
| 14. INSTALL MANIFOLD STAY |
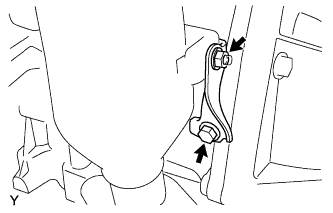 |
Install the manifold stay with the bolt and nut.
- Torque:
- 24 N*m{ 245 kgf*cm , 18 ft.*lbf }
| 15. INSTALL DUTY VACUUM SWITCHING VALVE |
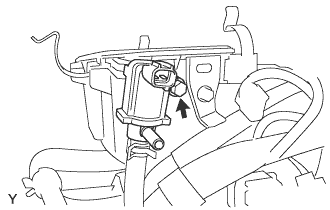 |
Install the duty vacuum switching valve with the bolt.
- Torque:
- 8.8 N*m{ 90 kgf*cm , 78 in.*lbf }
Connect the connector.
| 16. INSTALL IGNITION COIL NO. 1 |
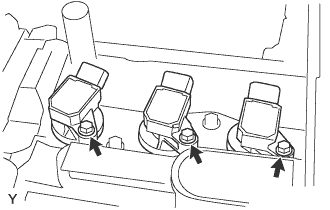 |
Install the ignition coil with the 3 bolts.
- Torque:
- 9.2 N*m{ 94 kgf*cm , 81 in.*lbf }
Connect the 3 connectors.
| 17. INSTALL FLYWHEEL ASSEMBLY |
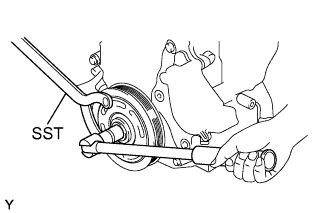 |
Hold the crankshaft with SST.
- SST
- 09960-10010
(09962-01000, 09963-01000)
Clean the 6 bolts and their holes.
Apply adhesive to the 2 or 3 end threads of the bolts.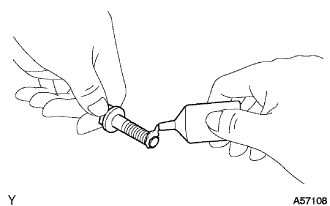
- Adhesive:
- Part No. 08833-00070, THREE BOND 1324 or equivalent
Install the flywheel with the 6 bolts in the order shown in the illustration.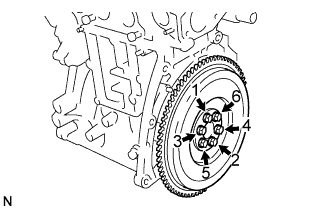
- Torque:
- 78 N*m{ 796 kgf*cm , 58 ft.*lbf }
| 18. INSTALL CLUTCH DISC ASSEMBLY |
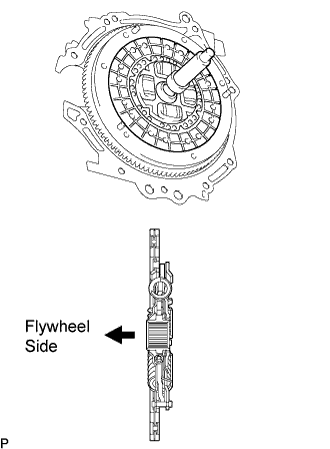 |
Insert SST into the clutch disc, and then insert them into the flywheel.
- SST
- 09301-00210
- NOTICE:
- Insert the clutch disc in the correct direction.
| 19. INSTALL CLUTCH COVER ASSEMBLY |
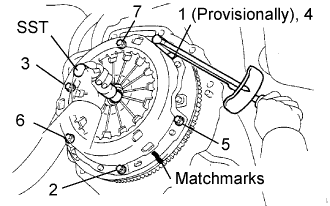 |
Align the matchmark on the clutch cover with the one on the flywheel.
Tighten the 6 bolts uniformly in the order shown in the illustration, starting with the bolt located near the knock pin at the top.
- Torque:
- 19 N*m{ 195 kgf*cm , 14 ft.*lbf }
- HINT:
- After checking that the disc is in the center, gently move SST up and down, right and left to tighten the bolts.
- SST
- 09301-00210
| 20. INSTALL MANUAL TRANSAXLE ASSEMBLY |
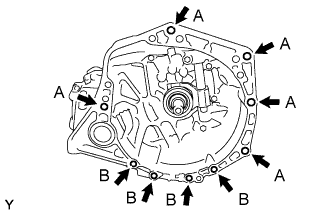 |
Align the input shaft with the clutch disc and install the manual transaxle onto the engine.
Install the 9 bolts.
- Torque:
- Bolt A:
- 64 N*m{ 653 kgf*cm , 47 ft.*lbf }
- Bolt B:
- 39 N*m{ 398 kgf*cm , 29 ft.*lbf }
- NOTICE:
- Insert a dowel pin securely into the dowel hole so that the end of face of the transaxle assembly is in close contact with the engine assembly before tightening the bolts to fix the engine and transaxle.
| 21. INSTALL ENGINE MOVING CONTROL ROD |
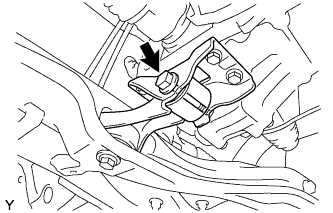 |
Install the engine moving control rod with the bolt.
- Torque:
- 120 N*m{ 1,224 kgf*cm , 89 ft.*lbf }
| 22. INSTALL STARTER ASSEMBLY (for 0.8 kW Type) |
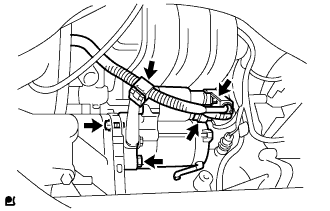 |
Install the starter assembly with the 2 bolts.
- Torque:
- 37 N*m{ 377 kgf*cm , 27 ft.*lbf }
Connect the connector.
Connect terminal 30 with the nut.
- Torque:
- 9.8 N*m{ 100 kgf*cm , 7.2 ft.*lbf }
Close the terminal cap.
Install the wire harness bracket with the bolt.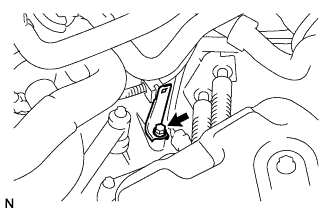
- Torque:
- 8 N*m{ 82 kgf*cm , 71 in.*lbf }
Install the harness clamp.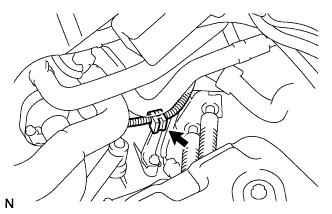
| 23. INSTALL STARTER ASSEMBLY (for 1.0 kW Type) |
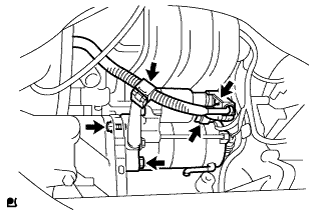 |
Install the starter assembly with the 2 bolts.
- Torque:
- 37 N*m{ 377 kgf*cm , 27 ft.*lbf }
Connect the connector.
Connect terminal 30 with the nut.
- Torque:
- 9.8 N*m{ 100 kgf*cm , 7.2 ft.*lbf }
Close the terminal cap.
Install the wire harness bracket with the bolt.
- Torque:
- 8 N*m{ 82 kgf*cm , 71 ft.*lbf }
Install the harness clamp.
| 24. INSTALL FLYWHEEL HOUSING SIDE COVER (for 0.8 kW Type) |
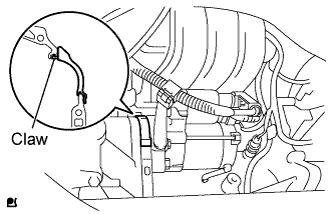 |
Insert the protruding portion into the end of the cylinder block and while pushing it along the cylinder block, fit the claw into the cylinder block.
- NOTICE:
- Make sure that the claw makes a click sound, indicating that it fits tightly.
- Replace the claw with a new one if it does not fit tightly or is deformed.
- Make sure that the claw makes a click sound, indicating that it fits tightly.
| 25. INSTALL FLYWHEEL HOUSING SIDE COVER (for 1.0 kW Type) |
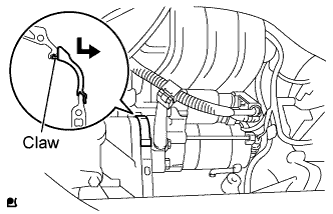 |
Insert the protruding portion into the end of the cylinder block and while pushing it along the cylinder block, fit the claw into the cylinder block.
- NOTICE:
- Make sure that the claw makes a click sound, indicating that it fits tightly.
- Replace the claw with a new one if it does not fit tightly or is deformed.
- Make sure that the claw makes a click sound, indicating that it fits tightly.
| 26. INSTALL ENGINE ASSEMBLY WITH TRANSAXLE |
Set the engine assembly with transaxle and the front suspension cross member on the engine lifter.
Operate the engine lifter and lift the engine assembly with transaxle and the front suspension cross member into the position where the engine mounting insulator RH and LH can be installed.
Install the engine mounting insulator LH with bolt B and the nut.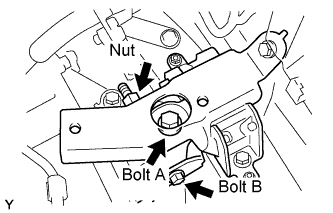
- Torque:
- 52 N*m{ 530 kgf*cm , 38 ft.*lbf }
Install the engine mounting insulator LH with bolt A.
- Torque:
- 64 N*m{ 653 kgf*cm , 47 ft.*lbf }
Provisionally install the engine mounting insulator RH with the 5 bolts and nut.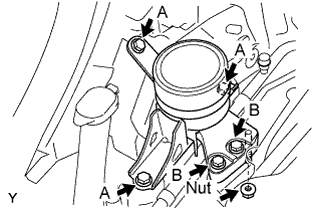
Tighten the 5 bolts and nut.
- Torque:
- Bolt A:
- 45 N*m{ 460 kgf*cm , 33 ft.*lbf }
- Bolt B:
- 52 N*m{ 530 kgf*cm , 38 ft.*lbf }
- Nut:
- 52 N*m{ 530 kgf*cm , 38 ft.*lbf }
Operate the engine lifter and provisionally install the engine assembly with transaxle and the front suspension cross member onto the vehicle with the 6 bolts.

Insert SST into the datum holes of the front suspension cross member RH and LH alternately and tighten bolts A, B and C on both sides in several steps.
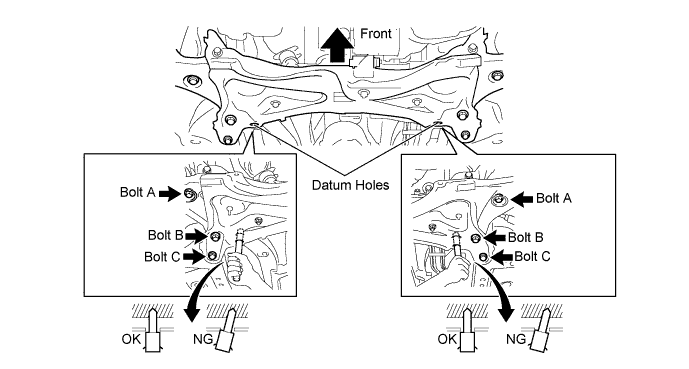
- SST
- 09670-00010
- Torque:
- Bolt A:
- 70 N*m{ 714 kgf*cm , 52 ft.*lbf }
- Bolt B:
- 160 N*m{ 1,631 kgf*cm , 118 ft.*lbf }
- Bolt C:
- 95 N*m{ 969 kgf*cm , 70 ft.*lbf }
- CAUTION:
- Insert SST into the datum holes vertically.
- If impossible to insert SST vertically, loosen all the bolts and then insert SST again.
- Insert SST into the datum holes vertically.
| 27. INSTALL WITH PULLEY COMPRESSOR ASSEMBLY (w/ Air Conditioning System) |
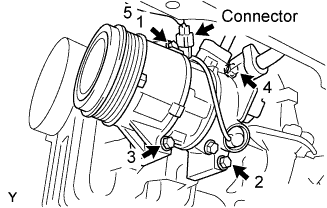 |
Install the compressor with the 4 bolts in the order shown in the illustration.
- Torque:
- 25 N*m{ 250 kgf*cm , 18 ft.*lbf }
Connect the connector.
| 28. INSTALL ENGINE WIRE |
| 29. INSTALL ECM |
Connect the ECM connector.
| 30. INSTALL STEERING COLUMN HOLE COVER SUB-ASSEMBLY NO. 1 |
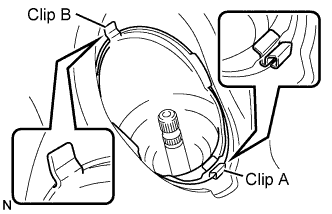 |
Install clip B onto the vehicle body and install the steering column hole cover onto the vehicle body with clip A.
- NOTICE:
- Fit the lip of steering column hole cover correctly onto the dash panel.
| 31. INSTALL STEERING INTERMEDIATE SHAFT ASSEMBLY NO. 2 |
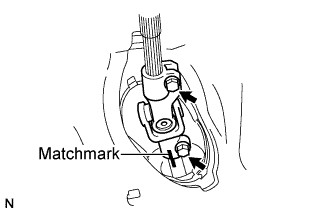 |
Align the matchmarks and install steering intermediate shaft onto the steering gear with the 2 bolts.
- Torque:
- 28 N*m{ 286 kgf*cm , 21 ft.*lbf }
| 32. INSTALL COLUMN HOLE COVER SILENCER SHEET |
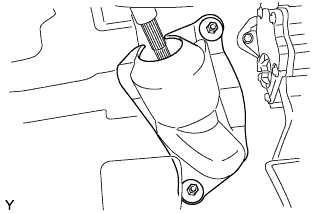 |
Install the column hole cover silencer sheet with the 2 clips.
| 33. INSTALL FRONT DRIVE SHAFT ASSEMBLY LH |
for Automatic Transaxle:
Coat the spline of the inboard joint with ATF.
for Manual Transaxle:
Coat the spline of the inboard joint with gear oil.
Align the inboard joint splines and install the drive shaft with a screwdriver and hammer.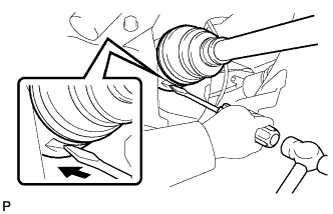
- NOTICE:
- Face the cut area of the front drive inboard joint hole snap ring downward.
- Do not damage the oil seal.
- Do not damage the inboard joint boot.
- Face the cut area of the front drive inboard joint hole snap ring downward.
- HINT:
- Confirm whether the drive shaft is securely driven in by checking the reaction force and sound.
| 34. INSTALL FRONT DRIVE SHAFT ASSEMBLY RH |
- HINT:
- The installation procedure for the RH side is the same as that for the LH side.
| 35. INSTALL FRONT AXLE ASSEMBLY LH |
Push the front axle out of the vehicle to align the spline of the drive shaft with the front axle and insert the front axle.
- NOTICE:
- Do not push the front axle further out of the vehicle than is necessary.
- Do not damage the outboard joint boot.
- Check for any foreign matter on the speed sensor rotor and insertion part.
- Do not damage the speed sensor rotor.
- Do not push the front axle further out of the vehicle than is necessary.
| 36. INSTALL FRONT AXLE ASSEMBLY RH |
- HINT:
- The installation procedure for the RH side is the same as that for the LH side.
| 37. INSTALL FRONT STABILIZER LINK ASSEMBLY LH |
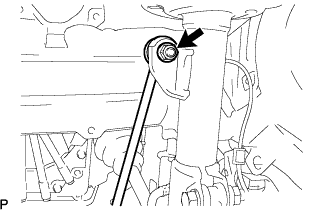 |
Install the stabilizer link with the nut.
- Torque:
- 74 N*m{ 755 kgf*cm , 55 ft.*lbf }
- HINT:
- If the ball joint turns together with the nut, use a socket hexagon wrench 6 to hold the stud.
| 38. INSTALL FRONT STABILIZER LINK ASSEMBLY RH |
- HINT:
- The installation procedure for the RH side is the same as that for the LH side.
| 39. INSTALL TIE ROD END SUB-ASSEMBLY LH |
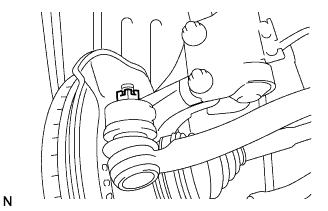 |
Install the tie rod end onto the steering knuckle with a new castle nut.
- Torque:
- 49 N*m{ 500 kgf*cm , 36 ft.*lbf }
- NOTICE:
- If the holes for the clip are not aligned, tighten the nut by a further turn of up to 60°.
Install a new cotter pin.
| 40. INSTALL TIE ROD END SUB-ASSEMBLY RH |
- HINT:
- The installation procedure for the RH side is the same as that for the LH side.
| 41. INSTALL FRONT SUSPENSION ARM SUB-ASSEMBLY LOWER NO. 1 LH |
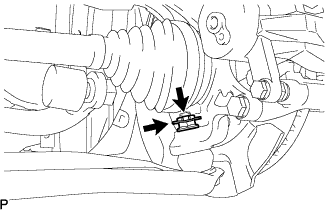 |
Install the lower arm onto the steering knuckle with a new castle nut.
- Torque:
- 98 N*m{ 1,000 kgf*cm , 72 ft.*lbf }
- NOTICE:
- If the holes for the clip are not aligned, tighten the nut by a further turn of up to 60°.
Install a new clip.
| 42. INSTALL FRONT SUSPENSION ARM SUB-ASSEMBLY LOWER NO. 1 RH |
- HINT:
- The installation procedure for the RH side is the same as that for the LH side.
| 43. INSTALL SPEED SENSOR FRONT LH |
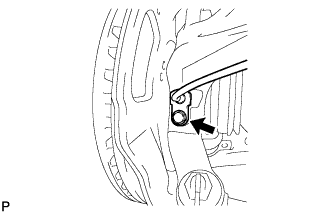 |
Install the speed sensor onto the steering knuckle with the bolt.
- Torque:
- 8.5 N*m{ 87 kgf*cm , 75 in.*lbf }
- NOTICE:
- Check that the speed sensor tip and installation portion are free of foreign matter.
- Install the speed sensor without turning it from its original installation angle.
- Check that the speed sensor tip and installation portion are free of foreign matter.
Install the flexible hose and speed sensor with the bolt.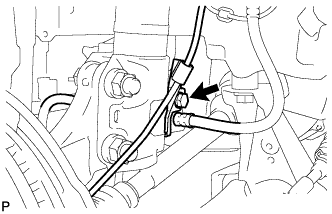
- Torque:
- 29 N*m{ 300 kgf*cm , 22 ft.*lbf }
- NOTICE:
- Install the flexible hose and speed sensor without twisting them.
| 44. INSTALL SPEED SENSOR FRONT RH |
- HINT:
- The installation procedure for the RH side is the same as that for the LH side.
| 45. INSTALL FRONT AXLE SHAFT LH NUT |
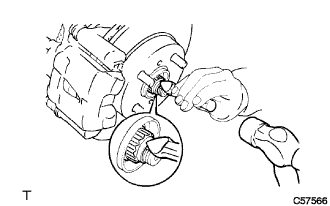 |
Using a 30 mm socket wrench, install a new axle hub nut.
- Torque:
- 216 N*m{ 2,203 kgf*cm , 160 ft.*lbf }
Using a chisel and hammer, caulk the axle hub nut.
| 46. INSTALL FRONT AXLE SHAFT RH NUT |
- HINT:
- The installation procedure for the RH side is the same as that for the LH side.
| 47. INSTALL FUEL TUBE SUB-ASSEMBLY |
Connect the fuel tube connector and fuel pipe, and install fuel pipe clamp No. 1.
- CAUTION:
- Align the fuel tube connector with the pipe, then push the fuel tube connector in until the retainer makes a click sound. If the connection is tight, apply a small amount of engine oil to the tip of the pipe. After connecting, pull the pipe and connector to make sure that they are securely connected.
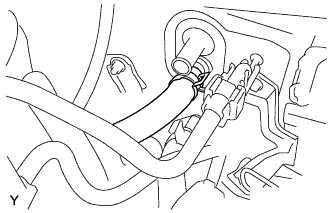
| 48. CONNECT HEATER WATER INLET HOSE A |
 |
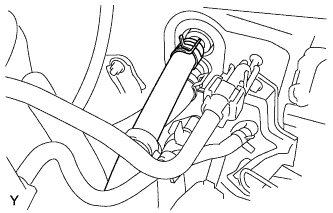
| 49. CONNECT HEATER WATER OUTLET HOSE A(FROM HEATER UNIT) |
 |
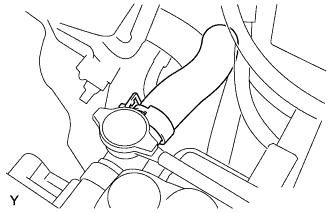
| 50. CONNECT RADIATOR HOSE NO. 1 |
 |
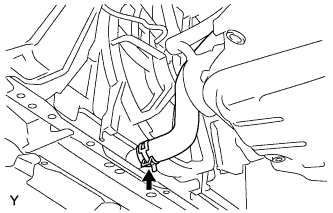
| 51. CONNECT RADIATOR HOSE NO. 2 |
 |
| 52. INSTALL TRANSMISSION CONTROL CABLE ASSEMBLY |
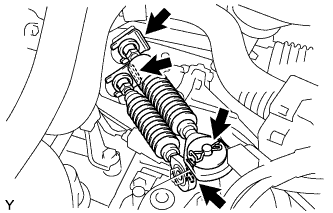 |
Connect the 2 cable ends, and install the 2 washers and the 2 clips.
Install the 2 new clips onto the control cable bracket.
| 53. INSTALL CLUTCH RELEASE CYLINDER ASSEMBLY |
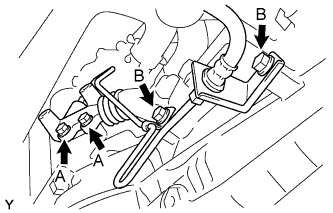 |
Install the clutch release cylinder and clutch pipe with the 4 bolts.
- Torque:
- Bolt A:
- 12 N*m{ 120 kgf*cm , 8.7 ft.*lbf }
- Bolt B:
- 19 N*m{ 194 kgf*cm , 14 ft.*lbf }
Install the release cylinder heat insulator with the 2 bolts.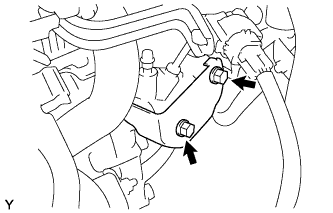
- Torque:
- 12 N*m{ 120 kgf*cm , 8.7 ft.*lbf }
| 54. CONNECT BOOSTER VACUUM TUBE |
Connect the booster vacuum hose the intake manifold.
| 55. CONNECT FUEL VAPOR FEED HOSE NO. 1 |
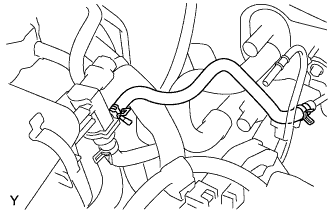 |
| 56. INSTALL FAN BELT ADJUSTING BAR |
Install the fan belt adjusting bar with the bolt.
- Torque:
- 34 N*m{ 347 kgf*cm , 25 ft.*lbf }
| 57. INSTALL GENERATOR ASSEMBLY |
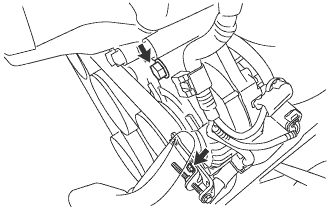 |
Provisionally install the generator with the 2 bolts.
Install the terminal B with the nut.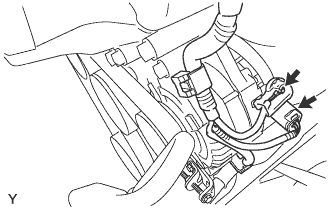
- Torque:
- 7.8 N*m{ 80 kgf*cm , 69 in.*lbf }
Connect the connector.
Engage the 2 clamps onto the generator.
| 58. INSTALL FAN AND GENERATOR V BELT |
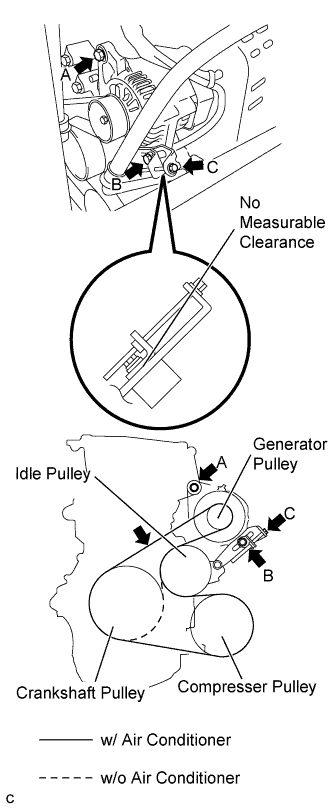 |
Install the fan and generator V belt.
Gently tighten bolt B until there is no measurable clearance.
Turn bolt C to adjust the tension of the fan and generator V belt.
Inspect the fan and generator V belt.
Tighten bolt B.
- Torque:
- 34 N*m{ 347 kgf*cm , 25 ft.*lbf }
Tighten bolt A.
- Torque:
- 54 N*m{ 551 kgf*cm , 40 ft.*lbf }
Visually check the generator wiring and listen for abnormal noise.
Check that the wiring is in good condition.
Check that there is no abnormal noise from the generator while the engine is running.
Inspect the discharge warning light circuit.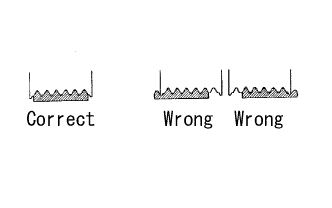
Turn the ignition switch to the ON position. Check that the discharge warning light illuminates.
Start the engine. Check that the light goes off.
| 59. INSTALL VENTILATION HOSE NO. 2 |
Install the ventilation hose No. 2 with the clamp.
| 60. INSTALL AIR CLEANER FILTER ELEMENT SUB-ASSEMBLY |
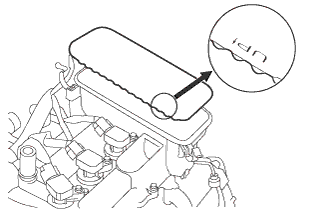 |
Install the air cleaner filter element as shown in the illustration.
| 61. INSTALL AIR CLEANER CAP SUB-ASSEMBLY |
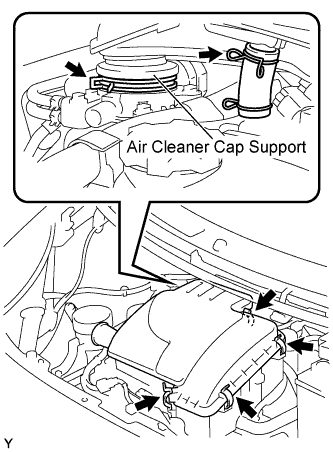 |
Install the air cleaner cap with the 2 clamps.
Tighten the 4 clamps.
| 62. INSTALL COWL TOP PANEL OUTER |
Install the cowl top panel outer with the 9 bolts.
- Torque:
- 6.5 N*m{ 66 kgf*cm , 58 in.*lbf }
Engage the clamp and install the wiper motor connector wire harness.
| 63. INSTALL COWL TO REGISTER DUCT SUB-ASSEMBLY NO. 2 |
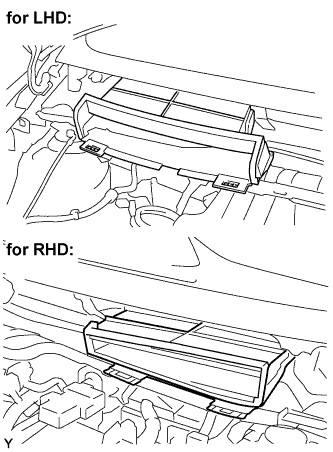 |
Engage the claws, and install the cowl to register duct No. 2.
| 64. INSTALL FRONT WINDOW WIPER MOTOR AND LINK |
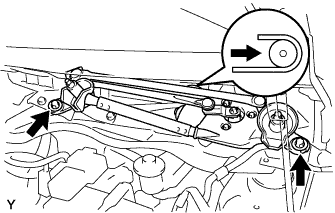 |
Connect the connector.
Slide the wiper link as shown in the illustration and engage the rubber pin with the body.
Install the front wiper motor and link with the 2 bolts.
- Torque:
- 5.5 N*m{ 56 kgf*cm , 49 in.*lbf }
| 65. INSTALL COWL TOP VENTILATOR LOUVER LH (for LHD) |
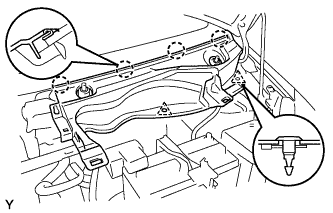 |
Engage the 4 claws and install the cowl top ventilator louver LH.
Install the 2 clips.
| 66. INSTALL COWL TOP VENTILATOR LOUVER SUB-ASSEMBLY (for LHD) |
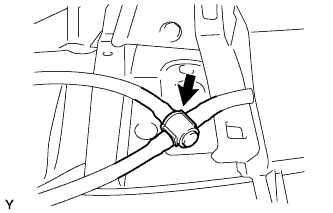 |
Connect the washer hose.
Engage the 11 claws and install the cowl top ventilator louver sub-assembly.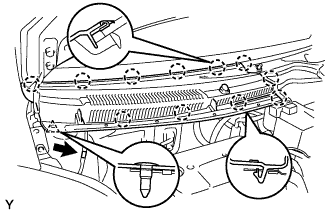
Install the clip.
Connect the washer hose.
Engage the 2 hooks and install cowl top ventilator louver center No. 1.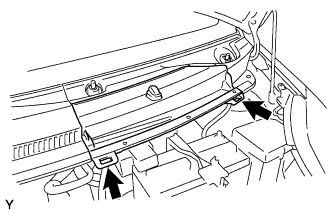
| 67. INSTALL COWL TOP VENTILATOR LOUVER LH (for RHD) |
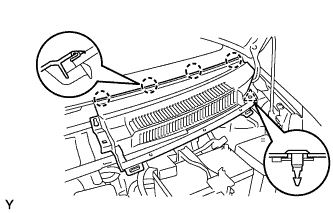 |
Engage the 4 claws and install the cowl top ventilator louver LH.
Install the clip.
| 68. INSTALL COWL TOP VENTILATOR LOUVER SUB-ASSEMBLY (for RHD) |
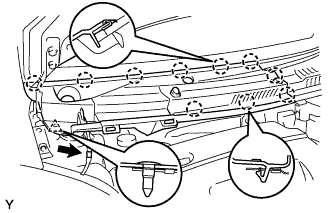 |
Engage the 10 claws and install the cowl top ventilator louver sub-assembly.
Install the clip.
Connect the washer hose.
| 69. INSTALL HOOD TO COWL TOP SEAL |
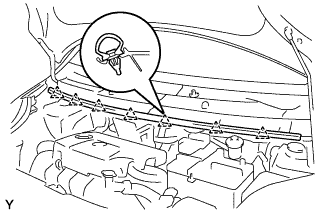 |
Engage the 7 clips and install the hood to cowl top seal.
| 70. INSTALL FRONT WIPER ARM AND BLADE ASSEMBLY LH |
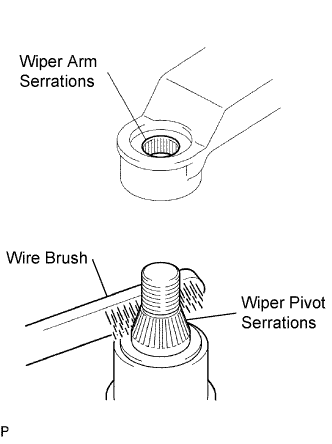 |
Scrape any metal powder off the serrated part of the wiper arm with a round file or the equivalent (when reinstalling).
Clean the wiper pivot serrations with a wire brush.
Operate the wiper, then stop the windshield wiper motor in the automatic stop position.
Align the blade tip with the mark on the windshield glass, as shown in the illustration.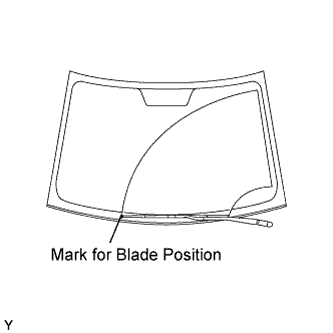
Tighten the nut of the front wiper arm.
- Torque:
- 26 N*m{ 265 kgf*cm , 19 ft.*lbf }
| 71. INSTALL FRONT WIPER ARM AND BLADE ASSEMBLY RH |
|
|
Scrape any metal powder off the serrated part of the wiper arm with a round file or the equivalent (when reinstalling).
Clean the wiper pivot serrations with a wire brush.
Operate the wiper, then stop the windshield wiper motor in the automatic stop position.
Align the blade tip with the mark on the windshield glass, as shown in the illustration.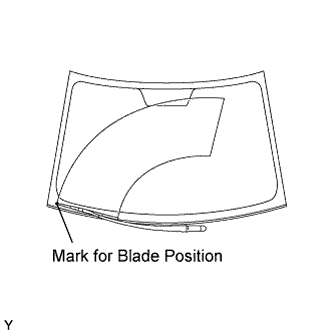
Tighten the nut of the front wiper arm.
- Torque:
- 26 N*m{ 265 kgf*cm , 19 ft.*lbf }
| 72. INSTALL FRONT WIPER ARM HEAD CAP |
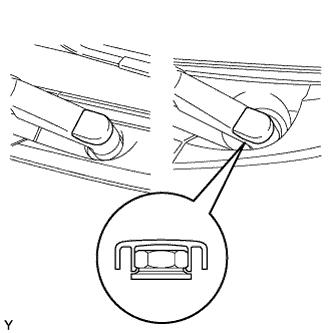 |
Engage the claw and install the 2 front wiper arm head caps.
| 73. INSTALL FRONT WHEELS |
- Torque:
- 103 N*m{ 1,050 kgf*cm , 76 ft.*lbf }
| 74. INSTALL EXHAUST PIPE ASSEMBLY FRONT |
Using a vernier caliper, measure the free length of the compression spring.
- Minimum length:
- Front side:
- 40.5 mm (1.594 in.)
- Rear side:
- 38.5 mm (1.516 in.)
Install a new gasket onto the rear side of the exhaust pipe front.
- NOTICE:
- Install the gasket in the correct direction.
- Do not reuse the gasket.
- To ensure a proper seal, do not use the tailpipe to force the gasket onto the exhaust pipe front.
- Install the gasket in the correct direction.
Install the 3 supports, and install the exhaust pipe front.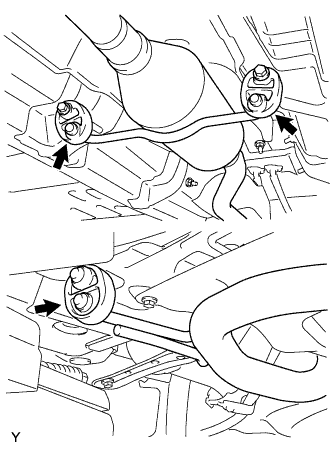
Install the exhaust pipe front to the exhaust pipe tail with the 2 bolts and compression springs.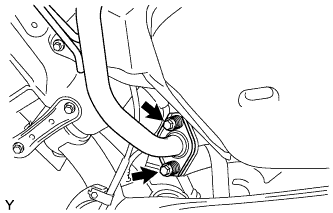
- Torque:
- 43 N*m{ 438 kgf*cm , 32 ft.*lbf }
Install the exhaust pipe front onto the exhaust manifold with the 2 bolts and compression springs.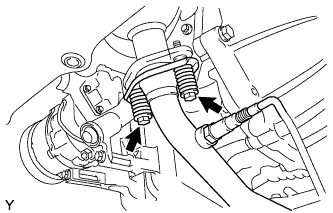
- Torque:
- 43 N*m{ 438 kgf*cm , 32 ft.*lbf }
Connect the oxygen sensor connector, and engage the 3 wire harness clamps.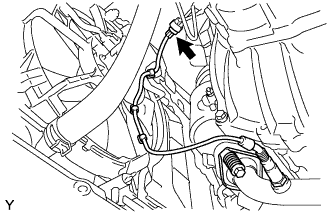
| 75. INSTALL EGR INLET EXHAUST MANIFOLD PLATE |
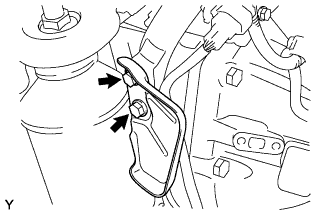 |
Install the EGR inlet exhaust manifold plate with the 2 bolts.
- Torque:
- 18 N*m{ 184 kgf*cm , 13 ft.*lbf }
| 76. INSTALL BATTERY CARRIER |
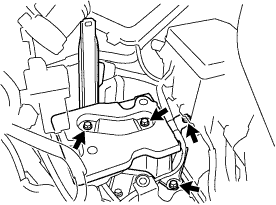 |
Install the battery carrier with the 4 bolts.
- Torque:
- 17 N*m{ 174 kgf*cm , 13 ft.*lbf }
Engage the 5 clamps, and install the engine wire harness.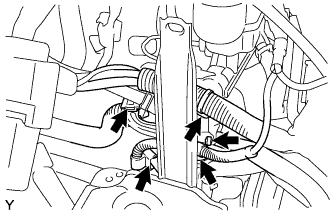
| 77. INSTALL BATTERY TRAY |
| 78. INSTALL BATTERY |
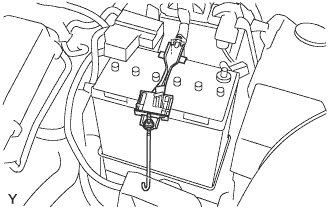 |
Install the battery onto the battery tray.
Install the battery carrier clamp with the nut.
Install the positive and negative terminals.
- Torque:
- 5.4 N*m{ 55 kgf*cm , 48 in.*lbf }
| 79. ADD ENGINE COOLANT |
Tighten all the plugs.
Disconnect the vinyl hose.
Pour engine coolant into the radiator assembly until it overflows.
- Capacity:
- 4.5 liters (4.8 USqts, 4.2 lmp. qts)
- NOTICE:
- Do not substitute water for engine coolant.
- HINT:
- Use of improper engine coolant may damage the engine coolant system.
- Use only Toyota Super Long Life Coolant or similar high quality ethylene glycol based non-silicate, non-amine, non-nitrite, and non-borate engine coolant with long-life hybrid organic acid technology (coolant with long-life hybrid organic acid technology consists of a combination of low phosphates and organic acids).
- Use of improper engine coolant may damage the engine coolant system.
Check the engine coolant level inside the radiator assembly by squeezing the inlet and outlet radiator hoses several times by hand. If the engine coolant level goes down, add engine coolant.
Install the radiator cap sub-assembly securely.
Slowly pour engine coolant into the radiator reservoir until it reaches the FULL line.
Warm up the engine until the cooling fan operates.
Set the air conditioning as follows while warming up the engine.
Item
Manual air conditioning system
Automatic air conditioning system
Set control as follows
Fan speed - Any setting except "OFF"
Temperature - Toward WARM
Air conditioning switch "OFF"
Fan speed - Any setting except "OFF"
Temperature - To the highest temperature
Air conditioning switch "OFF"
"AUTO" switch "OFF"
Maintain the engine speed at 2,000 to 2,500 rpm and warm up the engine until the cooling fan operates.
Stop the engine and wait until the coolant cools down.
If the engine coolant level is below the full level, perform steps (c) through (h) again and repeat the operation until the engine coolant level stays at the full level.
Recheck the engine coolant level inside the radiator reservoir tank assembly. If it is below the full level, add engine coolant.
| 80. ADD MANUAL TRANSAXLE OIL |
| 81. INSPECT MANUAL TRANSAXLE OIL |
Stop the vehicle in a level place.
Remove the transmission filler plug and the gasket.
Check that the oil surface is within 5 mm (0.20 in.) of the bottom of the transmission filler plug opening.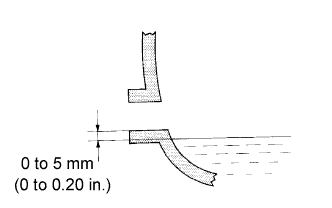
- NOTICE:
- Excessively large or small amounts of oil may cause problems.
- Excessively large or small amounts of oil may cause problems.
- After replacing the oil, drive the vehicle and check the oil level again.
- After replacing the oil, drive the vehicle and check the oil level again.
Check for oil leakage if the oil level is low.
Install the transmission filler plug and a new gasket.
- Torque:
- 39 N*m{ 400 kgf*cm , 29 ft.*lbf }
| 82. ADD ENGINE OIL |
Fill with new engine oil.
- Oil capacity:
Item
Specification
With oil filter change
3.1 liter (3.3 Us qts, 2.7 lmp. qts)
Without oil filter change
2.9 liter (3.1 Us qts, 2.6 lmp. qts)
Dry fill
3.4 liter (3.6 Us qts, 3.0 lmp. qts)
| 83. CHECK FOR ENGINE COOLANT LEAKAGE |
- CAUTION:
- To avoid the danger of being burned, do not remove the radiator cap sub-assembly while the engine and radiator assembly are still hot. Thermal expansion will cause hot engine coolant and steam to blow out from the radiator assembly.
Fill the radiator assembly with engine coolant, then attach a radiator cap tester.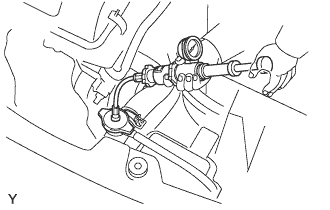
Pump it to 137 kPa (1.4 kgf/cm2, 19.9 psi), then check that the pressure does not drop.
If the pressure drops, check the hoses, radiator assembly and water pump assembly for leakage. If there are no signs or traces of external engine coolant leakage, check the heater core, cylinder block and head.
| 84. CHECK FOR MANUAL TRANSAXLE OIL LEAKAGE |
| 85. CHECK FOR ENGINE OIL LEAKAGE |
| 86. CHECK FOR EXHAUST GAS LEAKAGE |
| 87. INSPECT IGNITION TIMING |
- NOTICE:
- Turn all the electrical systems and the A/C off.
- Inspect the ignition timing with the cooling fan off.
- When checking the ignition timing, shift the transmission to the neutral position.
- Turn all the electrical systems and the A/C off.
Warm up and stop the engine.
When using the intelligent tester: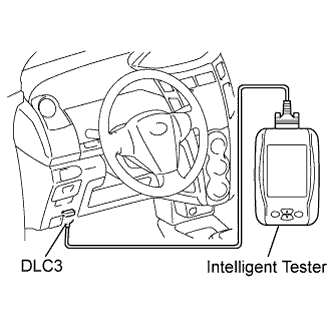
Connect the intelligent tester to the DLC3.
Turn the Ignition Switch on (IG).
Select the following menu items:
Powertrain / Engine and ECT / Active Test / TE1 (TC) / ON.- HINT:
- Refer to the intelligent tester operator's manual for further information regarding the selection of Active Test.
Inspect the ignition timing during idling.
- Ignition timing:
- 8 to 12° BTDC
Select the following menu items:
TE1 (TC) / OFFTurn the Ignition Switch off.
Disconnect the intelligent tester from the DLC3.
When not using the intelligent tester:
Remove the air cleaner cap sub-assembly (Click here).
Install the tester terminal of a timing light onto the position shown in the illustration.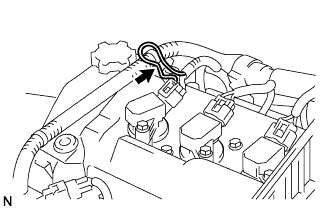
- NOTICE:
- Use a timing light that detects the first signal.
- Wrap the wire harness with tape after checking.
- Use a timing light that detects the first signal.
Using SST, connect terminals 13 (TC) and 4 (CG) of the DLC3.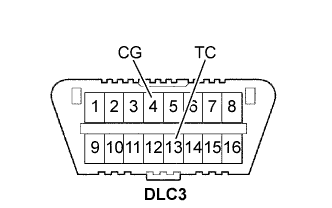
- SST
- 09843-18040
- NOTICE:
- Check the terminal numbers before connecting them. Connecting the wrong terminals could damage the engine.
Turn the Ignition Switch on (IG).
Inspect the ignition timing during idling.
- Ignition timing:
- 0 to 15° BTDC
- HINT:
- Run the engine speed at 1,000 to 1,300 rpm for 5 seconds, then check that the engine speed returns to the idling speed.
Disconnect terminals 13 (TC) and 4 (CG) of the DCL3.
Turn the Ignition Switch off.
Remove the timing light.
Install the air cleaner cap sub-assembly (Click here).
| 88. INSPECT ENGINE IDLING SPEED |
- NOTICE:
- Turn all the electrical systems and the A/C off.
- Inspect the engine idling speed with the cooling fan off.
- When checking the idling speed, shift the transmission to the neutral position.
- Turn all the electrical systems and the A/C off.
Warm up and stop the engine.
When using the intelligent tester:
Connect the intelligent tester to the DLC3.
Turn the Ignition Switch on (IG).
Select the following menu items:
Powertrain / Engine and ECT / Data List / Engine SPD.- HINT:
- Refer to the intelligent tester operator's manual for further information regarding the selection of Data List.
Inspect the engine idling speed.
- Idling speed:
- 730 to 830 rpm
Turn the Ignition Switch off.
Disconnect the intelligent tester from the DCL3.
When not using an intelligent tester: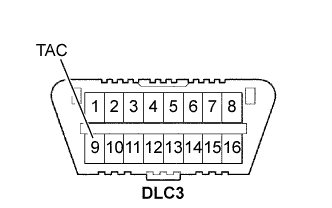
Install SST to terminal 9 (TAC) of the DLC3, then connect a tachometer.
- SST
- 09843-18040
- NOTICE:
- Check the terminal numbers before connecting them. Connecting the wrong terminals could damage the engine.
Turn the Ignition Switch on (IG).
Inspect the engine idling speed.
- Idling speed:
- 730 to 830 rpm
Turn the Ignition Switch off.
Disconnect the tachometer.
Remove SST from terminal 9 (TAC).
| 89. INSPECT CO/HC |
- HINT:
- The ECM controls the concentration of CO/HC in the emission gas.
Start the engine.
Run the engine at 2,500 rpm for approximately 180 seconds.
Insert the CO/HC meter testing probe at least 40 cm (1.3 ft) into the tailpipe during idling.
Check the CO/HC concentration during idling and when running at 2,500 rpm.
- Standard:
- CO concentration:
- 0.2 % or less
- HC concentration:
- 70 ppm or less
- Check the heated oxygen sensor operation (Click here and/or Click here).
- See the table below for possible causes, then inspect the applicable parts and repair them if necessary.
CO
HC
Problems
Causes
Normal
High
Rough idling
- Faulty ignition:
- Fouled, shorted or improperly gapped plugs
- Incorrect valve clearance
- Leakage from intake and exhaust valves
- Leakage from cylinders
Low
High
Rough idling
(Fluctuating HC reading)
- Lean mixture causing misfire
- Faulty SFI systems:
- Faulty pressure regulator
- Faulty engine coolant temperature sensor
- Faulty mass air flow meter
- Faulty ECM
- Faulty injectors
- Faulty throttle body
High
High
Rough idling
(Black smoke from exhaust)
- Faulty SFI systems:
- Faulty pressure regulator
- Faulty engine coolant temperature sensor
- Faulty mass air flow meter
- Faulty ECM
- Faulty injectors
- Faulty throttle body
| 90. INSPECT AND ADJUST FRONT WHEEL ALIGNMENT |
| 91. INSTALL ENGINE UNDER COVER RH |
| 92. INSTALL ENGINE UNDER COVER LH |
| 93. INSTALL FRONT SPOILER COVER (w/ Front Spoiler Cover) |
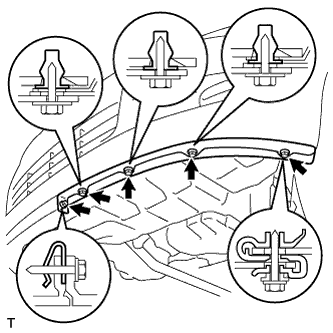
Install the front spoiler cover with the 4 screws.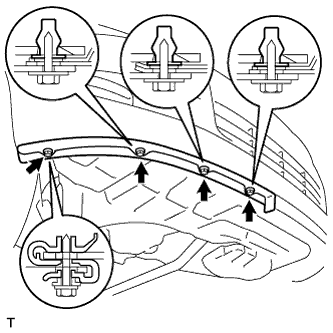
| 94. INSTALL FRONT SPOILER COVER LH (w/ Front Spoiler Cover LH) |
Install the front spoiler cover with the 5 screws.