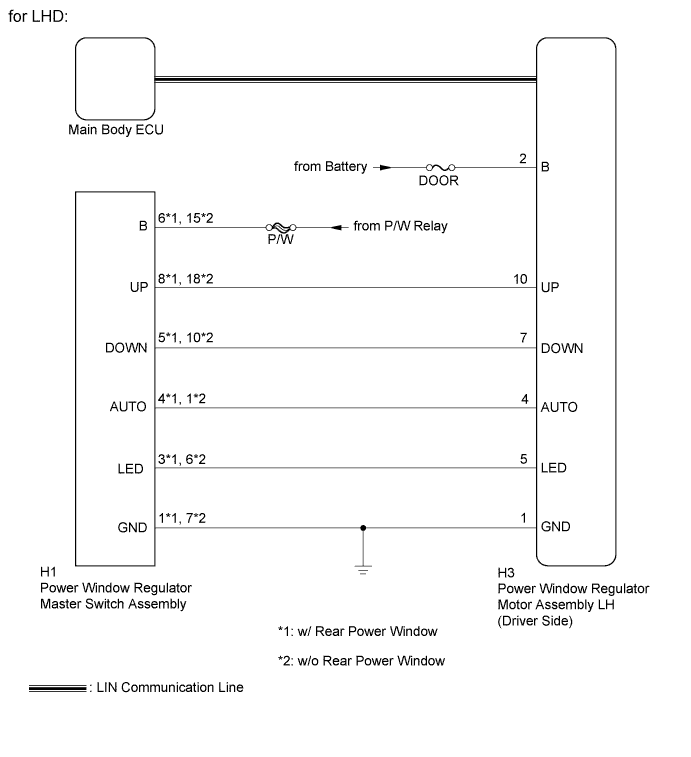
POWER WINDOW CONTROL SYSTEM > Driver Side Power Window does not Operate with Power Window Master Switch |
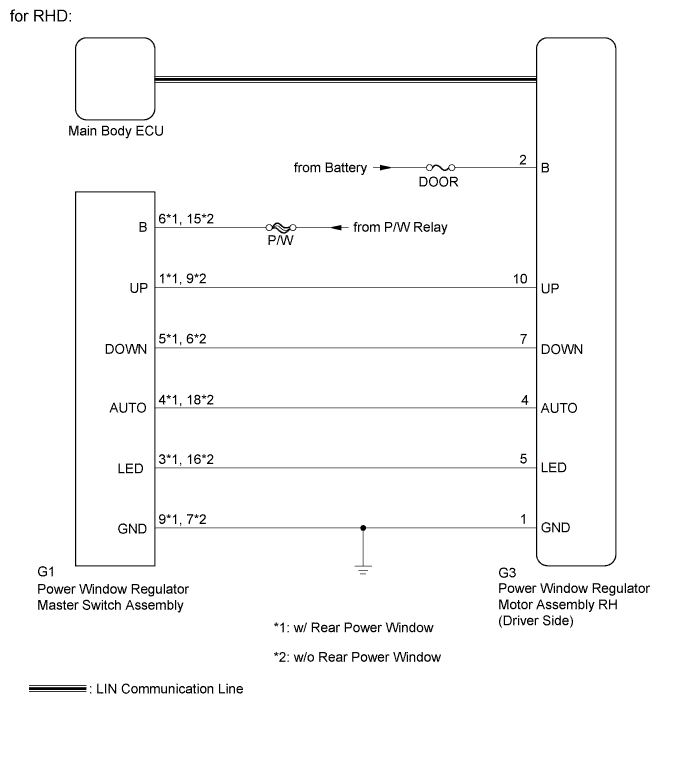
| 1.READ VALUE USING INTELLIGENT TESTER |
Connect the intelligent tester to the DLC3.
Turn the ignition switch to ON.
Turn the intelligent tester on.
Enter the following menus: Body / D-Door Motor / Data List.
According to the display on the intelligent tester, perform the Data List.
| Tester Display | Measurement Item/Range | Normal Condition | Diagnostic Note |
| D Door P/W Auto SW | Driver side power window auto switch signal / OFF or ON | OFF: Driver side door power window auto switch not operated ON: Driver side door power window auto switch operated | - |
| D Door P/W Up SW | Driver side power window manual up switch signal / OFF or ON | OFF: Driver side door power window manual up switch not operated ON: Driver side door power window manual up switch operated | - |
| D Door P/W Down SW | Driver side power window manual down switch signal / OFF or ON | OFF: Driver side door power window manual down switch not operated ON: Driver side door power window manual down switch operated | - |
|
| ||||
| OK | |
 |
| 2.PERFORM ACTIVE TEST USING INTELLIGENT TESTER |
Connect the intelligent tester to the DLC3.
Turn the ignition switch to ON.
Turn the intelligent tester on.
Enter the following menus: Body / D-Door Motor / Active Test.
According to the display on the intelligent tester, perform the Active Test.
| Tester Display | Test Part | Control Range | Diagnostic Note |
| Power Window | Power window | OFF / DOWN / UP | - |
|
| ||||
| OK | ||
 | ||
| ||
| 3.INSPECT POWER WINDOW REGULATOR MASTER SWITCH ASSEMBLY |
Inspect the power window regulator master switch assembly (Click here).
|
| ||||
| OK | |
|
| 4.CHECK HARNESS AND CONNECTOR (POWER WINDOW REGULATOR MASTER SWITCH ASSEMBLY - P/W RELAY AND BODY GROUND) |
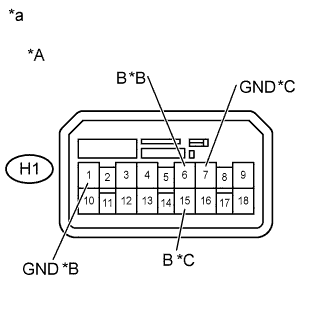 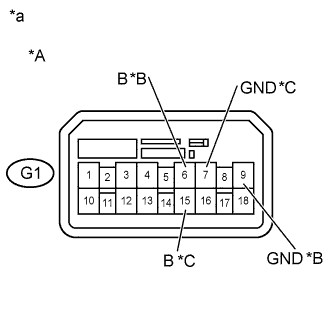 |
for LHD
Disconnect the H1 power window regulator master switch assembly connector.
Measure the voltage according to the value(s) in the table below.
| Tester Connection | Switch Condition | Specified Condition |
| H1-6 (B) - Body ground | Ignition switch ON | 11 to 14 V |
| Tester Connection | Switch Condition | Specified Condition |
| H1-15 (B) - Body ground | Ignition switch ON | 11 to 14 V |
Measure the resistance according to the value(s) in the table below.
| Tester Connection | Condition | Specified Condition |
| H1-1 (GND) - Body ground | Always | Below 1 Ω |
| Tester Connection | Condition | Specified Condition |
| H1-7 (GND) - Body ground | Always | Below 1 Ω |
| *A | for LHD |
| *B | w/ Rear Power Window |
| *C | w/o Rear Power Window |
| *a | Front view of wire harness connector (to Power Window Regulator Master Switch Assembly) |
for RHD
Disconnect the G1 power window regulator master switch assembly connector.
Measure the voltage according to the value(s) in the table below.
| Tester Connection | Switch Condition | Specified Condition |
| G1-6 (B) - Body ground | Ignition switch ON | 11 to 14 V |
| Tester Connection | Switch Condition | Specified Condition |
| G1-15 (B) - Body ground | Ignition switch ON | 11 to 14 V |
Measure the resistance according to the value(s) in the table below.
| Tester Connection | Condition | Specified Condition |
| G1-9 (GND) - Body ground | Always | Below 1 Ω |
| Tester Connection | Condition | Specified Condition |
| G1-7 (GND) - Body ground | Always | Below 1 Ω |
| *A | for RHD |
| *B | w/ Rear Power Window |
| *C | w/o Rear Power Window |
| *a | Front view of wire harness connector (to Power Window Regulator Master Switch Assembly) |
|
| ||||
| OK | |
|
| 5.CHECK HARNESS AND CONNECTOR (POWER WINDOW REGULATOR MOTOR ASSEMBLY LH OR RH - BATTERY AND BODY GROUND) |
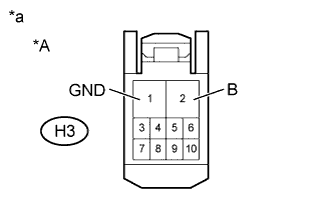 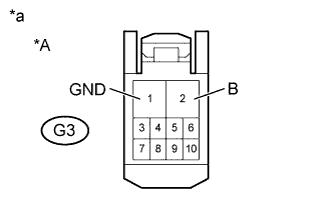 |
for LHD
Disconnect the H3 power window regulator motor assembly LH (driver side) connector.
Measure the voltage according to the value(s) in the table below.
| Tester Connection | Condition | Specified Condition |
| H3-2 (B) - Body ground | Always | 11 to 14 V |
Measure the resistance according to the value(s) in the table below.
| Tester Connection | Condition | Specified Condition |
| H3-1 (GND) - Body ground | Always | Below 1 Ω |
| *A | for LHD |
| *a | Front view of wire harness connector (to Power Window Regulator Motor Assembly LH (Driver Side)) |
for RHD
Disconnect the G3 power window regulator motor assembly RH (driver side) connector.
Measure the voltage according to the value(s) in the table below.
| Tester Connection | Condition | Specified Condition |
| G3-2 (B) - Body ground | Always | 11 to 14 V |
Measure the resistance according to the value(s) in the table below.
| Tester Connection | Condition | Specified Condition |
| G3-1 (GND) - Body ground | Always | Below 1 Ω |
| *A | for RHD |
| *a | Front view of wire harness connector (to Power Window Regulator Motor Assembly RH (Driver Side)) |
|
| ||||
| OK | |
|
| 6.CHECK HARNESS AND CONNECTOR (POWER WINDOW MASTER SWITCH ASSEMBLY - POWER WINDOW REGULATOR MOTOR ASSEMBLY) |
for LHD
Disconnect the H1 power window regulator master switch assembly connector.
Disconnect the H3 power window regulator motor assembly LH (driver side) connector.
Measure the resistance according to the value(s) in the table below.
| Tester Connection | Condition | Specified Condition |
| H1-8 (UP) - H3-10 (UP) | Always | Below 1 Ω |
| H1-5 (DOWN) - H3-7 (DOWN) | Always | Below 1 Ω |
| H1-4 (AUTO) - H3-4 (AUTO) | Always | Below 1 Ω |
| H1-3 (LED) - H3-5 (LED) | Always | Below 1 Ω |
| H1-8 (UP) - Body ground | Always | 10 kΩ or higher |
| H1-5 (DOWN) - Body ground | Always | 10 kΩ or higher |
| H1-4 (AUTO) - Body ground | Always | 10 kΩ or higher |
| H1-3 (LED) - Body ground | Always | 10 kΩ or higher |
| Tester Connection | Condition | Specified Condition |
| H1-18 (UP) - H3-10 (UP) | Always | Below 1 Ω |
| H1-10 (DOWN) - H3-7 (DOWN) | Always | Below 1 Ω |
| H1-1 (AUTO) - H3-4 (AUTO) | Always | Below 1 Ω |
| H1-6 (LED) - H3-5 (LED) | Always | Below 1 Ω |
| H1-18 (UP) - Body ground | Always | 10 kΩ or higher |
| H1-10 (DOWN) - Body ground | Always | 10 kΩ or higher |
| H1-1 (AUTO) - Body ground | Always | 10 kΩ or higher |
| H1-6 (LED) - Body ground | Always | 10 kΩ or higher |
for RHD
Disconnect the G1 power window regulator master switch assembly connector.
Disconnect the G3 power window regulator motor assembly RH (driver side) connector.
Measure the resistance according to the value(s) in the table below.
| Tester Connection | Condition | Specified Condition |
| G1-1 (UP) - G3-10 (UP) | Always | Below 1 Ω |
| G1-5 (DOWN) - G3-7 (DOWN) | Always | Below 1 Ω |
| G1-4 (AUTO) - G3-4 (AUTO) | Always | Below 1 Ω |
| G1-3 (LED) - G3-5 (LED) | Always | Below 1 Ω |
| G1-1 (UP) - Body ground | Always | 10 kΩ or higher |
| G1-5 (DOWN) - Body ground | Always | 10 kΩ or higher |
| G1-4 (AUTO) - Body ground | Always | 10 kΩ or higher |
| G1-3 (LED) - Body ground | Always | 10 kΩ or higher |
| Tester Connection | Condition | Specified Condition |
| G1-9 (UP) - G3-10 (UP) | Always | Below 1 Ω |
| G1-6 (DOWN) - G3-7 (DOWN) | Always | Below 1 Ω |
| G1-18 (AUTO) - G3-4 (AUTO) | Always | Below 1 Ω |
| G1-16 (LED) - G3-5 (LED) | Always | Below 1 Ω |
| G1-9 (UP) - Body ground | Always | 10 kΩ or higher |
| G1-6 (DOWN) - Body ground | Always | 10 kΩ or higher |
| G1-18 (AUTO) - Body ground | Always | 10 kΩ or higher |
| G1-16 (LED) - Body ground | Always | 10 kΩ or higher |
|
| ||||
| OK | ||
| ||
| ||

