ENGINE > ON-VEHICLE INSPECTION |
| 1. INSPECT COOLANT |
Remove the water filler cap sub-assembly.
Check for excessive deposits of rust or scale around the water filler cap sub-assembly and radiator filler hole. The coolant should be free of oil.
If excessively dirty, replace the engine coolant.
Reinstall the water filler cap sub-assembly.
| 2. INSPECT ENGINE OIL |
Check the oil for deterioration, entry of water, discoloring or thinning.
If the quality is visibly poor, replace the oil.
| 3. INSPECT BATTERY |
Check the battery for damage and deformation. If severe damage, deformation or leak is found, replace the battery.
Check the voltage.
Turn the ignition switch off and turn on the headlights for 20 to 30 seconds. This will remove the surface charge from the battery.
Measure the battery voltage according to the value(s) in the table below.
| Tester Connection | Condition | Specified Condition |
| Positive(+) terminal - Negative(-) terminal | 20°C (68°F) | 12.5 to 12.9 V |
| 4. INSPECT AIR CLEANER FILTER ELEMENT SUB-ASSEMBLY |
Remove air cleaner cap sub-assembly .
Remove the air cleaner filter element sub-assembly.
Visually check that there is no dirt, blockage, or damage to the air cleaner filter element.
Install the air cleaner filter element sub-assembly.
Install the air cleaner cap sub-assembly .
| 5. INSPECT FAN AND GENERATOR V BELT |
|
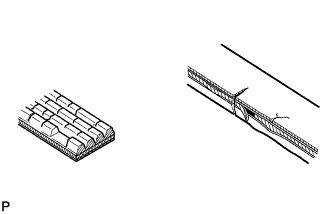
Check the fan and generator V belt for wear, cracks or other signs of damage.
If any of the following defects is found, replace the fan and generator V belt.
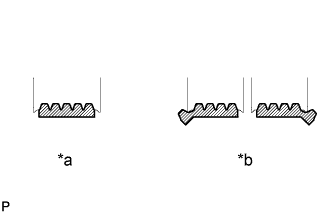 |
Check that the fan and generator V belt fits properly in the ribbed grooves.
| *a | Correct |
| *b | Incorrect |
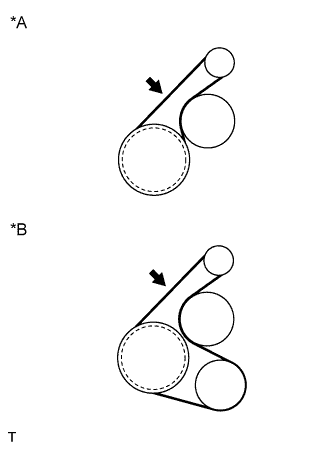 |
Inspect the V belt deflection and tension.
| *A | w/o Air Conditioner |
| *B | w/ Air Conditioner |
| Item | Specified Condition | |
| New belt | 8.0 to 9.0 mm (0.31 to 0.35 in) | |
| Used belt | 12.5 to 13.5 mm (0.49 to 0.53 in) | |
| Item | Specified Condition | |
| New belt | 700 to 800 N (71 to 82 kg, 157 to 180 lb) | |
| Used belt | 300 to 400 N (31 to 41 kg, 67 to 90 lb) | |
| 6. INSPECT SPARK PLUG |
Perform the spark test in accordance with the following procedure.
Check that the wire harness side connector of the ignition coil with igniter is securely connected.
| Result | Proceed to |
| NG | Connect securely |
| OK | Go to next step |
Perform a spark test on each ignition coil with igniter.
If there is a cylinder where sparks do not occur, replace its ignition coil with the ignition coil of a cylinder where sparks occur normally.
Crank the engine and visually check that sparks occur at the cylinder with the normally operating ignition coil.
| Result | Proceed to |
| NG | Replace ignition coil with igniter |
| OK | Go to next step |
Perform a spark test on each spark plug.
If there is a cylinder where sparks do not occur, replace its spark plug with the spark plug of a cylinder where sparks occur normally.
Crank the engine and visually check that sparks occur at the cylinder with the normally operating spark plug.
| Result | Proceed to |
| OK | Replace spark plug |
| NG | Ignition Circuit (Click here) |
Connect the 4 injector connectors.
Install the ignition coil and spark plug (Click here).
| 7. INSPECT IGNITION TIMING |
When using an intelligent tester:
Warm up and stop the engine.
Connect the intelligent tester to the DLC3.
Turn the ignition switch to ON and turn the tester on.
Start the engine.
Select the following menu items:
Powertrain / Engine and ECT / Active Test / TC and TE1 / ON.
Inspect the ignition timing during idling.
| Transaxle | Ignition Timing |
| Manual Transaxle | 8 to 12 degrees BTDC |
| Automatic Transaxle |
Select the following menu items: TC and TE1 / OFF.
Turn the ignition switch off.
Disconnect the intelligent tester from the DLC3.
When not using an intelligent tester:
Remove the No. 2 cylinder head cover .
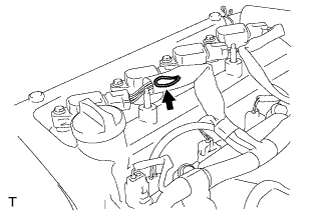 |
Pull out the wire harness (brown) shown in the illustration.
Warm up and stop the engine.
Connect the clip of the timing light to the wire harness.
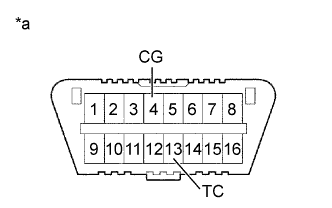 |
Using SST, connect terminals 13 (TC) and 4 (CG) of the DLC3.
| *a | Front view of DLC3 |
Start the engine.
Inspect the ignition timing during idling.
| Transaxle | Ignition Timing |
| Manual Transaxle | 8 to 12 degrees BTDC |
| Automatic Transaxle |
Turn the ignition switch off.
Remove the timing light.
Install the No. 2 cylinder head cover .
Disconnect terminals 13 (TC) and 4 (CG) of the DLC3.
| 8. INSPECT ENGINE IDLING SPEED |
When using an intelligent tester:
Warm up and stop the engine.
Connect the intelligent tester to the DLC3.
Turn the ignition switch to ON and turn the tester on.
Start the engine.
Select the following menu items: Powertrain / Engine and ECT / Data List / Engine Speed.
Inspect the engine idling speed.
| Transaxle | Ignition Timing |
| Manual Transaxle | 600 to 700 rpm |
| Automatic Transaxle | 650 to 750 rpm |
Turn the ignition switch off.
Disconnect the intelligent tester from the DLC3.
When not using an intelligent tester.
Warm up and stop the engine.
|
Install SST to terminal 9 (TAC) of the DLC3, then connect a tachometer.
| *a | Front view of DLC3 |
Start the engine.
Inspect the engine idling speed.
| Transaxle | Ignition Timing |
| Manual Transaxle | 600 to 700 rpm |
| Automatic Transaxle | 650 to 750 rpm |
Turn the ignition switch off.
Disconnect the tachometer.
Remove SST from terminal 9 (TAC).
| 9. INSPECT VALVE CLEARANCE |
Check for noise and vibration.
Check for valve noise or a rough idle.
Judge whether valve clearance needs to be adjustmented.
If the valve noise is too loud or the idle is rough, inspect the valve clearance (Click here).
| 10. INSPECT COMPRESSION |
Warm up and stop the engine.
Remove the No. 2 cylinder head cover .
Remove the 4 ignition coils .
Remove the 4 spark plugs .
Disconnect the 4 fuel injector connectors.
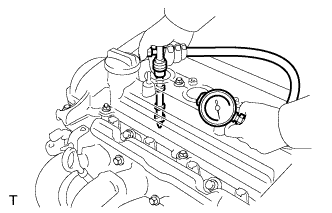 |
Inspect the cylinder compression pressure.
Insert a compression gauge into the spark plug hole.
Fully open the throttle.
While cranking the engine, measure the compression pressure.
If the cylinder compression is low, pour a light coat of engine oil into the cylinder through the spark plug hole, then inspect it again.
Connect the 4 fuel injector connectors.
Install the 4 spark plugs .
Install the 4 ignition coils .
Install the No. 2 cylinder head cover .
Clear the DTC (Click here).
| 11. INSPECT CO/HC |
Start the engine.
Run the engine at 2500 rpm for approximately 180 seconds.
Insert the CO/HC meter testing probe at least 40 cm (1.3 ft) into the tailpipe while idling.
Check the CO/HC concentration during idling and when running at 2500 rpm.
Check the heated oxygen sensor operation (Click here).
See the table below for possible causes, then inspect the applicable parts and repair them if necessary.
| CO | HC | Problems | Possible Causes |
| Normal | High | Rough idling |
|
| Low | High | Rough idling (Fluctuating HC reading) |
|
| High | High | Rough idling (Black smoke from exhaust) |
|