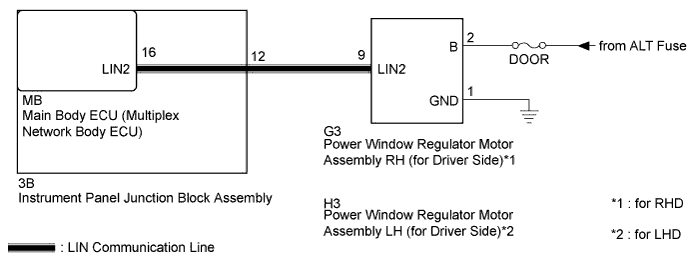
DTC B2321 Driver Side Door ECU Communication Stop |
| DTC No. | DTC Detection Condition | Trouble Area |
| B2321 | No communication between the power window regulator motor assembly RH (for driver side)*1 or power window regulator motor assembly LH (for driver side)*2 and main body ECU (multiplex network Body ECU) for 10 seconds or more. |
|
| 1.CLEAR DTC |
Clear the DTCs (Click here).
| NEXT | |
 |
| 2.CHECK FOR DTC |
Check for DTCs (Click here).
| Result | Proceed to |
| DTC B2321 is output | A |
| DTC B2321 and B2325 is output | B |
|
| ||||
| A | |
|
| 3.CHECK INSTRUMENT PANEL JUNCTION BLOCK ASSEMBLY |
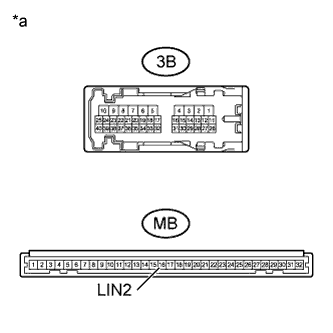 |
Remove the main body ECU (multiplex network Body ECU) from the instrument panel junction block assembly (Click here).
Disconnect the 3B instrument panel junction block assembly connector.
Measure the resistance according to the value(s) in the table below.
| Tester Connection | Condition | Specified Condition |
| MB-16 (LIN2) - 3B-12 | Always | Below 1 Ω |
| MB-16 (LIN2) or 3B-12 - Body ground | Always | 10 kΩ or higher |
| *a | Component without harness connected (Instrument Panel Junction Block Assembly) |
|
| ||||
| OK | |
|
| 4.CHECK HARNESS AND CONNECTOR (INSTRUMENT PANEL JUNCTION BLOCK ASSEMBLY - POWER WINDOW REGULATOR MOTOR ASSEMBLY) |
Disconnect the G3 power window regulator motor assembly RH (for driver side)*1 or H3 power window regulator motor assembly LH (for driver side)*2 connector.
Measure the resistance according to the value(s) in the table below.
| Tester Connection | Condition | Specified Condition |
| 3B-12 - G3-9 (LIN2)*1 3B-12 - H3-9 (LIN2)*2 | Always | Below 1 Ω |
| 3B-12 or G3-9 (LIN2) - Body ground*1 3B-12 or H3-9 (LIN2) - Body ground*2 | Always | 10 kΩ or higher |
|
| ||||
| OK | |
|
| 5.CHECK HARNESS AND CONNECTOR (POWER SOURCE CIRCUIT) |
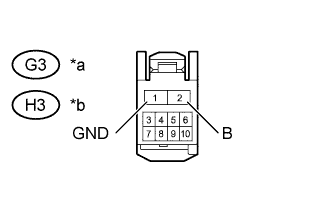 |
Measure the resistance according to the value(s) in the table below.
| Tester Connection | Condition | Specified Condition |
| G3-1 (GND) - Body ground*1 H3-1 (GND) - Body ground*2 | Always | Below 1 Ω |
Measure the voltage according to the value(s) in the table below.
| Tester Connection | Condition | Specified Condition |
| G3-2 (B) - Body ground*1 H3-2 (B) - Body ground*2 | Always | 11 to 14 V |
| *a | Front view of wire harness connector (to Power Window Regulator Motor Assembly RH (for Driver Side))*1 |
| *b | Front view of wire harness connector (to Power Window Regulator Motor Assembly LH (for Driver Side))*2 |
|
| ||||
| OK | |
|
| 6.REPLACE FRONT POWER WINDOW REGULATOR MOTOR ASSEMBLY |
Replace the power window regulator motor assembly RH (for driver side)*1 or power window regulator motor assembly LH (for driver side)*2 (Click here).
| NEXT | |
|
| 7.CLEAR DTC |
Clear the DTCs (Click here).
| NEXT | |
|
| 8.CHECK FOR DTC |
Check for DTCs (Click here).
| Result | Proceed to |
| DTC B2321 is not output | A |
| DTC B2321 is output | B |
|
| ||||
| A | ||
 | ||
| ||
