DOOR
REMOVAL
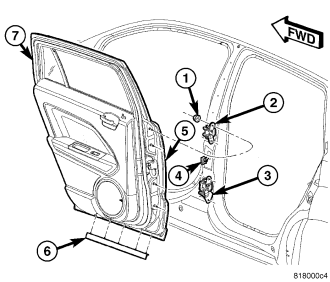
1. Disconnect and isolate the negative battery cable.
2. Disconnect the door wire harness connector (4) from the body wire harness.
3. Using a grease pencil or equivalent, mark the location of the door hinges (2 and 3) on the door.
4. Support the door with a suitable lifting device and remove the nuts (1) that secure the door to the hinges.
5. Carefully remove the door from the hinges.
6. If necessary, remove the rear door hinges from the B-pillar.
INSTALLATION
1. Carefully position the door onto the hinges (2 and 3) and support the door with a suitable lifting device.
2. Loosely install the four nuts (1) that secure the door to the hinges.
3. Align the door to the hinges using the reference marks made during the removal procedure and tighten the nuts and bolts to 13 N·m (9.5 ft. lbs.).
4. Connect the door wire harness (4) to the body wire harness.
5. Reconnect the negative battery cable.
6. If necessary, adjust the door (Refer to 23 - BODY/DOORS - REAR/DOOR - ADJUSTMENTS).
ADJUSTMENTS
NOTE:
For four door vehicles, it is recommended that you adjust the rear door before adjusting the front door.
FORE/AFT
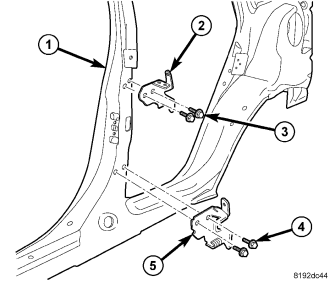
NOTE: Fore/aft (lateral) door adjustment is done by loosening the hinge to the hinge pillar fasteners one hinge at a time and moving the door to the correct position.
1. Support the door with a suitable lifting device.
2. Loosen the hinge to hinge pillar fasteners (3) and (4), (Refer to 23 - BODY/DOORS - REAR/HINGE - REMOVAL).
3. Adjust the door to the correct position, (Refer to 23 - BODY/BODY STRUCTURE/GAP AND FLUSH - SPECIFICATIONS).
4. Tighten the upper most hinge bolt (1) to hinge pillar to 22 N·m (16 ft. lbs.).
5. Tighten the lower most hinge bolt (4) to hinge pillar to 22 N·m (16 ft. lbs.).
6. Tighten the remaining hinge pillar fasteners to 22 N·m (16 ft. lbs.), (Refer to 23 - BODY/DOORS - REAR/HINGE - INSTALLATION).
NOTE: Use a suitable body sealer on the hinge to body mating surfaces.
UP/DOWN
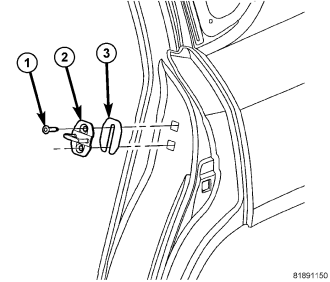
NOTE: Up/down door adjustment is done by loosening either the hinge to the hinge pillar fasteners or the hinge to door fasteners and moving the door to the correct position.
1. Support the door with a suitable lifting device.
2. Remove the latch striker (2), (Refer to 23 - BODY/DOORS - REAR/LATCH STRIKER - REMOVAL).
3. If necessary, loosen the hinge to hinge pillar fasteners (3) and (4), (Refer to 23 - BODY/DOORS - REAR/HINGE - REMOVAL).
4. If necessary, loosen the hinge to door fasteners (1), (Refer to 23 - BODY/DOORS - REAR/DOOR - REMOVAL).
5. Adjust the door to the correct position, (Refer to 23 - BODY/BODY STRUCTURE/GAP AND FLUSH - SPECIFICATIONS).
6. If necessary, tighten the hinge to pillar bolts.
a. Tighten the upper most hinge bolt (3) to hinge pillar to 22 N·m (16 ft. lbs.).
b. Tighten the lower most hinge bolt (4) to hinge pillar to 22 N·m (16 ft. lbs.).
c. Tighten the remaining hinge pillar fasteners to 22 N·m (16 ft. lbs.), (Refer to 23 - BODY/DOORS - REAR/HINGE - INSTALLATION).
7. Tighten the door to hinge fasteners (1) to 13 N·m (9.5 ft. lbs.), (Refer to 23 - BODY/DOORS - REAR/HINGE - INSTALLATION).
8. Install the latch striker, (Refer to 23 - BODY/DOORS - REAR/LATCH STRIKER - INSTALLATION).
IN/OUT
NOTE: In/out door adjustment is done by loosening the hinge to door fasteners one hinge at a time and moving the door to the correct position.
1. Support the door with a suitable lifting device.
2. Remove the latch striker, (Refer to 23 - BODY/DOORS - REAR/LATCH STRIKER - REMOVAL).
3. Loosen the hinge to door fasteners (1), (Refer to 23 - BODY/DOORS - REAR/DOOR - REMOVAL).
4. Adjust the front of the door to the correct position, (Refer to 23 - BODY/BODY STRUCTURE/GAP AND FLUSH - SPECIFICATIONS).
5. Tighten the door to hinges fasteners to 13 N·m (9.5 ft. lbs.).
6. Install the latch striker (2), (Refer to 23 - BODY/DOORS - REAR/LATCH STRIKER - INSTALLATION).