REMOVAL
2.8L DIESEL ENGINE
WARNING: Refer to the applicable warnings and cautions for this system before performing the following operation (refer to 24 - HEATING & AIR CONDITIONING/PLUMBING - WARNING) and (refer to 24 - HEATING & AIR CONDITIONING/PLUMBING - CAUTION). Failure to follow the warnings and cautions could result in possible personal injury or death.
NOTE: LHD model shown in illustrations. RHD model similar.
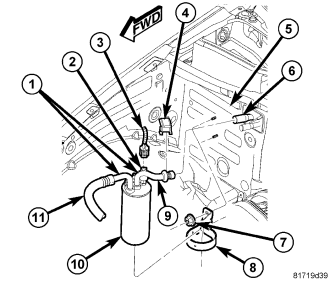
1. Disconnect and isolate the negative battery cable.
2. Recover the refrigerant from the refrigerant system (refer to 24 - HEATING & AIR CONDITIONING/PLUMBING - STANDARD PROCEDURE - REFRIGERANT SYSTEM RECOVERY).
3. If servicing the rear section of the A/C suction line (9), proceed to STEP 4. If servicing only the front section of the A/C suction line (11), go to STEP 10.
4. Disconnect the wire lead and connector (3) from the A/C low pressure switch (2) and remove the switch from the A/C accumulator (10).
5. Remove the two nuts (7) that secure the accumulator bracket (8) to the dash panel (5).
6. On LHD models, remove the secondary retaining clip (4) from the suction line spring-lock coupler and using the proper A/C line disconnect tool (Special Tool Kit 7193 or equivalent), disconnect the rear section of the A/C suction line (9) from the evaporator outlet tube (6) (refer to 24 - HEATING & AIR CONDITIONING/PLUMBING/COUPLER-REFRIGERANT LINE - REMOVAL).
7. On RHD models, remove the nut that secures the rear section of the A/C suction line to the A/C evaporator and disconnect the line from the evaporator.
8. Remove the nut (1) that secures the rear section of the A/C suction line to the A/C accumulator and disconnect the line from the accumulator.
9. Remove and discard the O-ring seals and install plugs in, or tape over the opened refrigerant line fittings and the accumulator and evaporator ports.
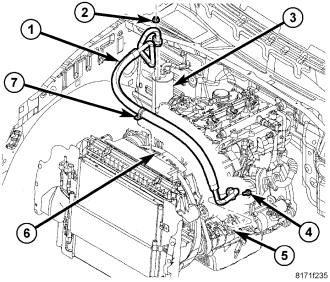
10. Remove the nut (2) that secures the front section of the A/C suction line (1) to the A/C accumulator (3) and disconnect the line from the accumulator.
11. Remove and discard the O-ring seal from the refrigerant line fitting and install plugs in, or tape over the opened refrigerant line fitting and the accumulator port.
12. Disengage the retaining clip (7) that secures the A/C suction line to the top of the fan shroud (6).
13. Raise and support the vehicle.
14. Remove the front skid plate (refer to 13 - FRAME & BUMPERS/FRAME/FRONT SKID PLATE - REMOVAL).
15. Remove the bolt (4) that secures the A/C suction line to the A/C compressor (5) and disconnect the line from the compressor.
16. Remove and discard the O-ring seal from the refrigerant line fitting and install plugs in, or tape over the opened fitting and compressor port.
17. Remove the A/C suction line from the engine compartment.
3.7L ENGINE
WARNING: Refer to the applicable warnings and cautions for this system before performing the following operation (refer to 24 - HEATING & AIR CONDITIONING/PLUMBING - WARNING) and (refer to 24 - HEATING & AIR CONDITIONING/PLUMBING - CAUTION). Failure to follow the warnings and cautions could result in possible personal injury or death.
NOTE: LHD model shown in illustrations. RHD model similar.
1. Disconnect and isolate the negative battery cable.
2. Recover the refrigerant from the refrigerant system (refer to 24 - HEATING & AIR CONDITIONING/PLUMBING - STANDARD PROCEDURE - REFRIGERANT SYSTEM RECOVERY).
3. If servicing the rear section of the A/C suction line (9), proceed to STEP 4. If servicing only the front section of the A/C suction line (11), go to STEP 10.
4. Disconnect the wire lead and connector (3) from the A/C low pressure switch (2) and remove the switch from the A/C accumulator (10).
5. Remove the two nuts (7) that secure the accumulator bracket (8) to the dash panel (5).
6. On LHD models, remove the secondary retaining clip (4) from the suction line spring-lock coupler and using the proper A/C line disconnect tool (Special Tool Kit 7193 or equivalent), disconnect the rear section of the A/C suction line (9) from the evaporator outlet tube (6) (refer to 24 - HEATING & AIR CONDITIONING/PLUMBING/COUPLER-REFRIGERANT LINE - REMOVAL).
7. On RHD models, remove the nut that secures the rear section of the A/C suction line to the A/C evaporator and disconnect the line from the evaporator.
8. Remove the nut (1) that secures the rear section of the A/C suction line to the A/C accumulator and disconnect the line from the accumulator.
9. Remove and discard the O-ring seals and install plugs in, or tape over the opened refrigerant line fittings and the accumulator and evaporator ports.
10. Remove the nut (1) that secures the front section of the A/C suction line (11) to the A/C accumulator (10) and disconnect the line from the accumulator and remove and discard the O-ring seal.
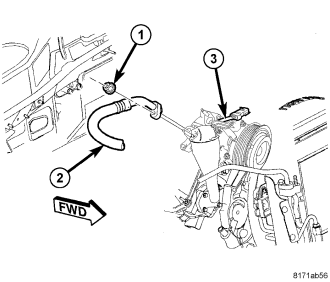
11. Remove the nut (1) that secures the front section of the A/C suction line (2) to the A/C compressor (3) and disconnect the line from the compressor.
12. Remove and discard the O-ring seals and install plugs in, or tape over the opened refrigerant line fittings and the accumulator and compressor ports.