ELECTRONIC VEHICLE INFO CENTER
- DESCRIPTION
- OPERATION
- DIAGNOSIS AND TESTING - ELECTRONIC VEHICLE INFORMATION CENTER
- REMOVAL
- INSTALLATION
DESCRIPTION
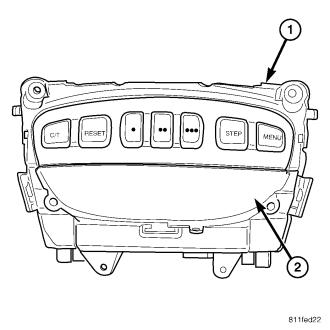
The Electronic Overhead Module (EOM)(1) is located in the overhead console on some models. The EOM features a large Vacuum Fluorescent Display (VFD) screen (2) for displaying information, and back-lit push button function switches labeled C/T (compass/temperature), RESET, STEP, and MENU.
The EOM contains a central processing unit and interfaces with other electronic modules in the vehicle over the Programmable Communications Interface (PCI) data bus network. The PCI data bus network allows the sharing of sensor information. This helps to reduce wire harness complexity, reduce internal controller hardware, and reduce component sensor current loads. At the same time, this system provides increased reliability, enhanced diagnostics, and allows the addition of many new feature capabilities.
The Electronic Vehicle Information Center (EVIC) includes the following display options:
- Average Fuel Economy - provides the average fuel economy the vehicle is achieving.
- Distance To Empty - provides the approximate distance the vehicle can be driven on the current fuel level.
- Trip Odometer - shows the accumulated miles since the last trip computer reset.
- Elapsed time - shows the accumulated ignition-on time since the last trip computer reset.
- Service Mileage - shows the distance remaining until the next scheduled service interval.
- Individual Tire Pressure - shows the current individual tire air pressures.
- Blank - the EVIC computer VF display is turned off.
The EVIC “Menu” push button provides the vehicle operator with a user interface, which allows the selection of several optional customer programmable electronic features to suit individual preferences.
If the vehicle is equipped with the optional Universal Transmitter, the EVIC will also display messages and an icon indicating when the Universal Transmitter is being trained, which of the three transmitter buttons is transmitting, and when the transceiver is cleared.
Data input for all EVIC functions, including VFD dimming level, is received through PCI data bus messages. The EOM uses its internal programming and all of its data inputs to calculate and display the requested data. If the data displayed is incorrect, perform the self-diagnostic tests as described in this group. If these tests prove inconclusive, the use of a scan tool and the proper Diagnostic Procedures manual are recommended for further testing of the EOM and the PCI data bus.
The EOM cannot be repaired, and is available for service only as a unit. This unit includes the push button switches and the plastic module. If any of these components is faulty or damaged, the complete EOM must be replaced. The incandescent bulbs used for EVIC push button back-lighting and the lens are available for service replacement.
DESCRIPTION - COMPASS
While in the compass/temperature mode, the compass will display the direction in which the vehicle is pointed using the eight major compass headings (Examples: north is N, northeast is NE). The self-calibrating compass unit requires no adjusting in normal use. The only calibration that may prove necessary is to drive the vehicle in three complete circles at 5 to 8 km/h (3 to 5 mp/h), on level ground, in not less than forty-eight seconds. This will reorient the compass unit to its vehicle.
The compass unit also will compensate for magnetism the body of the vehicle may acquire during normal use. However, avoid placing anything magnetic directly on the roof of the vehicle. Magnetic mounts for an antenna, a repair order hat, or a funeral procession flag can exceed the compensating ability of the compass unit if placed on the roof panel. Magnetic bit drivers used on the fasteners that hold the overhead console assembly to the roof header can also affect compass operation. If the vehicle roof should become magnetized, the demagnetizing and calibration procedures found in this group may be required to restore proper compass operation.
DESCRIPTION - TEMPERATURE
The temperature displays the outside ambient temperature in whole degrees. The temperature display can be toggled from Fahrenheit to Celsius by selecting the desired U.S./Metric option from the customer programmable features, (Refer to 8 - ELECTRICAL/OVERHEAD CONSOLE - STANDARD PROCEDURE - ELECTRONIC VEHICLE INFORMATION CENTER PROGRAMMING). The displayed temperature is not an instant reading of conditions, but an average temperature. It may take the thermometer display several minutes to respond to a major temperature change, such as driving out of a heated garage into winter temperatures.
When the ignition switch is turned to the Off position, the last displayed temperature reading stays in the EOM unit memory. When the ignition switch is turned to the On position again, the EOM will display the memory temperature for one minute; then update the display to the current average temperature reading within five minutes if temperature is less than memory.
The temperature function is supported by an ambient temperature sensor. The sensor is mounted outside the passenger compartment near the front and center of the vehicle, and is hard wired to the Powertrain Control Module (PCM). The PCM sends temperature status messages to the EOM over the PCI data bus network. The ambient temperature sensor is available as a separate service item.
OPERATION
The EVIC has access to both non-switched and ignition switched sources of battery current so that some of its features remain operational at any time, while others may only operate with the ignition switch in the On position. When the ignition switch is turned to the On position, the EVIC module VFD will return to the last function being displayed before the ignition was turned to the Off position.
The compass/temperature display is the normal EVIC display. With the ignition switch in the On position, momentarily depressing and releasing the C/T (compass/temperature) push button switch will cause the EVIC to return to the compass/temperature display mode from any other mode. While in the compass/temperature display mode, momentarily depressing and releasing the Step push button will step through the available trip computer display options.
The EVIC trip computer features several functions that can be reset. The functions that can be reset are: average fuel economy, trip odometer and elapsed time. With the ignition switch in the On position and with one of the functions of the trip computer that can be reset currently displayed, depressing the Reset push button twice within three seconds will perform a global reset, and all of the trip computer information that can be reset will be reset. With the ignition switch in the On position and the function that is to be reset currently displayed, momentarily depressing and releasing the Reset push button once will perform a local reset, and only the value of the displayed function will be reset to zero. A global or local reset will only occur if the function currently displayed is a function that can be reset. The distance to service function can also be reset by pressing and holding the RESET button for 1 second. Refer to ELECTRONIC VEHICLE INFORMATION CENTER PROGRAMMING in the Standard Procedures section of this group for more information on setting the Service Interval.
For more information on the features, control functions and setting procedures for the EVIC module, see the owner's manual in the vehicle glove box.
DIAGNOSIS AND TESTING - ELECTRONIC VEHICLE INFORMATION CENTER
If the problem with the EVIC is an inaccurate or scrambled display, refer to Self-Diagnostic Test later in this section. If the problem with the EVIC is incorrect Vacuum Fluorescent Display (VFD) dimming levels, use a DRB scan tool and the proper Diagnostic Procedures manual to test for the correct dimming message inputs being received from the Body Control Module (BCM) over the Programmable Communications Interface (PCI) data bus. If the problem is a no-display condition, use the following procedures. For complete circuit diagrams, refer to Overhead Console in Wiring Diagrams.
1. Press the C/T button.
2. Check the fused B(+) fuse in the junction block. If OK, go to STEP 3. If not OK, repair the shorted circuit or component as required and replace the faulty fuse.
3. Check for battery voltage at the fused B(+) fuse in the junction block. If OK, go to STEP 4. If not OK, repair the open fused B(+) circuit to the fused B(+) fuse in the PDC as required.
4. Check the fused ignition switch output (run/start) fuse in the junction block. If OK, go to STEP 5. If not OK, repair the shorted circuit or component as required and replace the faulty fuse.
5. Turn the ignition switch to the On position. Check for battery voltage at the fused ignition switch output (run/start) fuse in the junction block. If OK, go to STEP 6. If not OK, repair the open fused ignition switch output (run/start) circuit to the ignition switch as required.
6. Turn the ignition switch to the Off position. Disconnect and isolate the battery negative cable. Remove the overhead console. Check for continuity between the ground circuit cavity of the roof wire harness connector for the EVIC module and a good ground. There should be continuity. If OK, go to STEP 7. If not OK, repair the open ground circuit to ground as required.
7. Connect the battery negative cable. Check for battery voltage at the fused B(+) circuit cavity of the roof wire harness connector for the EVIC module. If OK, go to STEP 8. If not OK, repair the open fused B(+) circuit to the fused B(+) fuse in the junction block as required.
8. Turn the ignition switch to the On position. Check for battery voltage at the fused ignition switch output (run/start) circuit cavity of the roof wire harness connector for the EVIC module. If OK, refer to Self-Diagnostic Test in the Diagnosis and Testing section of this group for further diagnosis of the EVIC module and the PCI data bus. If not OK, repair the open fused ignition switch output (run/start) circuit to the fuse in the junction block as required.
SELF-DIAGNOSTIC TEST
A self-diagnostic test is used to determine that the EVIC module is operating properly, and that all PCI data bus messages are being received for initial operation. Initiate the self-diagnostic test as follows:
1. With the ignition switch in the Off position, simultaneously depress and hold the C/T button and the Reset button.
2. Turn the ignition switch to the On position.
3. Continue to hold both buttons depressed until the EVIC software version information is displayed, then release both buttons.
4. Following completion of these tests, the EVIC module will display one of the following messages:
- PASS SELF TEST - Momentarily depress and release the Reset button to return to the compass/temperature/trip computer display mode. The EVIC module is working properly.
- FAILED SELF TEST - The EVIC module has an internal failure. The EVIC module is faulty and must be replaced.
- NOT RECEIVING J1850 MESSAGE - The EVIC module is not receiving proper message input through the PCI data bus. This can result from one or more faulty electronic modules in the vehicle, or from a faulty PCI data bus. The use of a DRB scan tool and the proper Diagnostic Procedures manual are required for further diagnosis.
NOTE: If the compass functions, but accuracy is suspect, it may be necessary to perform a variation adjustment. This procedure allows the compass unit to accommodate variations in the earth's magnetic field strength, based on geographic location. Refer to Compass Variation Adjustment in the Service Procedures section of this group.
NOTE: If the compass reading displays a blank, and only “CAL” appears in the display, demagnetizing may be necessary to remove excessive residual magnetic fields from the vehicle. Refer to Compass Demagnetizing in the Service Procedures section of this group.
REMOVAL
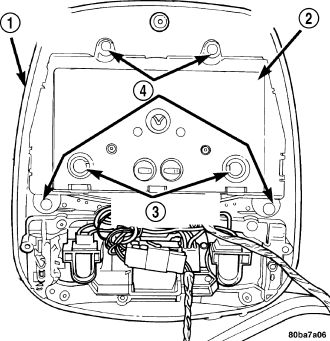
NOTE: If the evic module is being replaced, the tire pressure monitoring system must be programmed. Refer to the tires/wheels section of this manual for detailed instructions.
1. Disconnect and isolate the battery negative cable.
2. Remove the overhead console from the headliner, (Refer to 8 - ELECTRICAL/OVERHEAD CONSOLE - REMOVAL).
3. Remove the four screws (4) that secure the Electronic Overhead Module (EOM) (2) to the overhead console housing (1).
4. Remove the EOM (2) from the overhead console housing (1).
INSTALLATION
NOTE: If a new Electronic Overhead Module (EOM) has been installed, the compass will have to be calibrated and the variance set. Refer to compass variation adjustment and compass calibration in the standard procedures section of this group for detailed instructions.
NOTE: If a new Electronic Overhead Module (EOM) has been installed, the tire pressure sensors will have to be reprogrammed. Refer to the tires/wheels section of this manual for detailed instructions.
1. Position the Electronic Overhead Module (EOM) (2) onto the overhead console housing (1).
2. Install the four screws (4) that secure the EOM (2) to the overhead console housing (1). Tighten the screws to 1 N·m (8 in. lbs.).
3. Install the overhead console (1) onto the headliner, (Refer to 8 - ELECTRICAL/OVERHEAD CONSOLE - INSTALLATION).
4. Reconnect the battery negative cable.