FRONT SUSPENSION FRONT SHOCK ABSORBER INSTALLATION
CAUTION / NOTICE / HINT
- HINT:
- ·
Use the same procedure for the RH and LH sides.
·The procedure listed below is for the LH side.
·A bolt without a torque specification is shown in the standard bolt chart (See page General>SPECIFICATIONS>STANDARD BOLT>SPECIFIED TORQUE FOR STANDARD BOLTS).
PROCEDURE

 1.TEMPORARILY INSTALL FRONT SHOCK ABSORBER WITH COIL SPRING
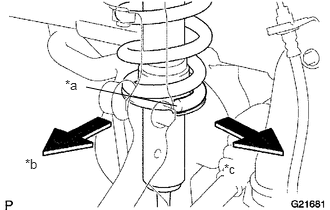
Install the coil spring to the vehicle body with the lower end of the coil spring facing the rear side of the vehicle.
| *a | Lower End |
| *b | Outer Side |
| *c | Rear Side |
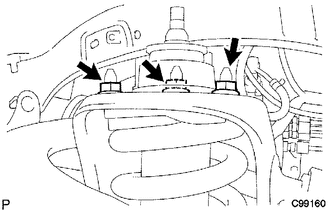
Install the 3 nuts to the upper side of the front shock absorber with coil spring.
- Torque:
- 64 N*m (653 kgf*cm, 47 ft.*lbf)
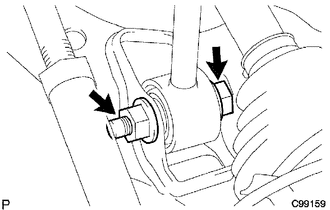
Temporarily install the bolt, nut and washer as shown in the illustration.
48811
2.INSTALL FRONT STABILIZER BAR
48829A
3.INSTALL FRONT NO. 1 STABILIZER BRACKET LH
48824A
4.INSTALL FRONT NO. 1 STABILIZER BRACKET RH
48810
5.CONNECT FRONT STABILIZER LINK ASSEMBLY LH
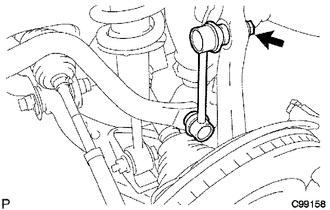
Connect the stabilizer link to the steering knuckle with the nut.
- Torque:
- 70 N*m (710 kgf*cm, 52 ft.*lbf)
- HINT:
-
If the ball joint turns together with the nut, use a 6 mm hexagon wrench to hold the stud.
48820B
6.CONNECT FRONT STABILIZER LINK ASSEMBLY RH
- HINT:
-
Use the same procedure described for the LH side.
7.INSTALL FRONT SUSPENSION MEMBER BRACE SUB-ASSEMBLY
51405A
8.INSTALL NO. 1 ENGINE UNDER COVER SUB-ASSEMBLY
52129B
9.INSTALL LOWER FRONT BUMPER COVER
Install the front bumper cover lower with the 5 bolts and clip.
- Torque:
- 8.0 N*m (82 kgf*cm, 71 in.*lbf)
10.INSTALL FRONT WHEEL
- Torque:
- 103 N*m (1050 kgf*cm, 76 ft.*lbf)
11.STABILIZE SUSPENSION
Lower the vehicle.
Bounce the vehicle up and down several times to stabilize the suspension.
12.TIGHTEN FRONT SHOCK ABSORBER WITH COIL SPRING
Tighten the nut.
- Torque:
- 95 N*m (969 kgf*cm, 70 ft.*lbf)
13.INSPECT AND ADJUST FRONT WHEEL ALIGNMENT
Inspect and adjust the front wheel alignment (See page Suspension>ALIGNMENT / HANDLING DIAGNOSIS>FRONT WHEEL ALIGNMENT>ADJUSTMENT).