INTERIOR PANELS / TRIM INSTRUMENT PANEL SAFETY PAD INSTALLATION
CAUTION / NOTICE / HINT
- HINT:
-
A bolt without a torque specification is shown in the standard bolt chart (See page General>SPECIFICATIONS>STANDARD BOLT>SPECIFIED TORQUE FOR STANDARD BOLTS).
PROCEDURE

 55301
1.INSTALL INSTRUMENT PANEL SUB-ASSEMBLY
Attach the 2 guides to install the instrument panel safety pad.
Install the bracket with the 2 bolts and nut.
Connect the connectors and attach the clamps and claws.
Install the 2 passenger airbag bolts.
- Torque:
- 20 N*m (204 kgf*cm, 15 ft.*lbf)
Install the nut labeled A and bolt labeled B.
Install the 6 bolts <E> and nut <F>.
Install the front floor carpet.
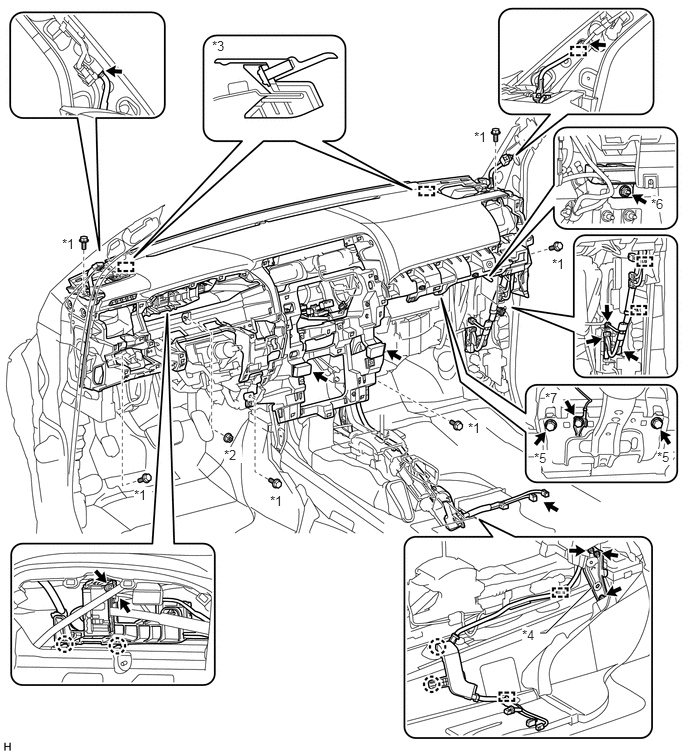
| *1 | Bolt <E> | *2 | Nut <F> |
| *3 | Guide | *4 | Bracket |
| *5 | Passenger Airbag Bolt | *6 | Nut A |
| *7 | Bolt B | - | - |
861A1
2.INSTALL MULTI-MEDIA INTERFACE ECU
89533A
3.INSTALL 4 WHEEL DRIVE CONTROL ECU NO.2 (for 4WD)
86160P
4.INSTALL FRONT NO. 2 SPEAKER ASSEMBLY
55408F
5.INSTALL NO. 1 INSTRUMENT PANEL SPEAKER PANEL SUB-ASSEMBLY
Attach the 2 clips, 4 claws and 3 guides to install the No. 1 instrument panel speaker panel.
55409F
6.INSTALL NO. 2 INSTRUMENT PANEL SPEAKER PANEL SUB-ASSEMBLY
Attach the 2 clips, 3 claws and 3 guides to install the No. 2 instrument panel speaker panel.
55650
7.INSTALL NO. 1 INSTRUMENT PANEL REGISTER ASSEMBLY
Attach the 4 clips and 2 guides to install the No. 1 instrument panel register.
55660
8.INSTALL NO. 2 INSTRUMENT PANEL REGISTER ASSEMBLY
- HINT:
-
Use the same procedure described for the No. 1 instrument panel register.
55406B
9.INSTALL LOWER CENTER INSTRUMENT CLUSTER FINISH PANEL SUB-ASSEMBLY
Connect each connector.
Attach the 4 clips to install the lower center instrument cluster finish panel.
Install the 2 screws <B>.
86120
10.INSTALL RADIO RECEIVER ASSEMBLY (w/ Audio)
55424C
11.INSTALL RADIO TUNER FINISH PANEL (w/o Audio)
Attach the 6 clips to install the radio tuner finish panel.
Install the 4 bolts.
55910R
12.INSTALL HEATER CONTROL ASSEMBLY
55303B
13.INSTALL LOWER INSTRUMENT PANEL SUB-ASSEMBLY
Connect each connector.
Attach the 10 clips to install the lower instrument panel.
Install the 3 screws <B> and 2 bolts <C>.
55443A
14.INSTALL INSTRUMENT PANEL BOX DOOR COVER
Attach the 2 claws and 2 guides to install the instrument panel box door cover.
55312
15.INSTALL LOWER INSTRUMENT PANEL
Attach the 4 clips to install the lower instrument panel.
Install the 2 bolt <D>.
55607
16.INSTALL NO. 2 INSTRUMENT PANEL UNDER COVER SUB-ASSEMBLY
Attach the 3 clips and 2 guides to install the No. 2 instrument panel under cover.
55045
17.INSTALL LOWER INSTRUMENT PANEL FINISH PANEL SUB-ASSEMBLY
Connect each connector and cable.
Attach the 6 clips and 2 guides to install the lower instrument panel finish panel.
Install the 2 bolts <C>.
83100
18.INSTALL COMBINATION METER ASSEMBLY
55404D
19.INSTALL INSTRUMENT CLUSTER FINISH PANEL SUB-ASSEMBLY
Attach the 7 clips to install the instrument cluster finish panel.
55447C
20.INSTALL NO. 2 SWITCH HOLE BASE
Connect each connector.
Attach the 6 clips and 2 guides to install the No. 2 switch hole base.
55480D
21.INSTALL LOWER INSTRUMENT PANEL FINISH PANEL ASSEMBLY
Attach the 4 clips to install the lower instrument panel finish panel.
62212
22.INSTALL FRONT PILLAR GARNISH LH
62211
23.INSTALL FRONT PILLAR GARNISH RH
74611F
24.INSTALL NO. 1 ASSIST GRIP
74617A
25.INSTALL ASSIST GRIP PLUG
62312B
26.INSTALL FRONT DOOR OPENING TRIM WEATHERSTRIP LH
62311B
27.INSTALL FRONT DOOR OPENING TRIM WEATHERSTRIP RH
- HINT:
-
Use the same procedure described for the LH side.
62112
28.INSTALL COWL SIDE TRIM BOARD LH
62111C
29.INSTALL COWL SIDE TRIM BOARD RH
- HINT:
-
Use the same procedure described for the LH side.
67920
30.INSTALL DOOR SCUFF PLATE ASSEMBLY LH
67910
31.INSTALL DOOR SCUFF PLATE ASSEMBLY RH
- HINT:
-
Use the same procedure described for the LH side.
58910C
32.INSTALL REAR CONSOLE BOX ASSEMBLY
Install the rear console box assembly (See page Vehicle Interior>INTERIOR PANELS / TRIM>FRONT CONSOLE BOX>INSTALLATION).
84140
33.INSTALL HEADLIGHT DIMMER SWITCH ASSEMBLY
Install the headlight dimmer switch assembly (See page Vehicle Exterior>LIGHTING (EXT)>HEADLIGHT DIMMER SWITCH>INSTALLATION).
34.CONNECT CABLE TO NEGATIVE BATTERY TERMINAL
- NOTICE:
-
When disconnecting the cable, some systems need to be initialized after the cable is reconnected (See page General>INTRODUCTION>REPAIR INSTRUCTION>INITIALIZATION).
35.CHECK SRS WARNING LIGHT
Check the SRS warning light (See page Vehicle Interior>SUPPLEMENTAL RESTRAINT SYSTEMS>AIRBAG SYSTEM>DIAGNOSIS SYSTEM).