Home › Vehicle Interior › THEFT DETERRENT / KEYLESS ENTRY › THEFT DETERRENT SYSTEM

THEFT DETERRENT SYSTEM > Security Indicator Light Circuit

for Preparation Click here


DESCRIPTION

  1. When the theft deterrent system is in the disarmed state, the security indicator light flashes continuously when the engine immobiliser system is set, and does not illuminate when the engine immobiliser system is not set.
    When the theft deterrent system is in the armed state, the engine immobiliser system is automatically set and the security indicator light flashes continuously.
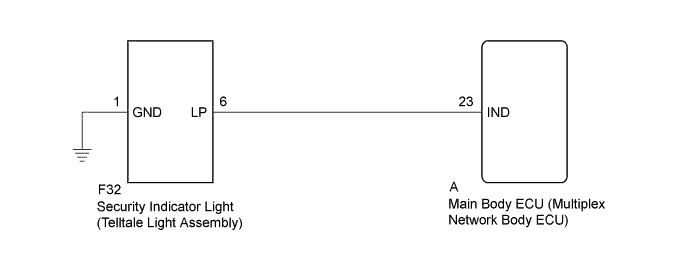
    When the theft deterrent system is in the arming preparation state or alarm sounding state, the main body ECU (multiplex network body ECU) causes the security indicator light to be illuminated.

WIRING DIAGRAM


B353562E03


INSPECTION PROCEDURE

1.PERFORM ACTIVE TEST USING TECHSTREAM (SECURITY INDICATOR)
  1. Operate the Techstream according to the steps on the display and select Active Test (Click here).

    Main Body 
    Tester Display
    Test Part
    Control Range
    Diagnostic Note
    Security Indicator
    Security indicator light
    ON/OFF
    The test is possible when the following conditions are met:
    1. The key is in the cabin*1
    2. The engine switch on (IG)*1
    3. The key is in the ignition key cylinder*2

    1. *1: w/ Smart Key System
    2. *2: w/o Smart Key System

    OK:
    Security indicator light can be turned on and off using the Techstream.


NG
Go to step 2
OK

PROCEED TO NEXT SUSPECTED AREA SHOWN IN PROBLEM SYMPTOMS TABLE (Click here)  

2.INSPECT SECURITY INDICATOR LIGHT (TELLTALE LIGHT ASSEMBLY)
  1. Remove the security indicator light (telltale light assembly) (Click here).

  1. Inspect the security indicator light (telltale light assembly) (Click here).


NG
REPLACE SECURITY INDICATOR LIGHT (TELLTALE LIGHT ASSEMBLY) (Click here)
OK


3.CHECK HARNESS AND CONNECTOR (TELLTALE LIGHT - MAIN BODY ECU AND BODY GROUND)
  1. Disconnect the F32 security indicator light (telltale light assembly) connector.

  1. Remove the main body ECU (multiplex network body ECU) from the driver side junction block assembly (Click here).

  1. Measure the resistance according to the value(s) in the table below.

    Standard Resistance:
    Tester Connection
    Condition
    Specified Condition
    F32-6 (LP) - A-23 (IND)
    Always
    Below 1 Ω
    F32-1 (GND) - Body ground
    Always
    Below 1 Ω
    F32-6 (LP) or A-23 (IND) - Body ground
    Always
    10 kΩ or higher


NG
REPAIR OR REPLACE HARNESS OR CONNECTOR
OK

REPLACE MAIN BODY ECU (MULTIPLEX NETWORK BODY ECU) (Click here)