WIRELESS DOOR LOCK CONTROL SYSTEM (w/ Smart Key System) > No Answer-Back |
| 1.READ VALUE USING TECHSTREAM (DOOR LOCK POSITION SWITCH) |
Connect the Techstream to the DLC3.
Turn the engine switch on (IG).
Turn the Techstream on.
Enter the following menus: Body Electrical / Main Body / Data List.
Read the Data List according to the display on the Techstream.
| Tester Display | Measurement Item/Range | Normal Condition | Diagnostic Note |
| FR Door Lock Pos | Front RH side door lock position switch signal / UNLOCK or LOCK | UNLOCK: Front RH side door unlocked LOCK: Front RH side door locked | - |
| FL Door Lock Pos | Front LH side door lock position switch signal / UNLOCK or LOCK | UNLOCK: Front LH side door unlocked LOCK: Front LH side door locked | - |
| RR-Door Lock Pos SW | Rear RH side door lock position switch signal / ON or OFF | ON: Rear RH side door unlocked OFF: Rear RH side door locked | - |
| RL-Door Lock Pos SW | Rear LH side door lock position switch signal / ON or OFF | ON: Rear LH side door unlocked OFF: Rear LH side door locked | - |
| Result | Proceed to |
| OK | A |
| NG (for Front RH Side) | B |
| NG (for Front LH Side) | C |
| NG (for Rear RH Side) | D |
| NG (for Rear LH Side) | E |
|
| ||||
|
| ||||
|
| ||||
|
| ||||
| A | |
 |
| 2.CHECK WIRELESS ANSWER-BACK OPERATION |
Check the wireless answer-back operation by the wireless door lock control function.
| Result | Proceed to |
| Only hazard warning light answer-back does not occur | A |
| Only wireless door lock buzzer answer-back does not occur | B |
|
| ||||
| A | |
|
| 3.CHECK HAZARD WARNING LIGHT OPERATION |
Check that the hazard warning lights flash continuously when the hazard warning signal switch is pressed.
|
| ||||
| OK | |
|
| Go to step 7 |
| 4.PERFORM ACTIVE TEST USING TECHSTREAM (HAZARD WARNING LIGHT) |
Operate the Techstream according to the steps on the display and select "Active Test" (Click here).
| Tester Display | Test Part | Control Range | Diagnostic Note |
| Hazard | Turn signal flasher relay | ON/OFF | - |
|
| ||||
| OK | ||
 | ||
| ||
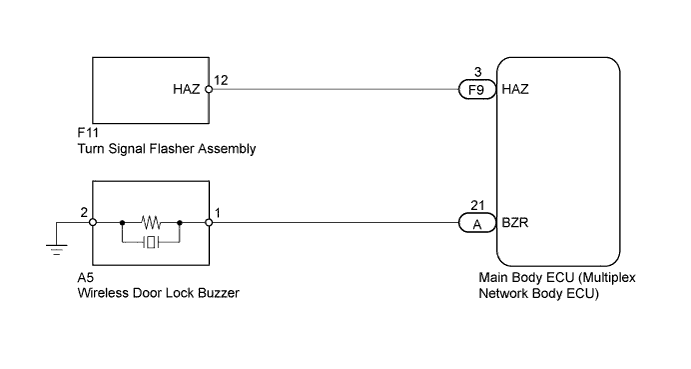
| 5.CHECK HARNESS AND CONNECTOR (TURN SIGNAL FLASHER - MAIN BODY ECU) |
Disconnect the F11 flasher connector.
Disconnect the F9 ECU connector.
Measure the resistance according to the value(s) in the table below.
| Tester Connection | Condition | Specified Condition |
| F11-12 (HAZ) - F9-3 (HAZ) | Always | Below 1 Ω |
| F11-12 (HAZ) - Body ground | Always | 10 kΩ or higher |
|
| ||||
| OK | ||
| ||
| ||
| 6.PERFORM ACTIVE TEST USING TECHSTREAM (WIRELESS DOOR LOCK BUZZER) |
Operate the Techstream according to the steps on the display and select "Active Test" (Click here).
| Tester Display | Test Part | Control Range | Diagnostic Note |
| Wireless Buzzer | Wireless door lock buzzer | ON/OFF | - |
|
| ||||
| OK | |
|
| 7.REPLACE MAIN BODY ECU (MULTIPLEX NETWORK BODY ECU) |
Temporarily replace the main body ECU with a new or normally functioning one (Click here).
| NEXT | |
|
| 8.CHECK WIRELESS DOOR LOCK BUZZER OPERATION |
Check that the wireless door lock buzzer sounds by operating the wireless door lock function.
|
| ||||
| OK | ||
| ||
| ||
| 9.CHECK HARNESS AND CONNECTOR (WIRELESS DOOR LOCK BUZZER - MAIN BODY ECU) |
Disconnect the A5 buzzer connector.
Remove the main body ECU (Click here).
Measure the resistance according to the value(s) in the table below.
| Tester Connection | Condition | Specified Condition |
| A5-1 - A-21 (BZR) | Always | Below 1 Ω |
| A5-2 - Body ground | Always | Below 1 Ω |
| A5-1 - Body ground | Always | 10 kΩ or higher |
|
| ||||
| OK | |
|
| 10.REPLACE WIRELESS DOOR LOCK BUZZER |
Temporarily replace the wireless door lock buzzer with a new or normally functioning one (Click here).
| NEXT | |
|
| 11.CHECK WIRELESS DOOR LOCK BUZZER OPERATION |
Check that the wireless door lock buzzer sounds by operating the wireless door lock function.
|
| ||||
| OK | ||
| ||
| ||

