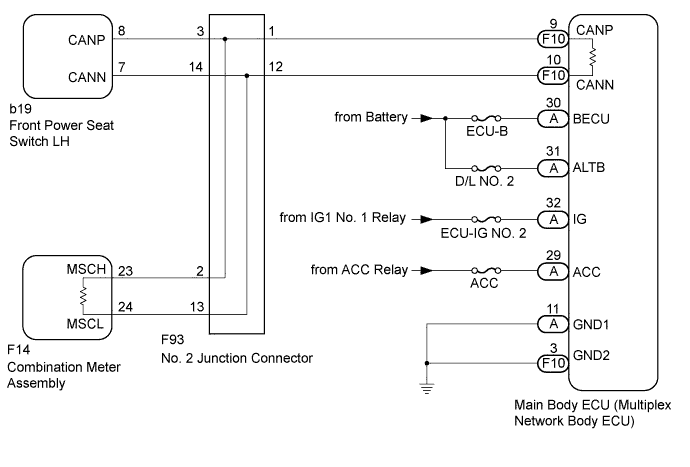
DTC U1002 Lost Communication with Gateway Module |
| DTC Code | DTC Detection Condition | Trouble Area |
| U1002 | Lost communication with the gateway module. |
|
| 1.DISCONNECT CABLE FROM NEGATIVE BATTERY TERMINAL |
Disconnect the cable from the negative (-) battery terminal before measuring the resistances of the main wire and the branch wire.
| NEXT | |
 |
| 2.CHECK FOR CAN BUS WIRE (MAIN WIRE FOR DISCONNECTION, BUS LINE FOR SHORT CIRCUIT) |
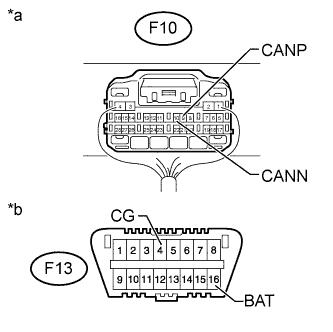 |
Measure the resistance according to the value(s) in the table below.
| Tester Connection | Switch Condition | Specified Condition | Resistance: Malfunction |
| F10-9 (CANP) - F10-10 (CANN) | Ignition switch off | 54 to 69 Ω | Below 54 Ω: Short in line |
| Higher than 69 Ω: Open in CAN main bus line | |||
| F10-9 (CANP) - F13-16 (BAT) | Ignition switch off | 6 kΩ or higher | Below 6 kΩ: +B short |
| F10-10 (CANN) - F13-16 (BAT) | Ignition switch off | 6 kΩ or higher | Below 6 kΩ: +B short |
| F10-9 (CANP) - F13-4 (CG) | Ignition switch off | 200 Ω or higher | Below 200 Ω: Ground short |
| F10-10 (CANN) - F13-4 (CG) | Ignition switch off | 200 Ω or higher | Below 200 Ω: Ground short |
| *a | Component with harness connected (Main Body ECU (Multiplex Network Body ECU)) |
| *b | Front view of DLC3 |
| Result | Proceed to |
| NG - Open in CAN main bus line | A |
| NG - Short in line - +B short - Ground short | B |
| OK | C |
|
| ||||
|
| ||||
| A | |
|
| 3.CHECK FOR OPEN IN CAN BUS MAIN WIRE (NO. 2 JUNCTION CONNECTOR - COMBINATION METER ASSEMBLY) |
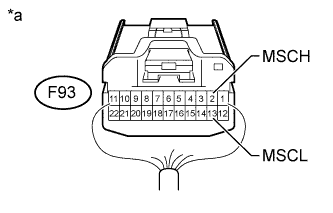 |
Disconnect the F93 No. 2 junction connector connector.
Measure the resistance according to the value(s) in the table below.
| Tester Connection | Switch Condition | Specified Condition |
| F93-2 (MSCH) - F93-13 (MSCL) | Ignition switch off | 108 to 132 Ω |
| *a | Rear view of wire harness connector (to No. 2 Junction Connector) |
|
| ||||
| OK | |
|
| 4.CHECK FOR OPEN IN CAN BUS MAIN WIRE (NO. 2 JUNCTION CONNECTOR - MAIN BODY ECU (MULTIPLEX NETWORK BODY ECU)) |
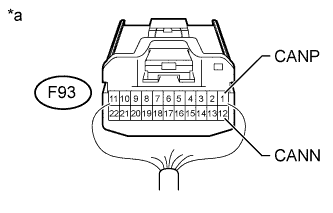 |
Measure the resistance according to the value(s) in the table below.
| Tester Connection | Switch Condition | Specified Condition |
| F93-1 (CANP) - F93-12 (CANN) | Ignition switch off | 108 to 132 Ω |
| *a | Rear view of wire harness connector (to No. 2 Junction Connector) |
|
| ||||
| OK | ||
 | ||
| ||
| 5.CONNECT CONNECTOR |
Reconnect the F93 No. 2 junction connector connector.
| NEXT | |
|
| 6.CHECK FOR OPEN IN CAN BUS MAIN WIRE (COMBINATION METER ASSEMBLY - NO. 2 JUNCTION CONNECTOR) |
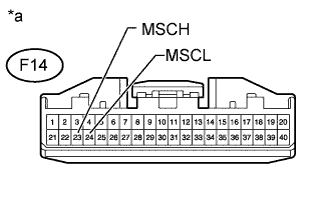 |
Disconnect the F14 combination meter assembly connector.
Measure the resistance according to the value(s) in the table below.
| Tester Connection | Switch Condition | Specified Condition |
| F14-23 (MSCH) - F14-24 (MSCL) | Ignition switch off | 108 to 132 Ω |
| *a | Front view of wire harness connector (to Combination Meter Assembly) |
|
| ||||
| OK | ||
| ||
| ||
| 7.CONNECT CONNECTOR |
Reconnect the F93 No. 2 junction connector connector.
| NEXT | |
|
| 8.CHECK FOR OPEN IN CAN BUS MAIN WIRE (MAIN BODY ECU (MULTIPLEX NETWORK BODY ECU) - NO. 2 JUNCTION CONNECTOR) |
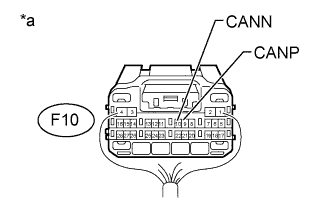 |
Disconnect the F10 main body ECU (multiplex network body ECU) connector.
Measure the resistance according to the value(s) in the table below.
| Tester Connection | Switch Condition | Specified Condition |
| F10-9 (CANP) - F10-10 (CANN) | Ignition switch off | 108 to 132 Ω |
| *a | Rear view of wire harness connector (to Main Body ECU (Multiplex Network Body ECU)) |
|
| ||||
| OK | ||
| ||
| ||
| 9.CHECK FOR SHORT IN CAN BUS WIRES (NO. 2 JUNCTION CONNECTOR - FRONT POWER SEAT SWITCH LH) |
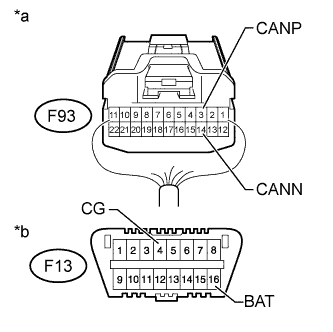 |
Disconnect the F93 No. 2 junction connector connector.
Measure the resistance according to the value(s) in the table below.
| Tester Connection | Switch Condition | Specified Condition |
| F93-3 (CANP) - F93-14 (CANN) | Ignition switch off | 200 Ω or higher |
| F93-3 (CANP) - F13-4 (CG) | Ignition switch off | 200 Ω or higher |
| F93-14 (CANN) - F13-4 (CG) | Ignition switch off | 200 Ω or higher |
| F93-3 (CANP) - F13-16 (BAT) | Ignition switch off | 6 kΩ or higher |
| F93-14 (CANN) - F13-16 (BAT) | Ignition switch off | 6 kΩ or higher |
| *a | Rear view of wire harness connector (to No. 2 Junction Connector) |
| *b | Front view of DLC3 |
|
| ||||
| OK | |
|
| 10.CHECK FOR SHORT IN CAN BUS WIRES (NO. 2 JUNCTION CONNECTOR - COMBINATION METER ASSEMBLY) |
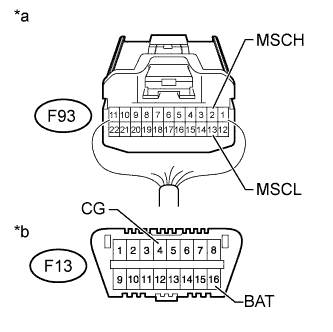 |
Measure the resistance according to the value(s) in the table below.
| Tester Connection | Switch Condition | Specified Condition |
| F93-2 (MSCH) - F93-13 (MSCL) | Ignition switch off | 108 to 132 Ω |
| F93-2 (MSCH) - F13-4 (CG) | Ignition switch off | 200 Ω or higher |
| F93-13 (MSCL) - F13-4 (CG) | Ignition switch off | 200 Ω or higher |
| F93-2 (MSCH) - F13-16 (BAT) | Ignition switch off | 6 kΩ or higher |
| F93-13 (MSCL) - F13-16 (BAT) | Ignition switch off | 6 kΩ or higher |
| *a | Rear view of wire harness connector (to No. 2 Junction Connector) |
| *b | Front view of DLC3 |
|
| ||||
| OK | |
|
| 11.CHECK FOR SHORT IN CAN BUS WIRES (NO. 2 JUNCTION CONNECTOR - MAIN BODY ECU (MULTIPLEX NETWORK BODY ECU)) |
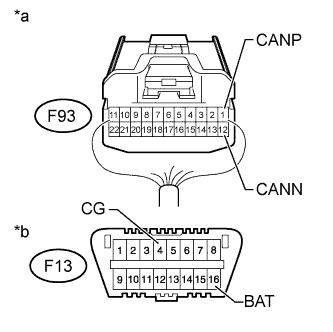 |
Measure the resistance according to the value(s) in the table below.
| Tester Connection | Switch Condition | Specified Condition |
| F93-1 (CANP) - F93-12 (CANN) | Ignition switch off | 108 to 132 Ω |
| F93-1 (CANP) - F13-4 (CG) | Ignition switch off | 200 Ω or higher |
| F93-12 (CANN) - F13-4 (CG) | Ignition switch off | 200 Ω or higher |
| F93-1 (CANP) - F13-16 (BAT) | Ignition switch off | 6 kΩ or higher |
| F93-12 (CANN) - F13-16 (BAT) | Ignition switch off | 6 kΩ or higher |
| *a | Rear view of wire harness connector (to No. 2 Junction Connector) |
| *b | Front view of DLC3 |
|
| ||||
| OK | ||
| ||
| ||
| 12.CONNECT CONNECTOR |
Reconnect the F93 No. 2 junction connector connector.
| NEXT | |
|
| 13.CHECK FOR SHORT IN CAN BUS WIRES (FRONT POWER SEAT SWITCH LH) |
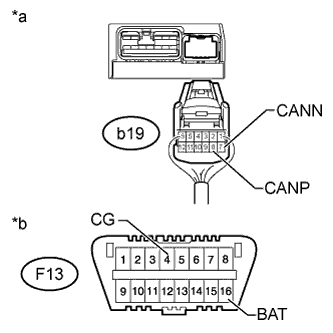 |
Disconnect the b19 front power seat switch LH connector.
Measure the resistance according to the value(s) in the table below.
| Tester Connection | Switch Condition | Specified Condition |
| b19-8 (CANP) - b19-7 (CANN) | Ignition switch off | 54 to 69 Ω |
| b19-8 (CANP) - F13-4 (CG) | Ignition switch off | 200 Ω or higher |
| b19-7 (CANN) - F13-4 (CG) | Ignition switch off | 200 Ω or higher |
| b19-8 (CANP) - F13-16 (BAT) | Ignition switch off | 6 kΩ or higher |
| b19-7 (CANN) - F13-16 (BAT) | Ignition switch off | 6 kΩ or higher |
| *a | Rear view of wire harness connector (to Front Power Seat Switch LH) |
| *b | Front view of DLC3 |
|
| ||||
| OK | ||
| ||
| ||
| 14.CONNECT CONNECTOR |
Reconnect the F93 No. 2 junction connector connector.
| NEXT | |
|
| 15.CHECK FOR SHORT IN CAN BUS WIRES (COMBINATION METER ASSEMBLY) |
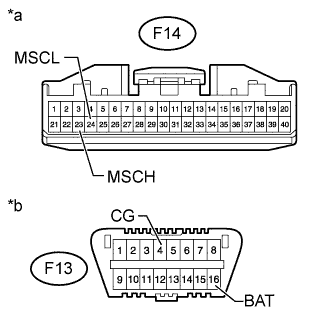 |
Disconnect the F14 combination meter assembly connector.
Measure the resistance according to the value(s) in the table below.
| Tester Connection | Switch Condition | Specified Condition |
| F14-23 (MSCH) - F14-24 (MSCL) | Ignition switch off | 108 to 132 Ω |
| F14-23 (MSCH) - F13-4 (CG) | Ignition switch off | 200 Ω or higher |
| F14-24 (MSCL) - F13-4 (CG) | Ignition switch off | 200 Ω or higher |
| F14-23 (MSCH) - F13-16 (BAT) | Ignition switch off | 6 kΩ or higher |
| F14-24 (MSCL) - F13-16 (BAT) | Ignition switch off | 6 kΩ or higher |
| *a | Front view of wire harness connector (to Combination Meter Assembly) |
| *b | Front view of DLC3 |
|
| ||||
| OK | ||
| ||
| ||
| 16.CONNECT CONNECTOR |
Reconnect the F93 No. 2 junction connector connector.
| NEXT | |
|
| 17.CHECK FOR SHORT IN CAN BUS WIRES (MAIN BODY ECU (MULTIPLEX NETWORK BODY ECU)) |
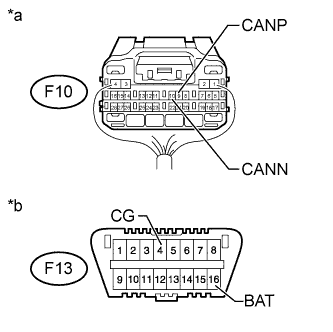 |
Disconnect the F10 main body ECU (multiplex network body ECU) connector.
Measure the resistance according to the value(s) in the table below.
| Tester Connection | Switch Condition | Specified Condition |
| F10-9 (CANP) - F10-10 (CANN) | Ignition switch off | 108 to 132 Ω |
| F10-9 (CANP) - F13-4 (CG) | Ignition switch off | 200 Ω or higher |
| F10-10 (CANN) - F13-4 (CG) | Ignition switch off | 200 Ω or higher |
| F10-9 (CANP) - F13-16 (BAT) | Ignition switch off | 6 kΩ or higher |
| F10-10 (CANN) - F13-16 (BAT) | Ignition switch off | 6 kΩ or higher |
| *a | Rear view of wire harness connector (to Main Body ECU (Multiplex Network Body ECU)) |
| *b | Front view of DLC3 |
|
| ||||
| OK | ||
| ||
| ||
| 18.CHECK HARNESS AND CONNECTOR (MAIN BODY ECU (MULTIPLEX NETWORK BODY ECU) - BATTERY AND GROUND) |
Remove the main body ECU (multiplex network body ECU) (Click here).
Reconnect the driver side junction block assembly connectors.
Connect the cable to the negative (-) battery terminal.
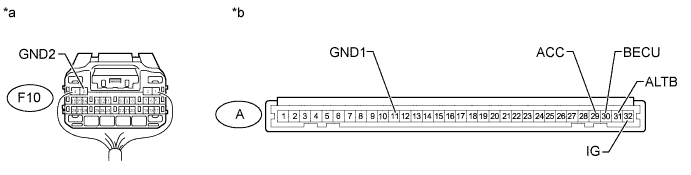
| *a | Rear view of wire harness connector (to Main Body ECU (Multiplex Network Body ECU)) | *b | Front view of wire harness connector (to Main Body ECU (Multiplex Network Body ECU)) |
Measure the resistance according to the value(s) in the table below.
| Tester Connection | Condition | Specified Condition |
| F10-3 (GND2) - Body ground | Always | Below 1 Ω |
| A-11 (GND1) - Body ground | Always | Below 1 Ω |
Measure the voltage according to the value(s) in the table below.
| Tester Connection | Condition | Specified Condition |
| A-30 (BECU) - Body ground | Always | 11 to 14 V |
| A-31 (ALTB) - Body ground | Always | 11 to 14 V |
| A-29 (ACC) - Body ground | Ignition switch ACC | 11 to 14 V |
| A-32 (IG) - Body ground | Ignition switch ON | 11 to 14 V |
|
| ||||
| OK | ||
| ||
| ||

