CRUISE CONTROL CRUISE CONTROL SYSTEM Stop Light Switch Circuit
DESCRIPTION
When the brake pedal is released, terminal STP of the ECM receives positive (+) battery voltage through the ECU IG2 fuse. While depressing the brake pedal, the stop light switch sends a signal to terminals STP and ST1- of the ECM. The ECM cancels cruise control drive when terminal STP receives the signal.
WIRING DIAGRAM
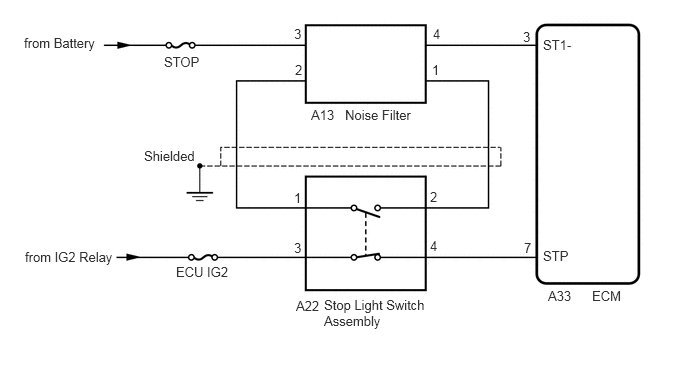
CAUTION / NOTICE / HINT
- HINT:
-
Stop light switch assembly conditions can be checked using the GTS.
- 1.
Connect the GTS to the DLC3.
2.Turn the ignition switch to ON.
3.Turn the GTS on.
4.Enter the following menus: Powertrain / Cruise Control / Data List / Stop Light Switch 1 and Stop Light Switch 2.
Cruise Control Brake Pedal Operation Stop Light Switch 1 Stop Light Switch 2 Depressed ON ON Released OFF OFF
PROCEDURE
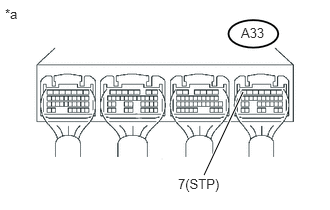
Turn the ignition switch to ON.
Measure the voltage according to the value(s) in the table below.
- Standard voltage:
Tester Connection Condition Specified Condition A33-7 (STP) - Body ground Brake pedal released 11 to 14 V Brake pedal depressed Below 1 V
| *a | Component with harness connected
(ECM) |
OK
NG
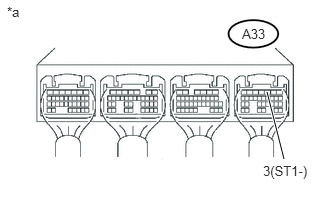
Turn the ignition switch to ON.
Measure the voltage according to the value(s) in the table below.
- Standard voltage:
Tester Connection Condition Specified Condition A33-3 (ST1-) - Body ground Brake pedal depressed 11 to 14 V Brake pedal released Below 1 V
| *a | Component with harness connected
(ECM) |
OK
NG
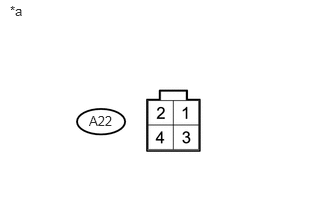
Disconnect the stop light switch assembly connector.
Measure the voltage according to the value(s) in the table below.
- Standard voltage:
Tester Connection Condition Specified Condition A22-3 - Body ground Ignition switch ON 11 to 14 V
| *a | Front view of wire harness connector
(to Stop Light Switch Assembly) |
OK
NG
Disconnect the ECM connector.
Disconnect the stop light switch assembly connector.
Measure the resistance according to the value(s) in the table below.
- Standard resistance (Check for open):
Tester Connection Condition Specified Condition A33-7 (STP) - A22-4 Always Below 1 Ω
- Standard resistance (Check for short):
Tester Connection Condition Specified Condition A33-7 (STP) or A22-4 - Body ground Always 10 kΩ or higher
OK
NG
Inspect the stop light switch assembly (See page Vehicle Exterior>LIGHTING (EXT)>STOP LIGHT SWITCH>INSPECTION).
OK
NG
Disconnect the stop light switch assembly connector.
Measure the voltage according to the value(s) in the table below.
- Standard voltage:
Tester Connection Condition Specified Condition A22-1 - Body ground Always 11 to 14 V
| *a | Front view of wire harness connector
(to Stop Light Switch Assembly) |
OK
NG
Disconnect the ECM connector.
Disconnect the stop light switch assembly connector.
Measure the resistance according to the value(s) in the table below.
- Standard resistance (Check for open):
Tester Connection Condition Specified Condition A33-3 (ST1-) - A22-2 Always Below 1 Ω
- Standard resistance (Check for short):
Tester Connection Condition Specified Condition A33-3 (ST1-) or A22-2 - Body ground Always 10 kΩ or higher
OK
NG
Inspect the stop light switch assembly (See page Vehicle Exterior>LIGHTING (EXT)>STOP LIGHT SWITCH>INSPECTION).
OK
NG
Disconnect the stop light switch assembly connector.
Disconnect the noise filter connector.
Measure the resistance according to the value(s) in the table below.
- Standard resistance (Check for open):
Tester Connection Condition Specified Condition A22-1 - A13-2 Always Below 1 Ω
- Standard resistance (Check for short):
Tester Connection Condition Specified Condition A22-1 or A13-2 - Body ground Always 10 kΩ or higher
OK
NG
Inspect the noise filter (See page Audio / Visual / Telematics>AUDIO / VIDEO>NOISE FILTER>INSPECTION).
OK
NG
Disconnect the stop light switch assembly connector.
Disconnect the noise filter connector.
Measure the resistance according to the value(s) in the table below.
- Standard resistance (Check for open):
Tester Connection Condition Specified Condition A22-2 - A13-1 Always Below 1 Ω
- Standard resistance (Check for short):
Tester Connection Condition Specified Condition A22-2 or A13-1 - Body ground Always 10 kΩ or higher
OK
NG
Inspect the noise filter (See page Audio / Visual / Telematics>AUDIO / VIDEO>NOISE FILTER>INSPECTION).
OK
NG
Disconnect the ECM connector.
Disconnect the noise filter connector.
Measure the resistance according to the value(s) in the table below.
- Standard resistance (Check for open):
Tester Connection Condition Specified Condition A33-3 (ST1-) - A13-4 Always Below 1 Ω
- Standard resistance (Check for short):
Tester Connection Condition Specified Condition A33-3 (ST1-) or A13-4 - Body ground Always 10 kΩ or higher
OK
NG