STEERING COLUMN STEERING COLUMN ASSEMBLY REMOVAL
CAUTION / NOTICE / HINT
- CAUTION:
-
Some of these service operations affect the SRS airbag system. Read the precautionary notices concerning the SRS airbag system before servicing the steering column. (See page Vehicle Interior>SUPPLEMENTAL RESTRAINT SYSTEMS>AIRBAG SYSTEM>PRECAUTION)
- HINT:
- ·
Use the same procedure for RHD and LHD vehicles.
·The procedure listed below is for LHD vehicles.
PROCEDURE

 1. PRECAUTION
2.TURN FRONT WHEELS TO FACE STRAIGHT AHEAD
51441
3.REMOVE NO. 1 ENGINE UNDER COVER
51442E
4.REMOVE NO. 2 ENGINE UNDER COVER
5.REMOVE STEERING WHEEL ASSEMBLY
55318C
6.REMOVE INSTRUMENT SIDE PANEL (w/o Knee Airbag)
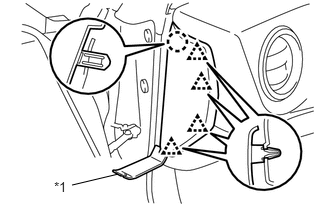
Using a moulding remover, disengage the claw and 4 clips and remove the instrument side panel.
| *1 | Moulding Remover |
55606
7.REMOVE NO. 1 INSTRUMENT PANEL UNDER COVER SUB-ASSEMBLY (w/o Knee Airbag)
73900
8.REMOVE LOWER NO. 1 INSTRUMENT PANEL AIRBAG ASSEMBLY (w/ Knee Airbag)
55405B
9.REMOVE CENTER INSTRUMENT CLUSTER FINISH PANEL SUB-ASSEMBLY
55403
10.REMOVE METER HOOD SUB-ASSEMBLY
55422
11.REMOVE UPPER INSTRUMENT PANEL METER ORNAMENT
45289A
12.REMOVE STEERING COLUMN COVER SUPPORT (w/ Entry and Start System)
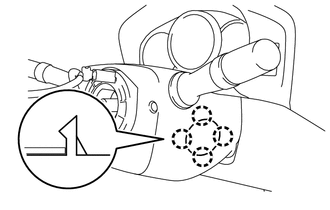
Disengage the 4 claws and remove the steering column cover support.
13.REMOVE LOWER STEERING COLUMN COVER
w/ Knee Airbag
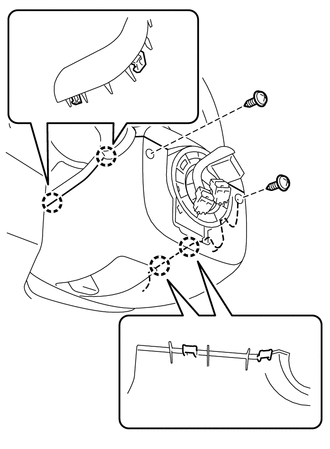
Remove the 2 screws.
Disengage the 4 claws and remove the lower steering column cover.
w/o Knee Airbag
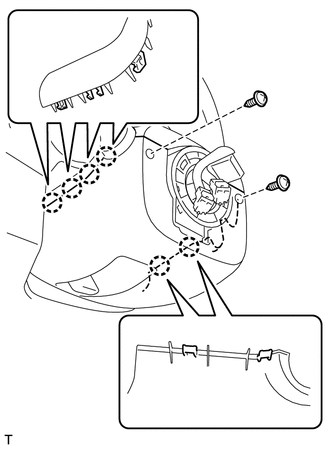
Remove the 2 screws.
Disengage the 6 claws and remove the lower steering column cover.
45286
14.REMOVE UPPER STEERING COLUMN COVER
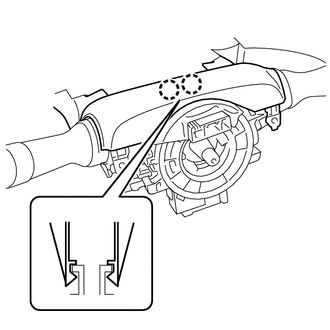
Disengage the 2 claws to remove the upper steering column cover.
15.REMOVE TURN SIGNAL SWITCH ASSEMBLY WITH SPIRAL CABLE SUB-ASSEMBLY
Disconnect the each connector from the turn signal switch assembly with spiral cable sub-assembly.
Using pliers, loosen the clamp.
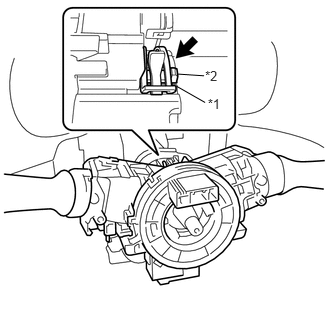
With the clamp loosened, use a screwdriver to disengage the claw, and remove the turn signal switch assembly with spiral cable sub-assembly from the steering column assembly.
| *1 | Clamp |
| *2 | Claw |
- NOTICE:
- ·
Do not replace the spiral cable with the battery connected and the ignition switch ON.
·Do not rotate the spiral cable with the battery connected and the ignition switch ON.
·Ensure that the steering wheel is installed and aligned straight when inspecting the steering sensor.
45260
16.REMOVE STEERING INTERMEDIATE SHAFT ASSEMBLY
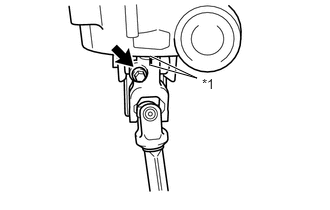
Put matchmarks on the steering intermediate shaft assembly and the steering column assembly.
| *1 | Matchmark |
Remove the bolt and separate the steering intermediate shaft assembly from the steering column assembly.
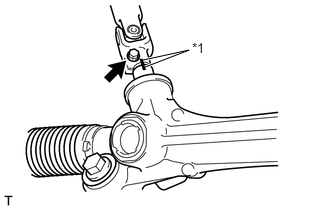
Put matchmarks on the steering intermediate shaft assembly and the rack and pinion power steering gear assembly.
| *1 | Matchmark |
Remove the bolt and separate the steering intermediate shaft assembly from the rack and pinion power steering gear assembly.
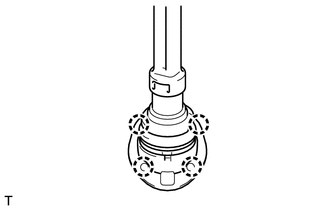
Disengage the 4 claws remove the steering intermediate shaft assembly from the exterior of the vehicle cabin.
45250
17.REMOVE STEERING COLUMN ASSEMBLY
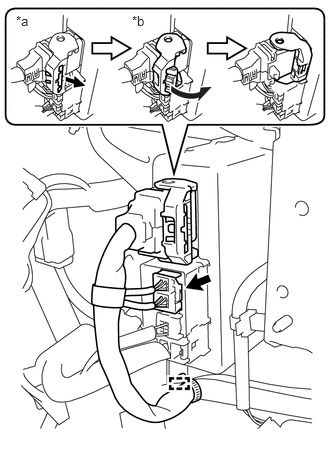
Disconnect the 2 connectors from the power steering ECU assembly.
As shown illustration, pull out the lock of the lock lever and turn the lock lever to disconnect the connector.
| *a | Pull out the lock |
| *b | Turn the lock lever |
Disengage the clamp.
Disconnect the each connector and disengage the wire harness clamps from the steering column assembly.
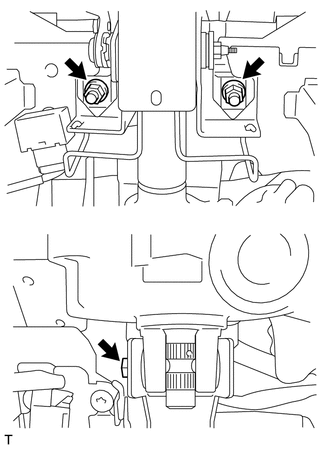
Remove the bolt and 2 nuts to remove the steering column assembly.
- HINT:
-
When pulling the bolts out, lifting the motor section of the steering column assembly and tilting the steering column assembly will make it easier to remove the bolts.