SEAT BELT SEAT BELT WARNING SYSTEM Front Passenger Side Seat Belt Warning Light Malfunction
DESCRIPTION
The belt warning occupant detection sensor detects if the passenger seat is occupied and sends signals to the combination meter assembly. the front seat inner belt (for front passenger) detects the passenger seat belt condition and sends signals to the combination meter assembly. After receiving the signals from the belt warning occupant detection sensor and front seat inner belt (for front passenger), the seat belt warning light in the telltale light assembly will blink or go off.
WIRING DIAGRAM
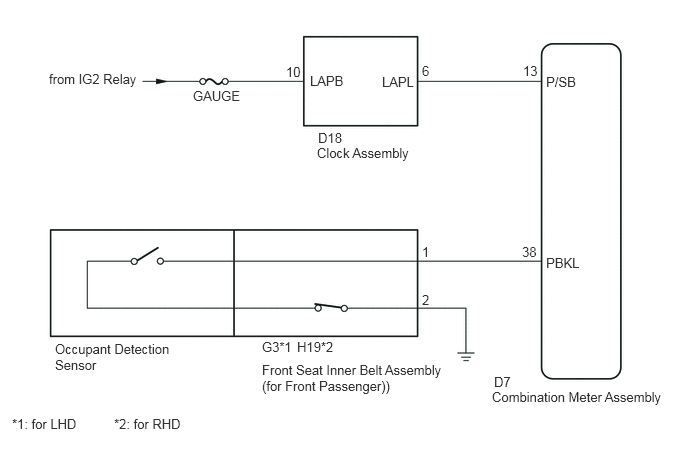
PROCEDURE
Connect the GTS to the DLC3.
Turn the ignition switch to ON.
Turn the GTS on.
Enter the following menus: Body Electrical / Combination Meter / Data List.
Read the Data List according to the display on the GTS.
- OK:
ON or OFF appears on the GTS screen according to the front passenger seat belt condition.
- Combination Meter:
Tester Display Measurement Item/Range Normal Condition Diagnostic Note P-Seatbelt Buckle SW Front passenger seat belt buckle switch signal/ON or OFF ON: Front passenger seat belt fastened
OFF: Front passenger seat belt not fastened-
OK
NG
Connect the GTS to the DLC3.
Turn the ignition switch to ON.
Turn the GTS on.
Enter the following menus: Body Electrical / Combination Meter / Active Test.
Perform the Active Test according to the display on the GTS.
- OK:
Front passenger side seat belt warning light condition can be switched by Active Test.
| Tester Display | Test Part | Control Range | Diagnostic Note |
|---|---|---|---|
| Front Passenger Side Seat Belt | Front passenger side seat belt warning light | ON/OFF | - |
OK
NG
Remove the clock assembly (See page Vehicle Interior>METER / GAUGE / DISPLAY>CLOCK>REMOVAL).
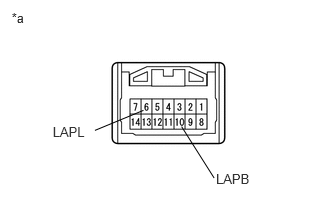
Apply battery voltage to the connector and check the illumination condition.
- Result:
Condition Specified Condition Battery positive (+) → 10 (LAPB)
Battery negative (-) → 6 (LAPL)Front passenger side seat belt warning light comes on
| *a | Component without harness connected
(Clock assembly) |
OK
NG
Disconnect the D18 clock assembly connector.
Disconnect the D7 combination meter assembly connector.
Measure the resistance according to the value(s) in the table below.
- Standard Resistance:
Tester Connection Condition Specified Condition D18-6 (LAPL) - D7-13 (P/SB) Always Below 1 Ω D18-6 (LAPL) - Body ground Always 10 kΩ or higher
Measure the voltage according to the value(s) in the table below.
- Standard Voltage:
Tester Connection Condition Specified Condition D18-10 (LAPB) - Body ground Ignition switch ON 11 to 14 V
OK
NG
Inspect the separate type front seat cushion pad (occupant detection sensor) (See page Vehicle Interior>SEAT BELT>OCCUPANT DETECTION SENSOR>INSPECTION).
OK
NG
Inspect the front seat inner belt assembly (for front passenger) (See page Vehicle Interior>SEAT BELT>FRONT SEAT INNER BELT ASSEMBLY>INSPECTION).
OK
NG
Disconnect the G3 front seat inner belt assembly connector. (for LHD)
Disconnect the H19 front seat inner belt assembly connector. (for RHD)
Disconnect the D7 combination meter assembly connector.
Measure the resistance according to the value(s) in the table below.
- Standard Resistance:
for LHD Tester Connection Condition Specified Condition G3-1 - D7-38 (PBKL) Always Below 1 Ω G3-1 - Body ground Always 10 kΩ or higher G3-2 - Body ground Always Below 1 Ω
- Standard Resistance:
for RHD Tester Connection Condition Specified Condition H19-1 - D7-38 (PBKL) Always Below 1 Ω H19-1 - Body ground Always 10 kΩ or higher H19-2 - Body ground Always Below 1 Ω
OK
NG