HEATING / AIR CONDITIONING AIR CONDITIONING SYSTEM(for Automatic Air Conditioning System) Air Conditioning Compressor Magnetic Clutch Circuit
DESCRIPTION
When the air conditioning control assembly is turned on, a magnetic clutch on signal is sent from the heater relay terminal of the air conditioning control assembly. Then, the engine room relay block assembly turns on to operate the magnetic clutch assembly.
WIRING DIAGRAM
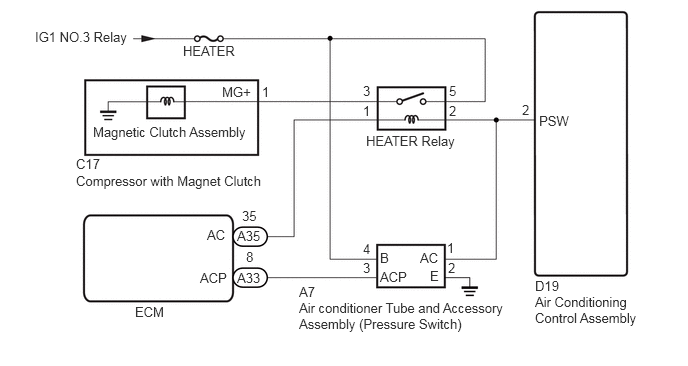
CAUTION / NOTICE / HINT
- NOTICE:
- ·
Inspect the fuses for circuits related to this system before performing the following inspection procedure.
PROCEDURE
Enter the following menus : Body Electrical / Air Conditioner / Date List.
Check the valve(s) by referring to the table below.
| Tester Display | Measurement Item/Range | Normal Condition | Diagnostic Note |
|---|---|---|---|
| Pressure Switch Operation
(Pressure Switch Oper) |
Pressure switch status /
Normal or Abnormal |
Normal | - |
- OK:
The display is as specified in the normal condition column.
Result Proceed to NG A OK B
A
B
Check the refrigerant volume (for HFC-1234yf (R1234yf)) (See page Vehicle Interior>HEATING / AIR CONDITIONING>REFRIGERANT(for HFO-1234yf(R1234yf))>ON-VEHICLE INSPECTION
Check the refrigerant volume (for HFC-134a (R134a)) (See page Vehicle Interior>HEATING / AIR CONDITIONING>REFRIGERANT(for HFC-134a(R134a))>ON-VEHICLE INSPECTION)
OK
NG
Disconnect the A7 air conditioner tube and accessory assembly connector.
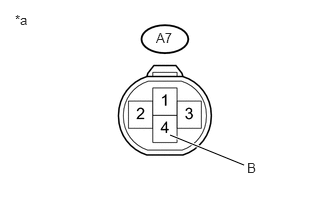
Measure the voltage according to the value(s) in the table below.
- Standard Voltage:
Tester Connection Condition Specified Condition A7-4(B) - Body ground Ignition switch on 11 to 14 V
Text in Illustration *a Front view of wire harness connector
(to Air Conditioner Tube and Accessory Assembly)
OK
NG
Measure the resistance according to the value(s) in the table below.
- Standard Resistance:
Tester Connection Condition Specified Condition A7-2(E) - Body ground Always Below 1 Ω
OK
NG
Disconnect the A33 ECM connector.
Measure the resistance according to the value(s) in the table below.
- Standard Resistance:
Tester Connection Condition Specified Condition A7-3(ACP) - A33-8(ACP) Always Below 1 Ω A7-3(ACP) - Body ground Always 10 kΩ or higher
OK
NG
Disconnect the D19 air conditioning control assembly connector.
Measure the resistance according to the value(s) in the table below.
- Standard Resistance:
Tester Connection Condition Specified Condition A7-1(AC) - D19-2(PSW) Always Below 1 Ω A7-1(AC) - Body ground Always 10 kΩ or higher
OK
NG
Inspect the air conditioner tube and accessory assembly (See page Vehicle Interior>HEATING / AIR CONDITIONING>AIR CONDITIONING PRESSURE SENSOR>ON-VEHICLE INSPECTION)
OK
NG
Connect the GTS to the DLC3.
Turn the ignition switch to ON.
Turn the GTS on.
Enter the following menus : Powertrain / Engine and ECT / Date List.
Check the value(s) by referring to the table below.
| Tester Display | Measurement Item/Range | Normal Condition | Diagnostic Note |
|---|---|---|---|
| A/C Signal | A/C switch status / ON or OFF | ON: A/C switch on
OFF: A/C switch off |
The air conditioning control assembly sends the A/C switch signal to the ECM via CAM communication |
- OK:
The display is as specified in the normal condition column.
Result Proceed to NG A OK B
A
B
Remove the heater relay from the engine room relay block assembly.
Disconnect the D19 air conditioning control assembly connector.
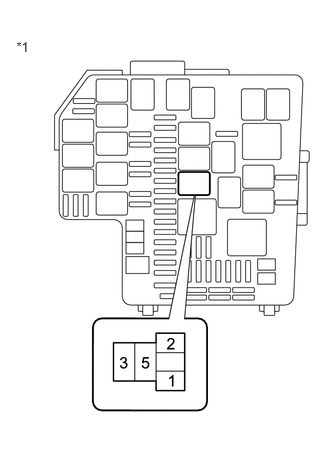
Measure the resistance according to the value(s) in the table below.
- Standard Resistance:
Tester Connection Condition Specified Condition 2 - D19-2(PSW) Always Below 1 Ω 2 - Body ground Always 10 kΩ or higher
| *1 | Engine room relay block assembly |
OK
NG
Disconnect the A35 ECM connector.
Measure the resistance according to the value(s) in the table below.
- Standard Resistance:
Tester Connection Condition Specified Condition A35-35(AC) - 1 Always Below 1 Ω A35-35(AC) - Body ground Always 10 kΩ or higher
| *1 | Engine room relay block assembly |
OK
NG
Inspect the heater relay (See page Vehicle Interior>HEATING / AIR CONDITIONING>RELAY>ON-VEHICLE INSPECTION).
OK
NG
Measure the voltage according to the value(s) in the table below.
- Standard Resistance:
Tester Connection Condition Specified Condition 5 - Body ground Ignition switch off Below 1 V Ignition switch on 11 to 14 V
| *1 | Engine room relay block assembly |
OK
NG
Disconnect the C17 compressor with magnet clutch connector.
Measure the valve(s) in the table below.
- Standard Resistance:
Tester Connection Condition Specified Condition C17-1(MG+) - 3 Always Below 1 Ω C17-1(MG+) - Body ground Always 10 kΩ or higher
| *1 | Engine room relay block assembly |
OK
NG
Inspect the compressor with magnet clutch (See page Vehicle Interior>HEATING / AIR CONDITIONING>COMPRESSOR>INSPECTION).
OK
NG
Measure the voltage according to the valve(s) in the table below.
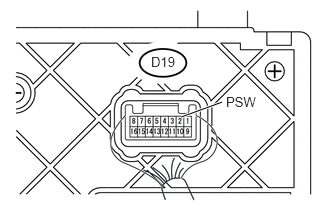
- Standard Voltage:
Tester Connection Condition Specified Condition D19-2(PSW) - Body ground ·Ignition switch on
·A/C switch : off
11 to 14 V ·Ignition switch on
·A/C switch : on
Below 1 V
| *1 | Component with harness connected
(Air Conditioning Control Assembly) |
OK
NG
Replace the blower resistor with a new or normally functioning one (See page Engine / Hybrid System>FA20 (ENGINE CONTROL)>ECM>REMOVAL)
NEXT
Enter the following menus : Body Electrical / Air Conditioner / Date List.
Check the valve(s) by referring to the table below.
| Tester Display | Measurement item/Range | Normal Condition | Diagnostic Note |
|---|---|---|---|
| Pressure Switch Operation
(Pressure Switch Oper) |
Pressure switch status /
Normal or Abnormal |
Normal | - |
OK
NG