WINDOW / GLASS QUARTER WINDOW GLASS INSTALLATION
CAUTION / NOTICE / HINT
- HINT:
- ·
Use the same procedure for both the RH and LH sides.
·The following procedure is for the LH side.
PROCEDURE

 62720A
1.CLEAN QUARTER WINDOW ASSEMBLY
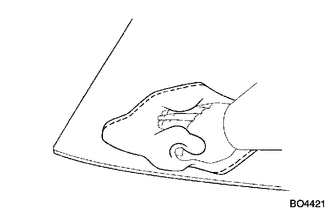
Clean the outer edges of the quarter window assembly with a non-residue solvent.
- NOTICE:
- ·
Do not touch the glass surface after cleaning it.
·Be careful not to damage the glass or clips.
62720A
2.INSTALL QUARTER WINDOW ASSEMBLY LH
Using a brush or a sponge, apply primer (3M N-200) to the quarter window glass adhesive dam attachment surface of the quarter window assembly LH.
Install the new quarter window glass adhesive dam, applying double-sided tape all the way around the glass except where the dam is installed, as shown in the illustration.
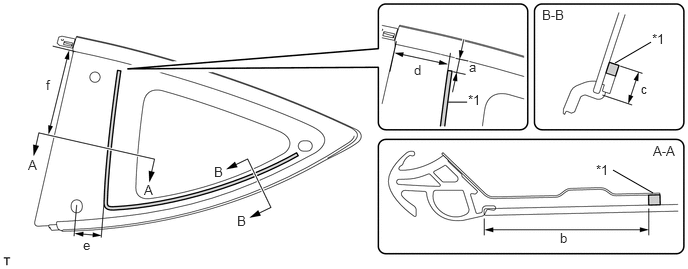
- Standard Dimension:
Area Dimension a 13.0 mm (0.5118 in.) b 72.5 mm (2.8543 in.) c 13.0 mm (0.5118 in.) d 62.3 mm (2.4528 in.) e 23.4 mm (0.9213 in.) f 123.8 mm (4.874 in.)
| *1 | Quarter Window Glass Adhesive Dam | - | - |
- HINT:
-
If an area other than that specified is coated by accident, wipe off the primer with a non-residue solvent before it dries.
- NOTICE:
- ·
Allow the primer to dry for 3 minutes or more.
·Throw away any leftover primer.
·Do not apply too much primer.
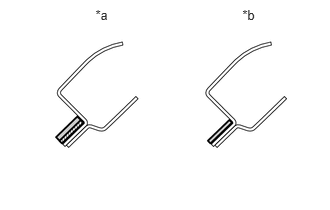
Using a brush, coat the installation surface on the vehicle body with Primer (Sunstar #435-40).
| *a | NG |
| *b | OK |

|
Primer (Sunstar #435-40) |

|
Adhesive |
- NOTICE:
- ·
Do not coat the adhesive with Primer (Sunstar #435-40).
·Do not apply too much primer.
·Allow the primer to dry for 3 minutes or more.
- HINT:
-
If an area other than that specified is coated by accident, wipe off the primer with a clean piece of cloth before it dries.
Using a brush or a sponge, coat the application area of adhesive with Primer (3M N-200).
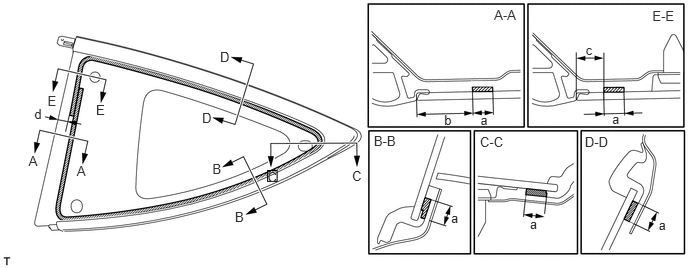
- Standard Dimension:
Item Dimension a 8.0 mm (0.315 in.) b 22.3 mm (0.878 in.) c 10.1 mm (0.398 in.) d 13.9 mm (0.547 in.)
|
|
Primer (3M N-200) | - | - |
- NOTICE:
- ·
Do not apply too much primer.
·Allow the primer to dry for 3 minutes or more.
- HINT:
-
If an area other than that specified is coated by accident, wipe off the primer with a clean piece of cloth before it dries.
Apply adhesive to the quarter window assembly LH.
- Adhesive:
Toyota Genuine Windshield Glass Adhesive or equivalent
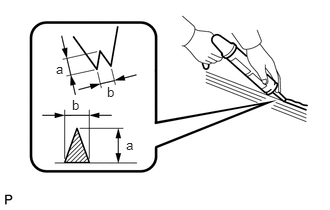
Cut off the tip of the cartridge nozzle, as shown in the illustration.
- Standard Dimension:
Item Dimension a 12.0 mm (0.472 in.) b 8.0 mm (0.315 in.)
Load the sealer gun with cartridge.
Apply adhesive to the quarter window assembly LH, as shown in the illustration.
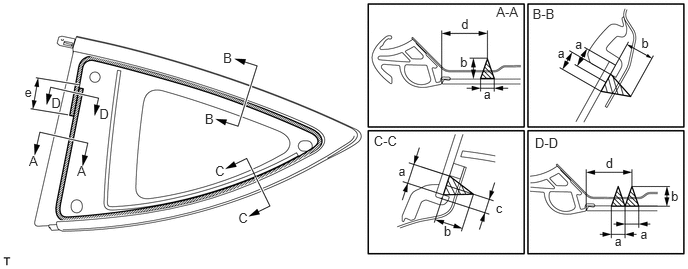
- Standard Dimension:
Item Dimension a 8.0 mm (0.315 in.) b 12.0 mm (0.4724 in.) c 5.6 mm (0.2205 in.) d 26.3 mm (1.0354 in.) e 50.0 mm (1.9685 in.)
|
|
Adhesive | - | - |
- HINT:
-
Apply adhesive onto the ceramic notches.
Install the quarter window assembly LH to the vehicle body (When reusing the quarter window assembly LH).
Install the butyl tape (If the clips are broken).
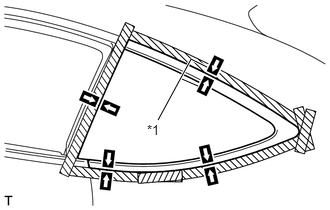
Position the quarter window assembly LH so that the matchmarks are aligned, and press it in gently along the rim.
| *1 | Matchmark |
Lightly press the front surface of the windshield glass to ensure that the windshield glass is securely fit to the vehicle body.
- HINT:
-
Press the glass with a force of 98 N (10 kgf, 22 lbf) or more.
Install the quarter window assembly LH (When using a new quarter window assembly LH).
Engage the 3 clips to install the quarter window assembly LH.
- NOTICE:
-
Allow the primer to dry for 3 minutes or more.
- HINT:
-
Press the glass with a force of 98 N (10 kgf, 22 lbf) or more.
Hold the quarter window assembly LH in place securely with protective tape or equivalent until the adhesive hardens.
- NOTICE:
- ·
Check that the clips are attached to the body correctly.
·Check the clearance between the body and the glass.
Lightly press the outer surface of the glass to ensure that the glass is securely fit to the vehicle body.
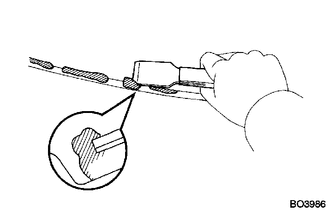
Using a scraper, remove any excess or protruding adhesive.
- HINT:
-
Apply adhesive onto the glass rim.
Hold the quarter window assembly LH using protective tape until the applied adhesive becomes hard.
3.INSPECT WATER LEAK
After the adhesive has hardened, apply water from the outside of the vehicle. Check that no water leaks into the cabin.
If water leaks into the cabin, allow the water to dry and add adhesive.
Remove the protective tape.
62412
4.INSTALL CENTER PILLAR GARNISH LH
62639
5.INSTALL REAR QUARTER TRIM GARNISH FRONT LH
62462A
6.INSTALL REAR WINDOW SIDE GARNISH LH
62606A
7.INSTALL QUARTER TRIM LID SUB-ASSEMBLY LH
64715D
8.INSTALL LUGGAGE COMPARTMENT TRIM COVER LH
64722
9.INSTALL LUGGAGE COMPARTMENT INNER TRIM COVER LH
62312B
10.INSTALL FRONT DOOR OPENING TRIM WEATHERSTRIP LH
67914
11.INSTALL FRONT DOOR SCUFF PLATE LH
73220
12.CONNECT FRONT SEAT OUTER BELT ASSEMBLY LH
71470S
13.INSTALL SEPARATE TYPE REAR SEAT CUSHION ASSEMBLY LH