HEATING / AIR CONDITIONING FRONT AIR CONDITIONING UNIT INSTALLATION
PROCEDURE

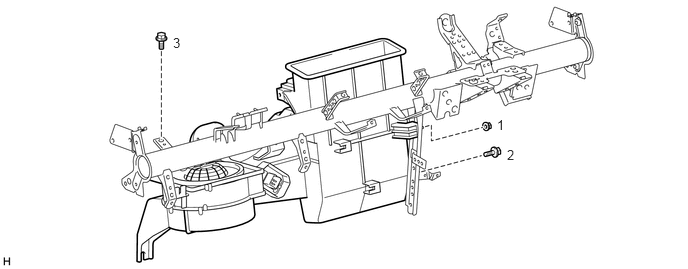
 1.INSTALL AIR CONDITIONING UNIT ASSEMBLY (for RHD)
Install the air conditioning unit assembly onto the instrument panel reinforcement with the 2 bolts and nut in the order indicated in the illustration.
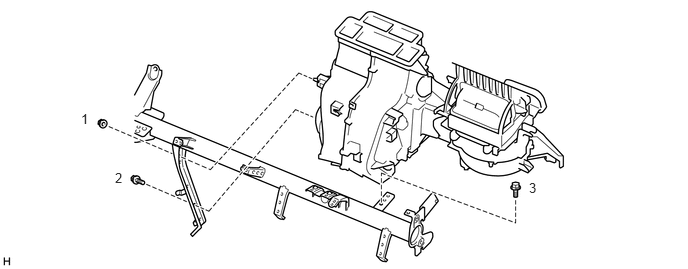
2.INSTALL AIR CONDITIONING UNIT ASSEMBLY (for LHD)
Install the air conditioning unit assembly onto the instrument panel reinforcement with the 2 bolts and nut in the order indicated in the illustration.
55331
3.INSTALL INSTRUMENT PANEL REINFORCEMENT (for RHD)
Install the instrument panel reinforcement with the 9 bolts.
Install the bolt in the engine compartment.
55331
4.REMOVE INSTRUMENT PANEL REINFORCEMENT (for LHD)
Install the instrument panel reinforcement with the 8 bolts.
Install the bolt in the engine compartment.
88539J
5.INSTALL DRAIN COOLER HOSE
Install the drain cooler hose.
- HINT:
-
Use the same procedure for the RHD and LHD vehicles.
87220
6.INSTALL AIR DUCT ASSEMBLY
Install the air duct assembly with the 2 bolts.
- HINT:
-
Use the same procedure for the RHD and LHD vehicles.
82141
7.INSTALL INSTRUMENT PANEL WIRE (for RHD)
Connect the instrument panel wire onto the instrument panel reinforcement with the 2 clamps.
Connect the ground wire onto the instrument panel reinforcement with the bolt.
Connect the ground wire onto the instrument panel reinforcement with the bolt and 3 clamps.
Connect the ground wire onto the instrument panel reinforcement with the bolt.
Connect the connector and engage the 4 clamps.
Connect the 2 connectors and engage the 2 clamps.
82141
8.INSTALL INSTRUMENT PANEL WIRE (for LHD)
Connect the instrument panel wire onto the instrument panel reinforcement with the 2 clamps.
Connect the ground wire onto the instrument panel reinforcement with the 2 bolts.
Connect the instrument panel wire onto the instrument panel reinforcement with the 3 clamps.
Connect the ground wire onto the instrument panel reinforcement with the bolt.
Connect the ground wire onto the instrument panel reinforcement with the bolt and 3 clamps.
Connect the ground wire onto the instrument panel reinforcement with the bolt.
Connect the connector and engage the and clamp.
Connect the connector and engage the 3 clamps.
Connect the ground wire onto the instrument panel reinforcement with the bolt.
Connect the 2 connectors and engage the clamp.
82600
9.INSTALL RELAY BLOCK ASSEMBLY (for RHD)
Install the relay block assembly with the 3 bolts.
Connect each connector.
82600
10.INSTALL RELAY BLOCK ASSEMBLY (for LHD)
Install the relay block assembly with the 3 bolts.
Connect each connector.
55453D
11.INSTALL NO. 1 INSTRUMENT PANEL SAFETY PAD (for RHD)
Engage the 2 clamps and install the No. 1 instrument panel safety pad.
55454B
12.INSTALL NO. 2 INSTRUMENT PANEL SAFETY PAD (for RHD)
- HINT:
-
Use the same procedure as for the No. 1 instrument panel safety pad.
85918A
13.INSTALL DOOR CONTROL RELAY (w/o Wireless Door Lock)
89743
14.INSTALL DOOR CONTROL RECEIVER (w/ Wireless Door Lock)
89530C
15.INSTALL TCM (for Automatic Transmission)
89561
16.INSTALL ECM (for RHD)
89561
17.INSTALL ECM (for LHD)
45250
18.INSTALL STEERING COLUMN ASSEMBLY
55303B
19.INSTALL LOWER INSTRUMENT PANEL SUB-ASSEMBLY
55302A
20.INSTALL UPPER INSTRUMENT PANEL SUB-ASSEMBLY
21.INSTALL FRONT SEAT ASSEMBLY
88716A
22.INSTALL LIQUID TUBE SUB-ASSEMBLY (for RHD)
Remove the vinyl tape from the liquid tube sub-assembly and the connecting portion of the air conditioning unit assembly.
Apply sufficient compressor oil (ND-OIL8 or equivalent) to a new O-ring and the connecting part of the liquid tube sub-assembly.
- Compressor oil:
ND-OIL8 or equivalent
Install the O-ring onto the liquid tube sub-assembly.
Connect the liquid tube sub-assembly onto the air conditioning unit assembly.
88716A
23.INSTALL LIQUID TUBE SUB-ASSEMBLY (for LHD)
Remove the vinyl tape from the liquid tube sub-assembly and the connecting portion of the air conditioning unit assembly.
Apply sufficient compressor oil (ND-OIL8 or equivalent) to a new O-ring and the connecting part of the liquid tube sub-assembly.
- Compressor oil:
ND-OIL8 or equivalent
Install the O-ring onto the liquid tube sub-assembly.
Connect the liquid tube sub-assembly onto the air conditioning unit assembly.
88717U
24.INSTALL SUCTION TUBE SUB-ASSEMBLY (for RHD)
Remove the vinyl tape from the suction tube sub-assembly and the connecting part of the air conditioning unit assembly.
Apply sufficient compressor oil (ND-OIL8 or equivalent) to a new O-ring and the connecting part of the suction tube sub-assembly.
- Compressor oil:
ND-OIL8 or equivalent
Install the O-ring onto the suction tube sub-assembly.
Connect the suction tube sub-assembly onto the air conditioning unit assembly.
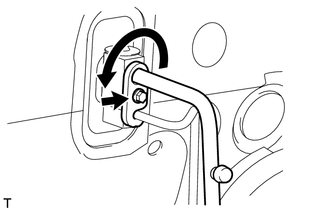
Turn the hook connector in the direction indicated by the arrow in the illustration.
Insert the pipe joints securely into the fitting holes and tighten the bolt.
- Torque:
- 6.2 N*m (63 kgf*cm, 55 in.*lbf)
88717U
25.INSTALL SUCTION TUBE SUB-ASSEMBLY (for LHD)
Remove the vinyl tape from the suction tube sub-assembly and the connecting part of the air conditioning unit assembly.
Apply sufficient compressor oil (ND-OIL8 or equivalent) to a new O-ring and the connecting part of the suction tube sub-assembly.
- Compressor oil:
ND-OIL8 or equivalent
Install the O-ring onto the suction tube sub-assembly.
Connect the suction tube sub-assembly onto the air conditioning unit assembly.
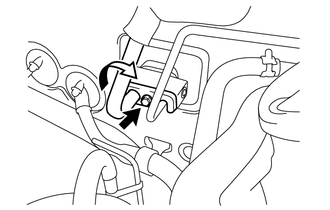
Turn the hook connector in the direction indicated by the arrow in the illustration.
Insert the pipe joints securely into the fitting holes and tighten the bolt.
- Torque:
- 6.2 N*m (63 kgf*cm, 55 in.*lbf)
87246X
26.INSTALL NO. 2 HEATER WATER HOSE (w/ Heater)
Connect the No. 2 heater water hose to the air conditioning unit with the clamp.
- HINT:
-
Use the same procedure for the RHD and LHD vehicles.
87245X
27.INSTALL NO. 1 HEATER WATER HOSE (w/ Heater)
Connect the No. 1 heater water hose to the air conditioning unit with the clamp.
- HINT:
-
Use the same procedure for the RHD and LHD vehicles.
28.CONNECT CABLE TO NEGATIVE BATTERY TERMINAL
- Torque:
- 6.4 N*m (65 kgf*cm, 57 in.*lbf)
29.ADD ENGINE COOLANT
30.CHARGE REFRIGERANT
31. WARM UP ENGINE
32.INSPECT FOR REFRIGERANT LEAK
33.INSPECT FOR COOLANT LEAK