NETWORKING CAN COMMUNICATION SYSTEM HOW TO PROCEED WITH TROUBLESHOOTING
CAUTION / NOTICE / HINT
PRECAUTIONS WHEN TROUBLESHOOTING
- NOTICE:
- ·
Because the order of diagnosis is important to allow correct diagnosis, make sure to begin troubleshooting using How to Proceed with Troubleshooting when CAN communication system related DTCs are output.
·If the CAN communication system is malfunctioning, check the contact pressure of the terminals in connectors, as insufficient terminal contact pressure may be the cause.
·Refer to Diagnosis System for CAN communication system DTCs.
·Refer to troubleshooting of each system if DTCs regarding the CAN communication system are not output.
·Before measuring the resistance of the CAN bus, turn the ignition switch off and leave the vehicle for 1 minute or more without operating the key or any switches, or opening or closing the doors. After that, disconnect the cable from the negative (-) battery terminal and leave the vehicle for 1 minute or more before measuring the resistance.
CAN communication DTCs are output for CAN main bus and CAN branch malfunctions as well as for internal malfunctions or power source malfunctions of ECUs or sensors for systems using CAN communication. Therefore, when DTCs for internal malfunctions or power source malfunctions of corresponding systems are output at the same time as CAN communication DTCs, troubleshoot according to the internal malfunction and power source malfunction DTCs.
The DLC3 branch and V bus main bus circuits can be checked for malfunctions by inspecting at the DLC3 terminals using an electrical tester.
- NOTICE:
- ·
When inspecting at the DLC3 connector, do not connect the tester directly to the terminals. Instead, connect using service wires.
·Inspections for an open in an ECU or sensor branch, or inspections for buses other than the V bus cannot be performed from the DLC3.
An open in a branch for ECUs or sensors that are connected to the CAN main bus can be checked by performing a CAN bus check using the GTS or Techstream. (This inspection is possible when the DLC3 branch and V bus main bus lines are normal.)
If the V bus had a communication error, the probable ECU or sensor for which communication stopped can be determined using the combination of communication DTCs (DTCs that start with U) that are output.
When an open circuit is detected, before disconnecting related connectors for inspection, push in on the connector body to check that the connector is not loose or disconnected.
When a connector is disconnected, check that the terminals and connector body are not cracked, deformed or corroded.
PROCEDURE
- HINT:
- ·
If the ignition switch can be turned to ON when the vehicle is brought in for repair, check for DTCs and check the illumination condition of the indicators in the combination meter assembly and the basic operation of the vehicle (such as steering operation) promptly.
·Do not turn the ignition switch off until the inspection of the vehicle is finished, as some fail-safe functions are canceled when the ignition switch is turned off.
·If the ignition switch cannot be turned to ON when the vehicle is brought in, measure the voltage of the battery. If the voltage is below 11 V, recharge or replace the battery before performing troubleshooting.
·If the ignition switch cannot be turned to ON even though the battery voltage is normal, repair this malfunction before performing troubleshooting.
- Result:
Proceed to NEXT
NEXT
- HINT:
- ·
When troubleshooting, confirm that the problem symptoms have been accurately identified. Preconceptions should be discarded in order to make an accurate judgment. To clearly understand what the problem symptoms are, it is extremely important to ask the customer about the problem and the conditions at the time the malfunction occurred.
·Ask the customer if the vehicle is/was equipped with additional devices such as a theft deterrent device or monitor. (If equipped, explain to the customer that the additional devices will be removed before performing troubleshooting as the malfunction cannot be checked properly.)
It is useful to confirm the symptoms and the conditions in which the vehicle was operating at the time when a malfunction occurred. This helps to narrow down the malfunctioning part.
- HINT:
- ·
What was affected (system, part or meter warning indicators)
·What happened (details of the malfunction)
·When (occurrence date and time, frequency and if it recurs or not)
·Under what kind of situation did the problem occur (driving and operating condition at the occurrence and weather)
·Road type or condition (city, suburb, paved road, unpaved road, highway, etc.)
·Return conditions (what made the vehicle return to normal, for example, the ignition switch was turned off)
Points to be confirmed Symptom ·Electric power steering
·Normal
·A little heavier than usual
·There was no assist
·Multi-information display
·Whether each display has stopped updating
·Operation of other systems of concern
Meter warning lights ·Illumination of warning lights and the order in which they illuminated
·MIL
·BRAKE
·ABS
·EPS
·SRS
·Others
·Meter display
·Speedometer
·Tachometer
·Others
- Result:
Proceed to NEXT
NEXT
- HINT:
-
Read the GTS or Techstream operators manual before use.
-
Click hereGeneral>INTRODUCTION>HOW TO USE THIS MANUAL>GENERAL INFORMATION
Connect the GTS or Techstream to the DLC3.
Turn the ignition switch to ON.
Turn the GTS or Techstream on.
Check that the GTS or Techstream and ECUs can communicate with the ignition switch ON.
- HINT:
- ·
If communication is not possible, the GTS or Techstream screen will indicate an error.
·If communication between the GTS or Techstream and ECUs is not possible, either the GTS or Techstream or vehicle has a malfunction.
·When communication between the GTS or Techstream and the vehicle is not possible, but communication is possible when the GTS or Techstream is connected to another vehicle, the vehicle is malfunctioning. Inspect the CANH and CANL branch lines of the DLC3 and the ECU power source circuits (in this case perform steps 7 to 9 first). In addition, check that the BAT terminal of the DLC3 receives battery voltage (11 V or more).
·If communication between the GTS or Techstream and ECUs is still not possible even when the GTS or Techstream is connected to another vehicle, the GTS or Techstream has a malfunction. Perform the self tests described in the GTS or Techstream operators manual. (The GTS or Techstream may be malfunctioning or its battery may be discharged.)
- Result:
Result Proceed to OK (Communication between the GTS or Techstream and the vehicle is possible.) A OK (Communication between the GTS or Techstream and the vehicle is not possible but communication is possible when connected to another vehicle.) B NG (Communication is not possible between the GTS or Techstream and the vehicle, nor between the GTS or Techstream and another vehicle.) C
A
B
C
Using the GTS or Techstream, perform Health Check to read current and history DTCs and record them.
- NOTICE:
- ·
CAN communication DTCs are output when there is an open or short in any of the communication lines. Any problems with the power source of a corresponding ECU or sensor, or problems in the ECU or sensor itself also cause these DTCs to be output.
·If a CAN communication line connector is disconnected with the ignition switch ON, the ECUs of the corresponding system and related systems store a DTC.
- HINT:
- ·
If an open in a CAN main bus line, a short between the CAN bus lines (CANH and CANL) or a short to ground or +B in a CAN bus occurs, DTCs of almost all ECUs and sensors on the CAN bus may be output (or a message indicating a communication error may be displayed on the GTS or Techstream screen). In this case, check the resistance of the CAN bus (steps 7 to 9) first.
·If an open occurs in just one of the lines of a CAN branch, DTCs which are not related to malfunctioning parts may be output (DTCs may be displayed randomly), or a message indicating a communication error may be displayed on the GTS or Techstream.
Read the freeze frame data using the GTS or Techstream and record it.
- Result:
Proceed to NEXT
NEXT
Select "Communication Malfunction Check" from the screen on the GTS or Techstream.
Record all the DTCs stored for ECUs and sensors.
- Result:
Proceed to NEXT
NEXT
Based on the vehicle equipment and specifications, confirm the systems that use CAN communication.
Click herePower Source / Network>NETWORKING>CAN COMMUNICATION SYSTEM>DIAGNOSIS SYSTEM
Select "CAN Bus Check" from the screen on the GTS or Techstream.
- CAN Bus Check
- 50007
Observe the screen for approximately 2 minutes to check the ECUs and sensors displayed on the screen.
- Result:
Proceed to NEXT
NEXT
- NOTICE:
-
Before measuring the resistance of the CAN bus, turn the ignition switch off and leave the vehicle for 1 minute or more without operating the key or any switches, or opening or closing the doors. After that, disconnect the cable from the negative (-) battery terminal and leave the vehicle for 1 minute or more before measuring the resistance.
- HINT:
-
Operating the ignition switch, any other switches or a door triggers related ECU and sensor communication on the CAN. This communication will cause the resistance value to change.
Disconnect the cable from the negative (-) battery terminal.
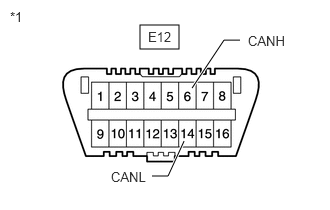
| *1 | DLC3 |
Measure the resistance according to the value(s) in the table below.
- Standard Resistance:
Tester Connection Condition Specified Condition E12-6 (CANH) - E12-14 (CANL) Cable disconnected from negative (-) battery terminal 54 to 69 Ω
- Result:
Result Proceed to OK A NG (70 Ω or higher) B NG (Below 54 Ω) C
A
B
C
Click herePower Source / Network>NETWORKING>CAN COMMUNICATION SYSTEM>Check CAN Bus Lines for Short Circuit
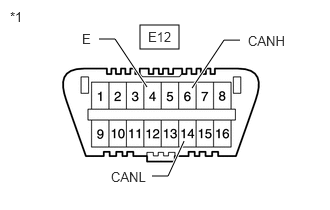
| *1 | DLC3 |
Measure the resistance according to the value(s) in the table below.
- Standard Resistance:
Tester Connection Condition Specified Condition E12-6 (CANH) - E12-4 (E) Cable disconnected from negative (-) battery terminal 200 Ω or higher E12-14 (CANL) - E12-4 (E) Cable disconnected from negative (-) battery terminal 200 Ω or higher
- Result:
Proceed to OK NG
OK
NG
Click herePower Source / Network>NETWORKING>CAN COMMUNICATION SYSTEM>Check CAN Bus Line for Short to GND
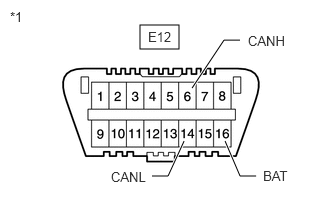
| *1 | DLC3 |
Measure the resistance according to the value(s) in the table below.
- Standard Resistance:
Tester Connection Condition Specified Condition E12-6 (CANH) - E12-16 (BAT) Cable disconnected from negative (-) battery terminal 6 kΩ or higher E12-14 (CANL) - E12-16 (BAT) Cable disconnected from negative (-) battery terminal 6 kΩ or higher
- Result:
Proceed to OK NG
OK
NG
Click herePower Source / Network>NETWORKING>CAN COMMUNICATION SYSTEM>Check CAN Bus Line for Short to +B
Inspect or repair the probable malfunctioning part based on the check result of step 6 (the step in which CAN bus check was performed).
- CAN Bus Check
- 50007
- Result of CAN Bus Check (Connection Status Check Using GTS or Techstream):
Result Proceed to All ECUs and sensors connected to the CAN communication system are displayed on the screen.
(CAN bus circuit is currently normal.)A One of the ECUs and sensors connected to the V Bus is not displayed on the screen.
(Open in ECU or sensor branch lines, or communication is interrupted.)B In addition to ECUs and sensors which are connected to the CAN communication system but are not displayed on the screen, there are ECUs or sensors for which the detection status changes (changes between detected and not detected) during the inspection.
(Open in one side of ECU or sensor branch lines.)C
- NOTICE:
- ·
Non-installed ECUs or sensors will not be displayed. Do not mistake them for being in communication stop mode.
·It may be possible to select buses that do not have ECUs or sensors from the bus selection pull-down menu on the GTS or Techstream. This is not a malfunction.
- HINT:
- ·
Regarding CAN Bus Check, refer to How to Interpret CAN Bus Check Screen.
Click herePower Source / Network>NETWORKING>CAN COMMUNICATION SYSTEM>DIAGNOSIS SYSTEM
·If the detection status of ECUs changes during the inspection, one of the branch lines of a connected ECU or sensor may be open. (Signals from the ECU or sensor that has an open in one of its branch lines create electrical noise, affecting response to the GTS or Techstream and whether or not the ECUs and sensors are displayed.)
A
B
C
Click herePower Source / Network>NETWORKING>CAN COMMUNICATION SYSTEM>Open in One Side of CAN Branch Line
Select "Bus Check" from "System Select".
Write down all of the DTCs output from each ECU.
- HINT:
- ·
If communication DTCs are stored, and all ECUs and sensors connected to the CAN communication system are displayed on the CAN Bus Check screen of the GTS or Techstream, a past malfunction that is currently not occurring is suspected.
·When a CAN branch of the V bus is malfunctioning, because the ECUs and sensors related to it detect the malfunction, the problem area can be determined using the combination of DTCs that are output.
- Result:
Proceed to NEXT
NEXT
Confirm the problem according to the combination of output DTCs regarding the CAN communication system.
Click herePower Source / Network>NETWORKING>CAN COMMUNICATION SYSTEM>DIAGNOSIS SYSTEM
- Result:
Result Proceed to Combination of DTCs is not in DTC Combination Table A Combination of DTCs is in DTC Combination Table B
- HINT:
-
CAN communication system history DTCs may indicate the problem if CAN communication system DTCs are output and all ECUs and sensors connected to the CAN communication system are displayed on the CAN Bus Check screen of the GTS or Techstream.
A
B
Connect the cable to the negative (-) battery terminal.
Clear the DTCs using the GTS or Techstream.
Perform the tests in Symptom Simulation to check the wire harnesses and connectors including those for V bus main bus lines.
Click hereGeneral>INTRODUCTION>HOW TO TROUBLESHOOT ECU CONTROLLED SYSTEMS>HOW TO PROCEED WITH TROUBLESHOOTING
Based on the results of the check, inspect the parts that output DTCs to determine the malfunctioning part.
- HINT:
-
If DTCs are output, do not turn the ignition switch off.
- Result:
Proceed to NEXT
NEXT
- Result:
Proceed to NEXT
NEXT
- Result:
Proceed to NEXT
NEXT