BRAKE CONTROL / DYNAMIC CONTROL SYSTEMS VEHICLE STABILITY CONTROL SYSTEM ABS Warning Light Remains ON
DESCRIPTION
When one of the following conditions is met, the ABS warning light remains on:
The skid control ECU (brake actuator assembly) connector is disconnected from the skid control ECU (brake actuator assembly).
There is a malfunction in the skid control ECU (brake actuator assembly) internal circuit.
There is an open in the harness between the combination meter and the skid control ECU (brake actuator assembly).
The anti-lock brake system is defective.
WIRING DIAGRAM
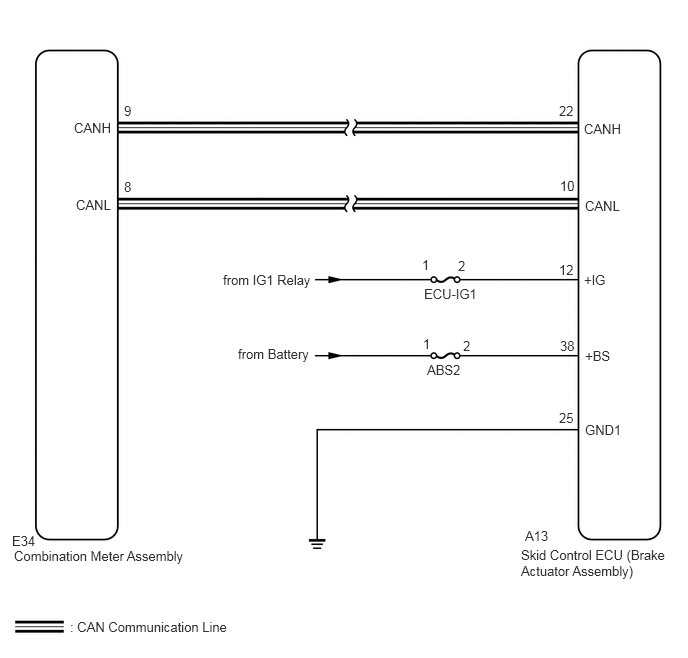
CAUTION / NOTICE / HINT
- NOTICE:
- ·
Inspect the fuses for circuits related to this system before performing the following procedure.
·If the skid control ECU (brake actuator assembly) is replaced with a new one, the skid control ECU (brake actuator assembly) makes the shift to test mode automatically when the ignition switch is turned to ON for the first time. Be sure to complete the test mode checks.
Click hereBrake>BRAKE CONTROL / DYNAMIC CONTROL SYSTEMS>VEHICLE STABILITY CONTROL SYSTEM>TEST MODE PROCEDURE
PROCEDURE
Move the connector and wire harness of the skid control ECU (brake actuator assembly) lightly up and down and to right and left to check the status of the ABS warning light.
- OK:
The status of the ABS warning light does not change.
- Result:
Proceed to OK NG
OK
NG
Check if a CAN communication system DTC is output.
Click herePower Source / Network>NETWORKING>CAN COMMUNICATION SYSTEM>DIAGNOSIS SYSTEM
- Result:
Result Proceed to DTC is not output A DTC is output B
A
B
Click herePower Source / Network>NETWORKING>CAN COMMUNICATION SYSTEM>HOW TO PROCEED WITH TROUBLESHOOTING
Check the battery voltage.
- Standard Voltage:
11 to 14 V
- Result:
Proceed to OK NG
OK
NG
Check if the skid control ECU (brake actuator assembly) connector is securely connected.
- OK:
The connector is securely connected.
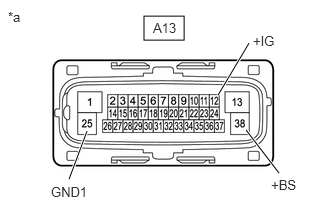
| *a | Front view of wire harness connector
(to Skid Control ECU (Brake Actuator Assembly)) |
Turn the ignition switch off.
Check that there is no deformation or corrosion on the case or the terminals of the connector.
- OK:
No deformation or corrosion is present.
Disconnect the A13 skid control ECU (brake actuator assembly) connector.
Measure the voltage according to the value(s) in the table below.
- Standard Voltage:
Tester Connection Switch Condition Specified Condition A13-38 (+BS) - Body ground Always 11 to 14 V A13-38 (+BS) - A13-25 (GND1) Always 11 to 14 V A13-12 (+IG) - Body ground Ignition switch ON 11 to 14 V A13-12 (+IG) - A13-25 (GND1) Ignition switch ON 11 to 14 V
- Result:
Proceed to OK NG
OK
NG
Turn the ignition switch off.
Disconnect the A13 skid control ECU (brake actuator assembly) connector.
Measure the resistance according to the value(s) in the table below.
- Standard Resistance:
Tester Connection Condition Specified Condition A13-25 (GND1) - Body ground Always Below 1 Ω
- Result:
Proceed to OK NG
OK
NG
Turn the ignition switch off.
Connect the GTS to the DLC3.
Start the engine.
Perform the Active Test of the skid control ECU (brake actuator assembly) using the GTS.
| Tester Display | Test Part | Control Range | Diagnostic Note |
|---|---|---|---|
| ABS warning lamp | ABS warning light | ON/OFF | Observe the combination meter assembly
Vehicle condition: Vehicle stopped |
- Result:
Result Proceed to Does not change between ON and OFF A Changes between ON and OFF B
A
B
Click hereVehicle Interior>METER / GAUGE / DISPLAY>METER / GAUGE SYSTEM>HOW TO PROCEED WITH TROUBLESHOOTING