M20A-FXS HYBRID / BATTERY CONTROL FRAME WIRE INSTALLATION
PROCEDURE

 821H1
1.INSTALL HV FLOOR UNDER WIRE
- CAUTION:
-
Be sure to wear insulated gloves.
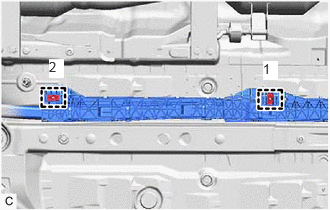
Install 2 new clamps in the order shown in the illustration.
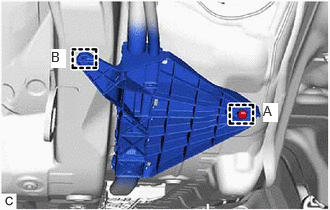
Engage the clamp (B).
Install new clamp (A).
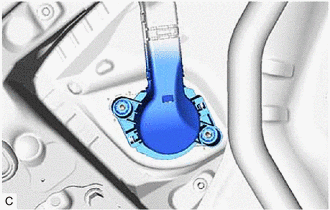
Insert the HV floor under wire into the floor panel hole and engage the grommet.
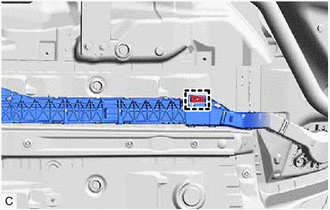
Install the new clamp.
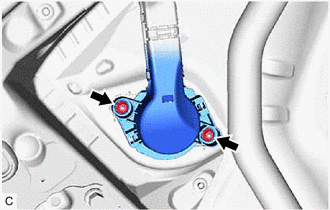
Install the HV floor under wire with the 2 nuts.
- Torque:
- 8.0 N*m (82 kgf*cm, 71 in.*lbf)
for LHD:
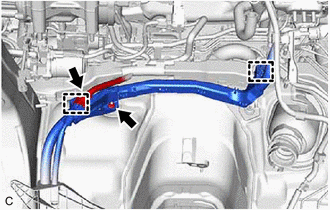
Connect the connector.
Engage the 2 clamps to install the HV floor under wire.
Install the HV floor under wire with the nut.
- Torque:
- 8.0 N*m (82 kgf*cm, 71 in.*lbf)
for RHD:
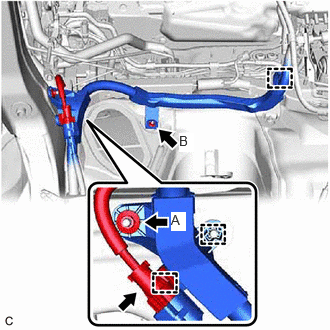
Connect the connector.
Engage the 3 clamps to install the HV floor under wire.
Install the nut(A).
- Torque:
- 12.5 N*m (127 kgf*cm, 9 ft.*lbf)
Install the nut(B).
- Torque:
- 8.0 N*m (82 kgf*cm, 71 in.*lbf)
51201
2.INSTALL FRONT SUSPENSION CROSSMEMBER SUB-ASSEMBLY
58165B
3.INSTALL FRONT FLOOR COVER RH
- HINT:
-
Perform the same procedure as for the front floor cover LH.
-
Click hereEngine / Hybrid System>M20A-FXS (INTAKE / EXHAUST)>EXHAUST MANIFOLD>INSTALLATION
57627A
4.INSTALL REAR FLOOR SIDE MEMBER COVER RH
821H1
5.CONNECT HV FLOOR UNDER WIRE
G92N4A
6.INSTALL NO. 1 HV BATTERY COVER PANEL RH
71033
7.INSTALL REAR SEAT CUSHION LEG SUB-ASSEMBLY
76971G
8.INSTALL REAR UNDER COVER
76974F
9.INSTALL REAR UNDER SIDE COVER LH
67918A
10.INSTALL REAR DOOR SCUFF PLATE LH
76973F
11.INSTALL REAR UNDER SIDE COVER RH
- HINT:
-
Use the same procedure as for the LH side.
67917A
12.INSTALL REAR DOOR SCUFF PLATE RH
- HINT:
-
Use the same procedure as for the LH side.
72693
13.INSTALL REAR SEAT CUSHION LOCK HOOK
14.INSTALL BENCH TYPE REAR SEAT CUSHION ASSEMBLY
73350C
15.CONNECT REAR CENTER SEAT OUTER BELT ASSEMBLY
821H1
16.CONNECT HV FLOOR UNDER WIRE
82121
17.CONNECT ENGINE WIRE
- CAUTION:
-
Be sure to wear insulated gloves.
- NOTICE:
-
Do not allow any foreign matter or water to enter the inverter with converter assembly.
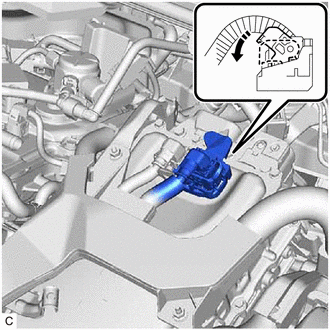
Connect the inverter with converter assembly connector and move each lock lever as shown in the illustration.
- NOTICE:
- ·
To prevent damage due to static electricity, do not touch the terminals of the disconnected connectors.
·Do not damage the terminals, connector housing or inverter with converter assembly when connecting the connectors.
·Do not touch the waterproof seal or terminals of the connector.
G3834
18.INSTALL SERVICE PLUG GRIP
19.PERFORM INITIALIZATION