HEATING / AIR CONDITIONING AIR CONDITIONING SYSTEM(for Manual Air Conditioning System) Blower Motor Circuit
DESCRIPTION
The blower motor with fan sub-assembly is operated by signals from the air conditioning amplifier assembly through the blower resistor. Blower motor speed signals are transmitted in accordance with changes in the duty ratio. The blower motor speed becomes slower when the duty interval is wider, and the blower motor speed becomes faster when the duty interval is narrower.
WIRING DIAGRAM
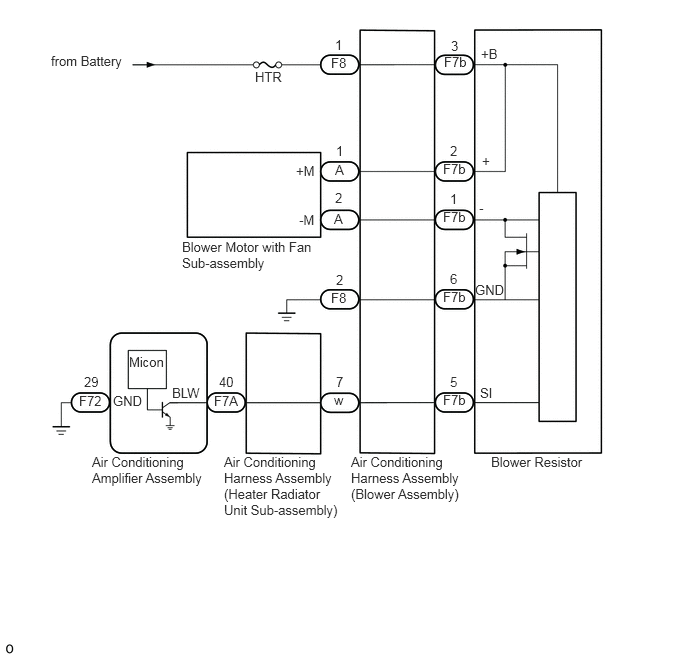
CAUTION / NOTICE / HINT
- NOTICE:
-
Inspect the fuses for circuits related to this system before performing the following procedure.
PROCEDURE
Connect the GTS to the DLC3.
Turn the ignition switch ON.
Turn the GTS on.
Enter the following menus: Body Electrical / Air Conditioner / Active Test.
Perform the Active Test according to the display on the GTS.
- Body Electrical > Air Conditioner > Active Test
-
Tester Display Measurement Item Control Range Diagnostic Note Blower Motor Blower motor with fan sub-assembly Min.: 0
Max.: 100Operates between 0 to 100 %
- Body Electrical > Air Conditioner > Active Test
-
Tester Display Blower Motor - 50004 121 2
- Result:
Result Proceed to OK A NG (Blower motor with fan sub-assembly does not operate) B NG (Blower motor with fan sub-assembly operates but does not change speed) C
A
B
C
Remove the blower motor with fan sub-assembly.
Click hereVehicle Interior>HEATING / AIR CONDITIONING>FRONT BLOWER MOTOR (for VALEO Made)>REMOVAL
Inspect the blower motor with fan sub-assembly.
Click hereVehicle Interior>HEATING / AIR CONDITIONING>FRONT BLOWER MOTOR (for VALEO Made)>INSPECTION
- Result:
Proceed to OK NG
OK
NG
Disconnect the F8 air conditioning harness assembly (blower assembly) connector.
Measure the voltage according to the value(s) in the table below.
- Standard Voltage:
Tester Connection Condition Specified Condition F8-1 - F8-2 Always 11 to 14 V
Measure the resistance according to the value(s) in the table below
- Standard Resistance:
Tester Connection Condition Specified Condition F8-2 - Body ground Always Below 1 Ω
- Result:
Proceed to OK NG
OK
NG
Remove the air conditioning harness assembly (blower assembly).
Click hereVehicle Interior>HEATING / AIR CONDITIONING>BLOWER UNIT (for VALEO Made)>DISASSEMBLY
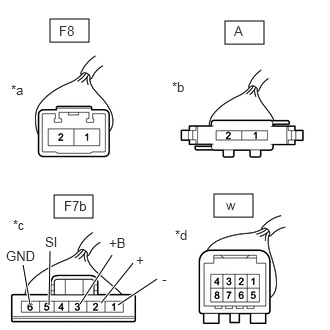
| *a | Front view of wire harness connector
(to Air Conditioning Harness Assembly (Blower Assembly)) |
| *b | Front view of wire harness connector
(to blower motor with fan sub-assembly) |
| *c | Front view of wire harness connector
(to blower resistor) |
| *d | Front view of wire harness connector
(to Air Conditioning Harness Assembly (Heater Radiator Unit Sub-assembly)) |
Measure the resistance according to the value(s) in the table below.
- Standard Resistance:
Tester Connection Condition Specified Condition F8-1 - F7b-3 (+B) Always Below 1 Ω A-1 - F7b-2 (+) Always Below 1 Ω A-2 - F7b-1 (-) Always Below 1 Ω F8-2 - F7b-6 (GND) Always Below 1 Ω w-7 - F7b-5 (SI) Always Below 1 Ω F8-1 or F7b-3 (+B) - Body ground Always 10 kΩ or higher A-1 or F7b-2 (+) - Body ground Always 10 kΩ or higher A-2 or F7b-1 (-) - Body ground Always 10 kΩ or higher F8-2 or F7b-6 (GND) - Body ground Always 10 kΩ or higher w-7 or F7b-5 (SI) - Body ground Always 10 kΩ or higher
- Result:
Proceed to OK NG
OK
NG
Remove the air conditioning harness assembly (heater radiator unit sub-assembly).
Click hereVehicle Interior>HEATING / AIR CONDITIONING>AIR CONDITIONING UNIT (for VALEO Made)>DISASSEMBLY
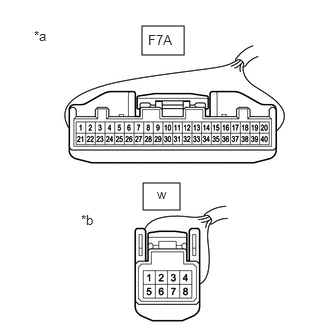
| *a | Front view of wire harness connector
(to Air Conditioning Amplifier Assembly) |
| *b | Front view of wire harness connector
(to Air Conditioning Harness Assembly (blower assembly)) |
Measure the resistance according to the value(s) in the table below.
- Standard Resistance:
Tester Connection Condition Specified Condition w-7 - F7A-40 Always Below 1 Ω w-7 or F7A-40 - Body ground Always 10 kΩ or higher
- Result:
Proceed to OK NG
OK
NG
Reconnect the F7b blower resistor connector.
Reconnect the w air conditioning harness assembly (blower assembly) connector.
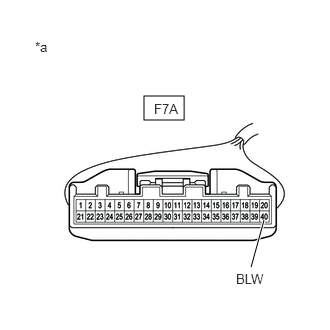
| *a | Front view of wire harness connector
(to Air Conditioning Amplifier Assembly) |
Measure the voltage according to the value(s) in the table below.
- Standard Voltage:
Tester Connection Switch Condition Specified Condition F7bA-40 (BLW) - Body ground ·Ignition switch ON
·Blower switch: Lo
11 to 14 V
- Result:
Proceed to OK NG
OK
NG
Reconnect the F7A air conditioning amplifier assembly connector.
Turn the ignition switch ON.
Turn the blower switch Lo.
Connect an oscilloscope to terminals F7A-40 (BLW) and F72-29 (GND) of the air conditioning amplifier assembly and check the waveform.
- OK:
Waveform is similar to that shown in the illustration.
- HINT:
-
The waveform varies with the blower speed.
| Item | Content |
|---|---|
| Tool Setting | 2 V/DIV., 1 ms./DIV. |
| Vehicle Condition | ·
Ignition switch ON ·
Blower switch: Lo |
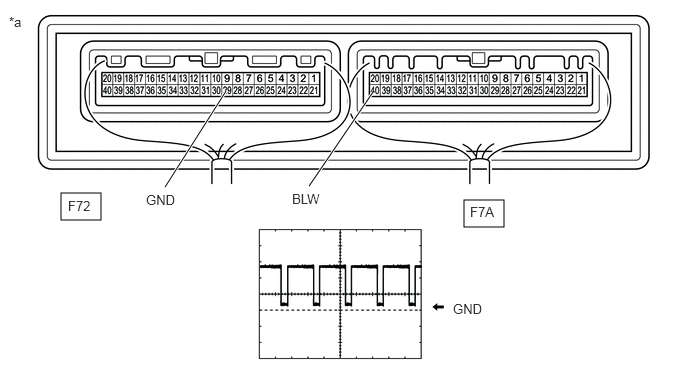
| *a | Component with harness connected (Air Conditioning Amplifier Assembly) | - | - |
- Result:
Proceed to OK NG
OK
NG